(Note: This post contains affiliate links. I will receive a teeny-tiny finder’s fee for anyone who signs up for the drawings; this revenue helps keep the blog lights on. If that bugs you, feel free to enter the giveaway daily at this non-affiliate link.)
Planning your holiday shopping? Savings.com can help. The coupon/deal site’s “12 days of giveaways” promotion will award one $250 gift card every weekday from now through Friday, Nov. 22.
Which merchants are participating? So glad you asked.
The giveaway started with HP, the company that manufactures laptops, desktops, printers, monitors and accessories to keep us connected. The only printers I’ve ever owned have been from HP, and I’ve had great service from them.
My next printer will also be from HP – but unfortunately I’m not allowed to enter this drawing because I’m a Savings.com DealPro. You, however, can enter – and I hope a member of this community wins.
Here’s the list of future giveaway partners – again, one each weekday until Nov. 22:
Heckler & Koch is proud to announce the US availability of the HK SP5, the only authentic sporting version of the legendary MP5 submachine gun available. The SP5 was developed by HK as a semiautomatic, civilian sporting pistol that matches the look and feel of the legendary MP5 submachine gun. “Our whole team is very […]
If you’re planning on spending a night out hunting coyotes, you’re going to need to pack
accordingly. After all, even the best hunter needs to make sure they have the right gear to have
a successful hunt. This handy checklist will help you make sure that you have everything you
need to enjoy yourself and catch your game. It’ll help you make sure you have everything and
that you know exactly why you need it!
Your Weapon
In any hunting excursion, your weapon should be one of the first things you pack. You have a lot
of different options but air rifles are becoming more and more popular. These come in a variety
of models that are good for all kinds of hunting. They’re lightweight and oftentimes more
inexpensive design has also gained them attention.
Gear to Let You See
While nighttime predators have superb night visions, humans, unfortunately, don’t. That means
that you need some way to see what you’re hunting. A plain white light might be effective at
illuminating an area but it’s also one of the fastest ways to alert wildlife of your presence. This is
why many nighttime hunters have turned to putting a red film over their light. This is an easy
way to add a little light to the situation without putting everyone else on alert because it will
reflect on the eyes of wildlife. Just make sure not to shine it directly in their face!
Some hunters who go for night game like hogs and coyotes prefer green light because it’s
slightly brighter in tone than red while still being low enough as to not alert the animals.
Unfortunately, green lights do have a disadvantage when it comes to cutting through moisture,
so they aren’t going to be as helpful as a red light on foggy or misty nights.
Alternatively, a lot of hunters like to use night vision to hunt. However, this does step into some
legally dicey territory. You have to be careful when reviewing the laws for night hunting in your
area. While it’s legal to purchase night vision gear across the United States, many states don’t
allow for this gear when night hunting or only allow it in certain conditions.
Calls and Decoys
Coyotes are smart creatures. In other words, you’re going to have to put in a bit of work to lure
them towards your position. Your best bets are to invest in some calls and decoys.
First, let’s take a look at calls. There are two primary calls you’ll have to choose from including
mouth calls and electronic calls and many hunters decide to use a mix of the two. When it
comes to the type of coyote calls to use, you have a few options. You might find success in
mimicking the sounds of a young coyote or coyote howls.
What’s often more effective, though, is to appeal to the coyote as a predator. Trying something
like a bleating fawn might attract coyotes to the area in search of a midnight snack. It can take a
little trial and error to nail down the most effective method for your area, so don’t be afraid if your
call doesn’t work on the first try.
If you’re just using a call and not seeing any results, that’s probably because the illusion you’re
creating isn’t quite putting the coyote at ease. Many hunters see better results if they have a
visual to work with their calls. This is where decoys come in. If a coyote hears a sound that
interests them and sees a visual cue with it, they’re more likely to approach. It’s important to
note that there is a chance they’ll charge at it which might be an intimidating enhancement to
newer hunters. Even if you’re only comfortable with a call, for now, you’ll have a lot more
success with one than without one.
Shooting Tripods and Chairs
Getting your shooting position a little higher can go a long way when you’re hunting. A shooting
tripod can help lift your point of view slightly higher and it can even make scanning for coyotes
easier and quieter.
It can also help to get a shooting chair to take with you. This doesn’t need to be anything highly
specialized but a little padding can go a long way in making sure that you don’t end up
uncomfortable or with legs that are falling asleep.
Warm Clothes
When it comes to dressing for the part of hunting at night, you’ll want to remember that if
hunting can get chilly during the day, it’s going to get even colder at night. As such, you should
make sure you’re dressing for the occasion. It’s going to make the waiting process much less
grueling if you aren’t freezing the whole time. Just like with the chair, the more comfortable you
are, the more alert and prepared you’ll be.
That being said, you don't want to bog yourself down with layers and clothing that sacrifices
movement for warmth. You should still be able to make any movement you need to as quickly
as you need to while you stay cozy.
You don’t have to worry about blending in with your surroundings in the same way as you do
when you hunt in the day but that doesn’t mean you don’t have to worry about it at all. Pale skin,
in particular, will stand out to a coyote’s eyes as a sign of danger. This is why many night
hunters opt for extra coverage with gear like gloves and balaclavas. Just like your other
wearable gear, these extras should be light and breathable so that they don’t restrict you in any
way.
Hunting at night can be a rewarding and exciting experience. However, if you want to have a
successful rather than frustrating time, you’re going to want to make sure you have all your
ducks in a row. This means making sure that you bring all the right gear on your next night
hunting outing.
I love a good compression sack because it allows me to save on space in my bag and provides some waterproof protection for my sleeping bag. I have a mid weight down sleeping bag from REI. It is over 30 … Continued
Security overload leads to apathy. How often do you hear a car alarm go off and roll your eyes hoping the owner would disable the blasted thing before the incoming headache comes a knocking? The primary objection I have to such systems is they work too well. Every week I hear an alarm being triggered […]
School is out for summer. Here’s a look in the rear view mirror at our first year of Project Based Learning at RISE Academy.
Our students and staff wish to thank each of you for the encouraging words, moral support, and following our journey of Doing the Stuff of Self-Reliance! Below is a pictorial recap (picture-heavy) of the skills, projects, and links to more in-depth posts for those interested in learning these skills.
Cutting Tool Safety and Use
Carving tent stakes.
Aware of his “blood circle”
How to safely chop kindling.
The draw knife was a hit with the students.
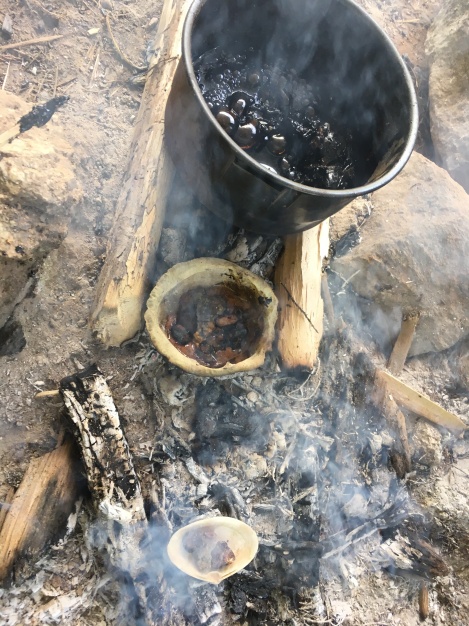
Cutting rounds for “burn and scrape” spoons and bowls.
Early in the school year, we decided to build an outdoor classroom. Nothing too fancy but functional for our needs. Students used math skills to square corners, learned to read a tape measure (fractions), and lashed the bamboo structure together. Their lashings held fast even through Hurricane Irma.
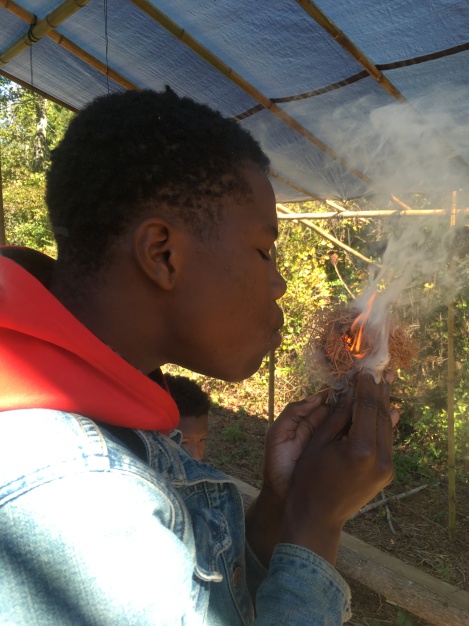
We have a joke around school when I’m asked, “What are we doing today?” My typical response is, “Cutting and burning stuff.” You may not get it, but fire takes center stage in the life of our outdoor classroom. Learning to use fire as a tool is paramount for outdoor living and education.
A simple way to introduce primitive technology to students is to make a Hoko knife. This stone cutting tool was discovered on the Hoko River archeological site in Washington State. A landslide destroyed the native fishing village about 2,700 years ago preserving artifacts of their material culture.
The flint flake compressed in a split stick with natural cordage.
Some were wrapped with modern cordage (tarred mariner’s line).
A simple dart-throwing stick with a handle on one end and spur (male end) or socket (female end) on the other end. The dart, a flexible spear, mates with the spur/socket when thrown. Typically about two feet long, an atlatl employs leverage to extend the arm’s length to propel a dart further and with more velocity than when thrown using only the arm.
I’ve also created a RISE Academy Playlist on our YouTube channel. if you’d like to see our students Doing the Stuff, click on the video link below:
Many Thanks!
The things we have to learn before we do them, we learn by doing them.
~ Aristotle
We cannot thank you enough for all the support and encouragement you’ve given our students whom you’ve never met! The full impact of this journey in experiential education may never be known. It’s difficult to quantify. But you can see it in their eyes and hear it in their voice.
Some of you have asked how you might help in more tangible ways. Stay tuned for updates on becoming a partner/sponsor with RISE Academy. Until then…
P.P.S – If you find value in our blog, Dirt Road Girl and I would appreciate your vote on Top Prepper Sites! You can vote daily by clicking hereor on the image below. Check out all the other value-adding sites while you’re there…
Photo and Video Credits: Many of the photos were taken by Mr. Chris Andrews (teacher) and various RISE students. Video footage was shot mainly by students and guided by Mr. Michael Chapman (teacher).
Heckler & Koch is proud to announce the US availability of the HK SP5, the only authentic sporting version of the legendary MP5 submachine gun available. The SP5 was developed by HK as a semiautomatic, civilian sporting pistol that matches the look and feel of the legendary MP5 submachine gun. “Our whole team is very […]
Imagine if everything you carried
was easy to transform into another piece of gear. What if you could use a few pieces of fabric
and a couple of well-placed, easy knots to replace broken gear, improvise packs
and bags in a pinch, or even customize haversacks, backpacks, beach bags, belt pouches,
and other bags to your personal body type and adventure needs?
While serving in the Marine Corps, I lived in Okinawa, Japan for several years and was fortunate to have a job that put me in direct contact with local nationals. I was fascinated by the many, intricate ways that they wrapped gifts, lunches, packages, gear, and deliveries. It was not uncommon to see someone walking down the street with their groceries, or some other heavy burden, safely contained in a piece of fabric. While attending some college classes I had a tutor that worked in a Furoshiki shop during the day. She would show up to our sessions in clothes made from sheets of fabric and knots that rivaled some of the most attractive clothing I have ever seen. She also carried all of our study gear in different types of bags made in the same fashion. One of my favorites was what I call the “Okinawa Haversack.” She would untie one knot, roll the bag out with a bit of a flourish, and we had a ready-made study area. The cloth contained all her books, pencils, note cards, a small chalk board, and other study materials. We could comfortably sit on the blanket, picnic-style, protected from moist or sandy ground, and did not have to worry about damaging books or losing items in the grass. When she was done, the study material was placed back on the blanket, and with a few quick folds and one knot and she was off to her next adventure.
I was so impressed with this style that I began to study
Furoshiki and other forms of cloth bending from indigenous peoples around the
world: the bags of the Maasai warrior, Sarong and Pareos-style skirts, the
rebozo materno dating all the way back to the Mayans, and many more. All these forms use just a bit of fabric and
a few simple well-placed knots to create something useful from the most basic of
materials. It was all so cool! Maybe it is the sheer practicality of it,
maybe it is the fond memories of my time in Japan, or maybe it is my love for the
Indiana Jones movies, but for whatever reason I still find the Okinawa
Haversack to be one of the coolest and most useful tricks in my arsenal.
To get started, your choice of fabric is just about limitless. This bag can be tailored to the size of your gear. Generally, the length of your object is approximately one-third the diagonal of your fabric. In the examples I will be using a normal sized handkerchief from Hobby Lobby, for short adventures I tend to use a Shemagh, and for my study trips I like to use a five-foot by five-foot piece of wool blanket that I acquired from a thrift store. Just keep in mind the size of the items you are packing, and the size of the work area you want when your fabric is unfolded. For example, my fire kit only needs to be large enough to keep everything dry, a fishing kit or art kit only needs to be big enough to sit on, and my study kit turns into a full-on picnic sized area that I can spread out and lay on, if I desire. Once you have decided on size, then the only other requirement is that the fabric will be able to form a knot without too much difficulty. There are many different sizes of material out there. Materials like silk and rayon tend to have more give and can be cut smaller; thicker fabrics with less give will end up a bit bulkier and tend to need to be just a bit larger in their dimensions. A great way to pick sizes is to find an old bed sheet or other thin fabric and cut three squares out of it. The dimensions should be about 12 inches by 12 inches, 34 inches by 34 inches and 5 feet by 5 feet. These will give you a pretty good idea of general sizes you’ll need for the different items you may want to pack. Then you can head to the fabric or thrift store and pick any fabric that you think will be strong enough for whatever you are carrying. Experiment with different types of fabrics. There are even many cool waterproof fabrics out there now that are great for keeping one dry while sitting on wet or snowy ground.
THE KNOT
Ceremonial Furoshiki has some amazingly beautiful knots, but I have found that, for practical applications, we can replace most of them with either the basic square knot or an overhand knot. For this application, we will be using the square knot. You may remember the old rhyme from your childhood: “Right over left and left over right makes a knot both tidy and tight.” The square knot works either as right over left, left over right or left over right then right over left. You may use one method over the other, depending on the angle you start from, but to make sure that the knot holds under weight for your whole adventure—and unties when you need it—make sure you tie it correctly.
TYING
First, Choose two corners and hold one in each of your hands.
Then, place the corner in your right hand over the corner in your left hand, then under the portion in your left hand. Now pull.
Next, take the corner that is now on the left and place it over and under the new right corner. Now pull and tighten your square knot (Note: Reverse if coming from the other direction).
UNTYING
Most people I meet can tie a square knot, but many do not know that there is a nifty trick that will “break” or untie the knot even after it has been cinched down by significant weight on a long hike. So much of the Okinawan culture was based on elegance, flourish, ceremony and grace. The art of Furoshiki taught me that every knot has a trick that will let it come undone easily and should make you look truly good while untying your wraps.
Start with with a square knot and pick a corner. In this example, we will pick the tail on the left side of our knot. It does not matter which side you start on.
Next, while holding the fabric underneath the left tail with your left hand, grab the left tail with your right hand.
Once you have this tail in your right hand, pull it over the knot to the right side.
The secret is to pull the knot hard enough to straighten out the fabric between your hands. Now, grasp the entire knot in your right hand.
Finally, pull the fabric out of the knot with your left hand. It should slide out easily. If it does not, go back to step 2 and repeat.
Learn how to apply the art of Furoshiki (Japanese Scarf Bending) to make 6 different improvised packs, pouches, and haversacks for survival or outdoor adventure. Make functional outdoor bags and packs using only square pieces of fabric & knots.
THE WRAP
The Okinawa Haversack finished product looks complicated, but in truth, it is rather easy to accomplish. As mentioned, I use it at different scales to keep my adventures compartmentalized, organized, and comfortable. To practice it is easiest to start with two rectangular items that are the same size, say two books or decks of cards. With time you will find that your items can be different shapes and sizes and still be wrapped with ease. If you are packing heavy items, consider using a stronger fabric, just leave a bit more room between your items to make up for the thickness.
First, find a mostly flat area to work, (the ground or couch cushions work great), then lay the fabric as a diamond, with the “ugly” or “wrong” side of the fabric facing up.
Next, lay the items on each side of the diagonal line of the cloth. This step and the next are not necessary with items of the same size, but it is a great way to ensure even wraps, if you start using items of different sizes.
At this point, you want to flip each item toward the corners. Count the flips as you go. Now, you will know how many times different sized items must be flipped to get back to the correct center position. This way items of different sizes will end up tightly wrapped and in the exact position necessary for this bag to be carried with no concern of coming undone.
Place the corner of your fabric over your items.
Roll the items in the fabric by flipping the items back to the imagined diagonal line. With items of different sizes, you will fold the number of times counted in step 4. Over time, you wont need to count, you will just be able to eyeball the correct position. Different fabrics require different spacing, but I have found one to two fingers of space is good for most fabrics, a bit more with something thick, like wool blankets.
Next, pull the top and bottom corners towards each other and cross them, pulling tightly so that the fabric begins to line up in the space between your items.
Then, fold the item on your right over and onto the other item and flip the entire package over.
Pull the two tails to tighten everything up.
Finally, tie the tails together using a square knot. If you used larger fabric you will have a nice shoulder strap, if you do not need a shoulder strap you can use smaller fabric or cinch down on the knot to make a secure package.
If you have smaller fabric and need a longer strap you can simply tie another piece of fabric to the two tails using the square knot. I use this method often when using two shemaghs.
THE OKINAWA HAVERSACKTHE OKINAWA HAVERSACK (Full-Size)
This bag is harder to explain than it is to use. Hopefully, the pictures will walk you through the process and you’ll end up with a nice, tight haversack. Now that you have mastered the mini version, detailed here, it’s time for you to try this to scale and make a haversack that first you! I also shot a short, quick video that goes through the folds needed to set this up with a small fire kit and Esbit stove:
Thank you so much for your time, do not forget to customize
your fabric to your interests and adventures.
I have found some great patterns for extremely cheap in the remnants
section of hobby stores, and there are countless treasures at local thrift
stores.
I would love to hear what types of things you pack, and any cool innovations or fabrics you find. Whether your adventure is around campus, taking off to the back country, or simply packing an elegant gift, stay safe out there, and keep on adventuring!
Aaron “Hutch” Hutchings is a survival instructor and outdoor educator. His love for adventure was first sparked by his grandfather’s teaching and stories. This spark was blown into flame in the Boy Scouts and fanned to a full-on bonfire in the Marine Corps. The only thing Hutch likes more then adventuring is helping others start down their own path. Learn more about Hutch on his blog at: http://www.hutchsadventures.com
Heckler & Koch is proud to announce the US availability of the HK SP5, the only authentic sporting version of the legendary MP5 submachine gun available. The SP5 was developed by HK as a semiautomatic, civilian sporting pistol that matches the look and feel of the legendary MP5 submachine gun. “Our whole team is very […]
There you are, just hiking along the trail when suddenly the footing changes and you roll your ankle to one side. You feel it stretch and maybe even feel it tear. It stops you cold and it hurts. You’re pretty sure you have a sprained ankle, and you’re miles from the trailhead. Before You Hit…