Brett

Wama Hemp Hipsters Review

Wama Hemp Hipsters - Front

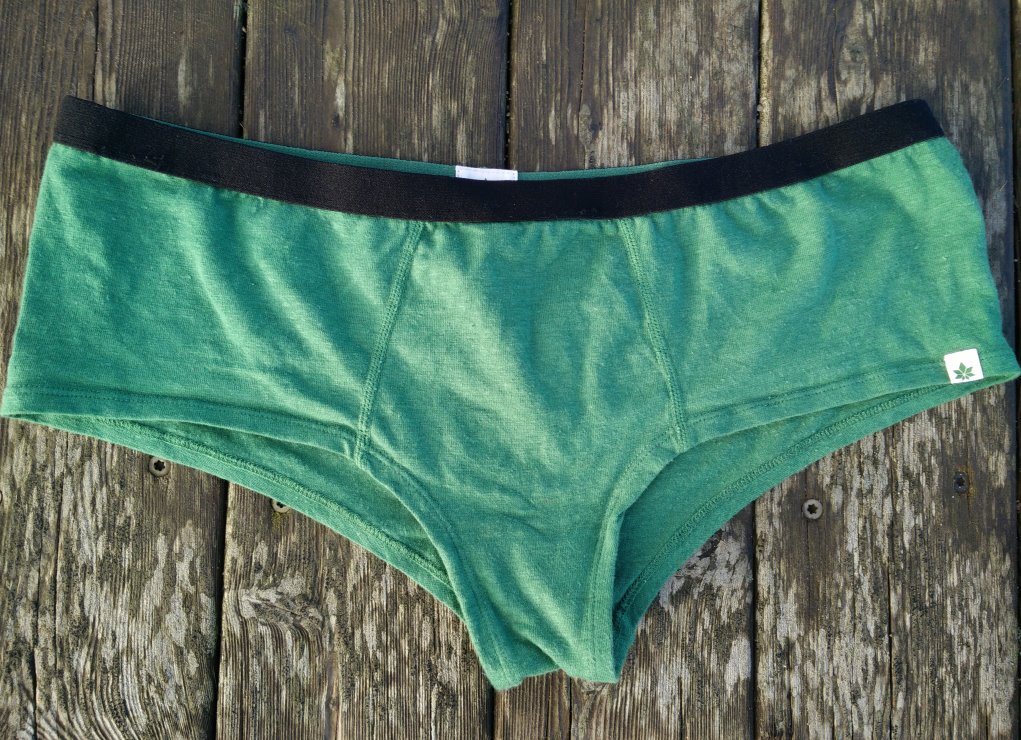
Wama Hemp Hipsters – Front

In late summer I received the Wama Hemp Hipsters for testing. Hemp is a much more sustainable fabric fiber than most base layer materials, and therefore I was excited to test the underwear which is made of approximately half-half hemp and organic cotton. As I was heavily pregnant when I received the Wama hipsters, I have mostly been testing them on easy hikes, walks with the stroller and for everyday use. Here is what I found out.

Wama Hemp Hipsters are suitable for:

  • Everyday use
  • Low intensity hiking

Material

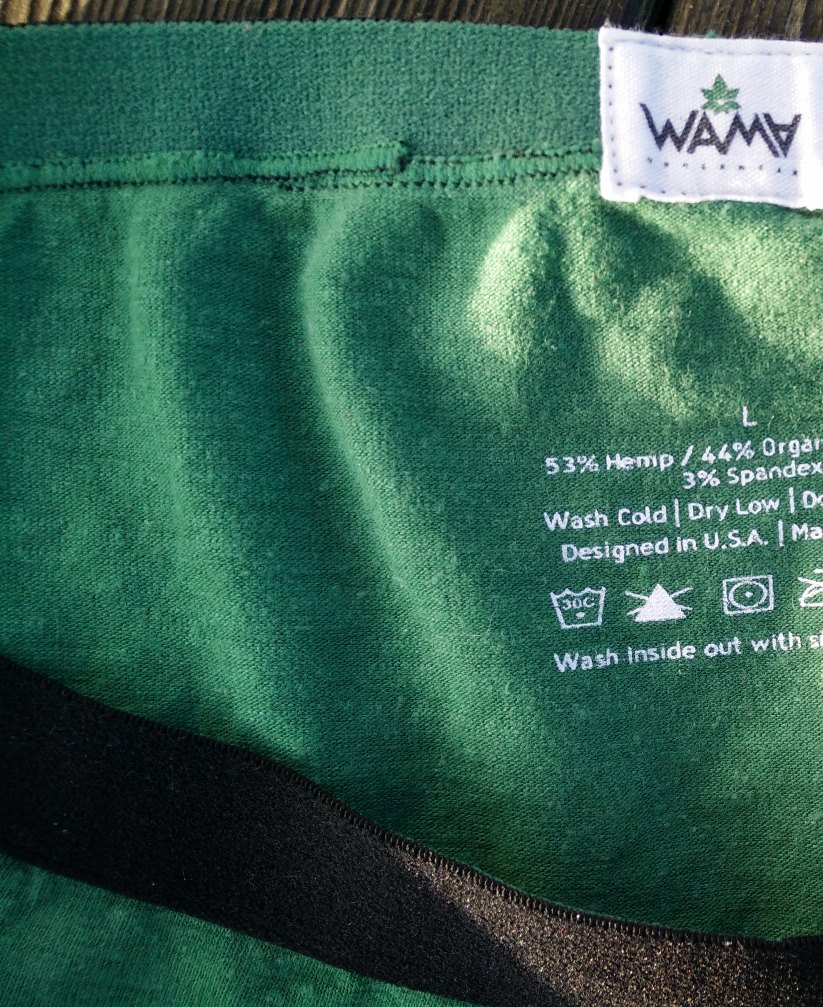
The Wama hemp hipsters are made of 53% hemp, 44% organic cotton and 3% spandex. The feel of the material is slightly rougher than 100% cotton, but still pleasant on the skin. In terms of performance, hemp and cotton have some similarities as well as differences. While cotton fibers are softer, both materials get softer with washing, take quite long time to dry and are about equally breathable.  Hemp is, however, more durable and has some anti-microbial properties to keep odor-causing bacteria at bay. Now, I have been testing naturally anti-microbial underwear both in the form of Merino wool mixed with silk (the Falke silk-wool underwear) and now hemp mixed with cotton, and I have to say that although there might be a slight difference in their odor level after a full day of hiking compared to panties made of 100% cotton, I have still not felt inclined to wear anti-microbial underwear for more than one day.

This sentiment may just be due to the habit of changing underwear every day, but on the other hand I have used naturally anti-microbial Merino base layers for many more days than cotton tops – even after the Merino shirts had been soaked with sweat from hiking. Aside from performance, there is another very important difference between hemp and cotton – the environmental impact of their production process. As described in the article Sustainable Outdoor Materials growing cotton conventionally requires 10.000 liters of water per kilo of the fiber, and accounts for 10-16% of the global pesticide usage while only taking up 2.5 % of cropland worldwide. In comparison 1 kilo of dry hemp matter (of which 30% is suitable for clothing production) requires 300-500 liters of water, and less than half the territory to produce the same amount of finished textile.

These large-scale numbers might be hard to relate to, and even feel downright silly to take into consideration when purchasing something as simple and small as underwear but for each of their products Wama has included ‘sustainability counters’. These show how much water and energy you have saved by choosing Wama’s underwear made of hemp and organic cotton versus underwear made of conventional grown cotton – and the numbers may just surprise you! There is, however, proper research and analysis behind the numbers as described in the complementary report made by Green Story.

Comfort, fit, sizing and functionality

Although I was eight months pregnant when I received the underwear, it fitted me perfectly both before and after birth due to the low cut of the hipsters. Size L was a good fit for me with 40 inches (101 cm) wide hips, so I’d say that their sizing is pretty correct. Note, however, that Wama (like most other manufacturers) bases underwear sizing on waist circumference instead of hip circumference. The ‘height’ at the side seams of the fabric is 14 cm (5.5’’) and there is good, if not full cheek coverage, which I’m personally in big favor of.

You can also get Wama hemp underwear for women in the form of bikini briefs, boy shorts and thongs, but the latter is not recommended for hiking as it provides too little cheek coverage and thus warmth. Due to their cut, thongs are also more prone to transport bacteria from the anal area to the vagina while walking or moving, which can lead to infections. Not to mention that thongs are just all-around uncomfortable to wear! Wama’s hipsters are, on the other hand, designed to be super comfortable to wear. The washing instructions are printed on the inside, rather than on a label, the elastic waistband is soft and brushed on the inside, and the underwear is stitched with flatlock seams all over. Rather than being placed on the sides (or God forbid, mid-front and -back) the connecting stitches are placed around the groin of the hipsters, which gives them a sporty boyish look.

Washing and drying

The Wama hipsters should be washed inside out on the cold setting (max. 30 ⁰C) and only be tumble-dried on the low setting. It should be noted, however, that all garments will last longer if air-dried – not to mention that it is a much less energy-consuming and thus sustainable way to dry textiles. You can read more about reducing the environmental footprint of your clothing here.

Verdict

The Wama hemp underwear is for sure a great replacement for cotton underwear – especially when it comes to sustainability. But cotton is in general not recommended for hiking because it takes too long to dry, which can become a serious problem if you first sweat and then get cold – for example when reaching a windy peak or taking a longer break where your body temperature drops. This is also why my boyfriend didn’t recommend his Wama men’s hemp underwear for aerobic activities. I am, however, a bit on the fence. In general women feel colder and sweat less than men, so if you (like me) rarely sweat on the butt and keep the intensity level moderate I don’t see a reason why you shouldn’t wear the Wama hipsters on shorter easy hikes out and about.

If you have any questions about this product, drop me a line in the comments below.

Wama Hemp Hipsters - Fabric Porosity

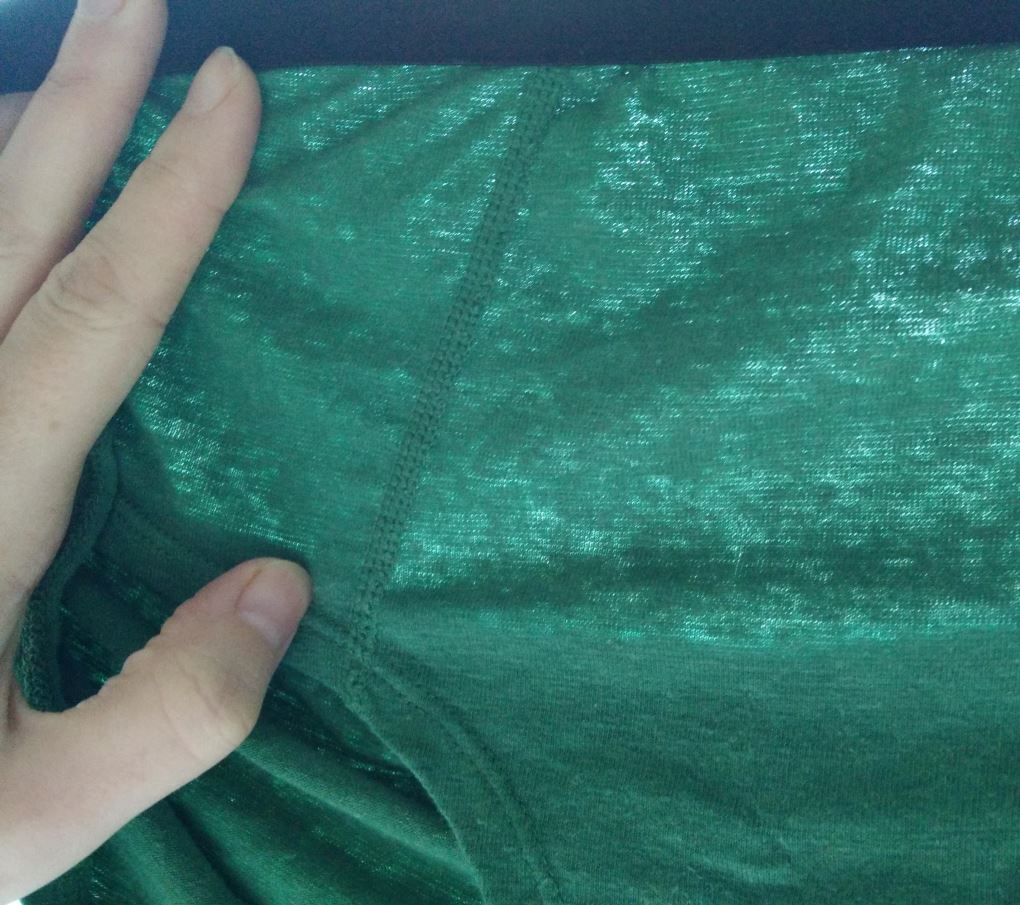
Wama Hemp Hipsters – Fabric Porosity

Wama's website tells how much saved water and energy

Wama’s website tells how much saved water and energy

Wama Hemp Hipsters - Brushed inside of waistband

Wama Hemp Hipsters – Brushed inside of waistband

Wama Hemp Hipsters - Logo Label on side

Wama Hemp Hipsters – Logo Label on side

Wama Hemp Hipsters - Flatlock seams around groin

Wama Hemp Hipsters – Flatlock seams around groin

Wama Hipsters - Washing Instructions

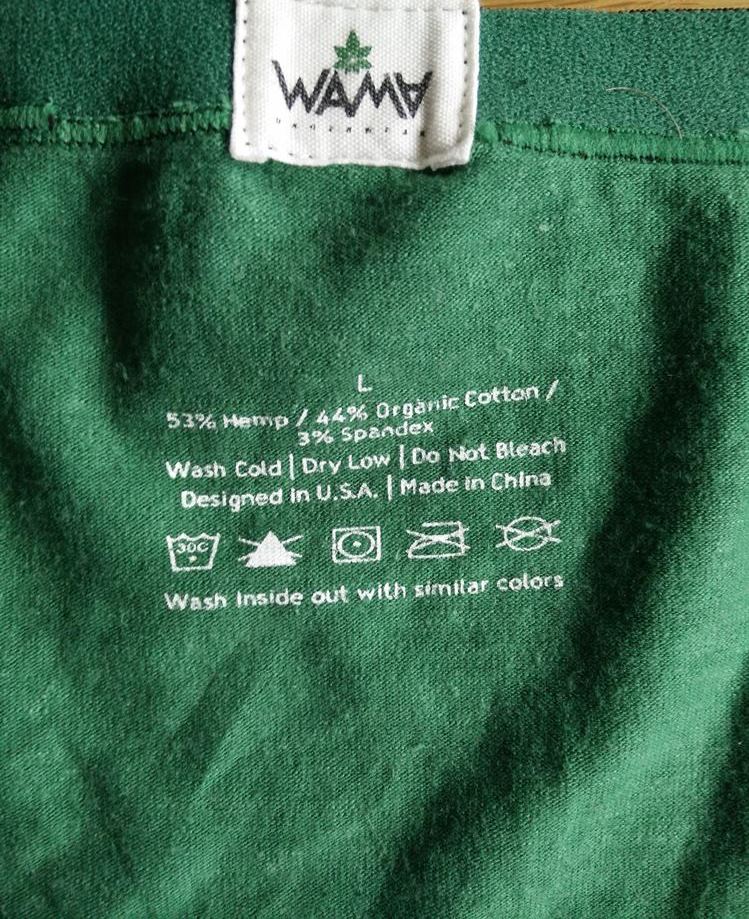
Wama Hipsters – Washing Instructions

Wama Hemp Hipsters - Back

Wama Hemp Hipsters – Back

Rating

Design
Quality
Comfort
Functionality

About Rating

Pros:

  • Soft cotton-like fabric
  • Comfortable design features
  • Sustainable and durable material

Cons:

  • Material absorbs too much moisture (and dries too slow) for high-intensity activities


Details

Tested by: Laura P.

Review date: 2019-12-18

Product: Wama Hemp Hipsters

Final rating: 4.5 out of 5

{
“@context”: “http://schema.org”,
“@type”: “Product”,
“brand”: {
“@type”: “Organization”,
“name”: “Wama Underwear”
},
“image”: “https://besthiking.net/wp-content/uploads/2019/12/Cover.jpg”,
“name”: “Wama Hemp Hipsters “,
“review”: {
“@context”: “http://schema.org”,
“@type”: “Review”,
“author”: {
“@type”: “Person”,
“name”: “Laura P.”
},
“creator”: {
“@type”: “Person”,
“name”: “Laura P.”
},
“publisher”: {
“@type”: “Organization”,
“name”: “Best Hiking”
},
“reviewRating”: {
“@type”: “Rating”,
“ratingValue”: “4.5”,
“bestRating”: 5,
“worstRating”: 0
},
“datePublished”: “2019-12-18”,
“name”: “Wama Hemp Hipsters Review”,
“headline”: “Wama Hemp Hipsters Review”,
“itemReviewed”: {
“@type”: “Thing”,
“name”: “Wama Hemp Hipsters ”
}
}
}

How helpful was this post?

Click a star to rate it!

1 vote(s) so far. Average rating 5 out of 5.

Post Author

Post Author

Laura P.

I loved to climb trees when I was a child – as an adult I use these skills for climbing and scrambling up mountain sides! I always wear a Merino baselayer, sunscreen and my hair tousled.

You may also like…

The post Wama Hemp Hipsters Review appeared first on Best Hiking.

Wama Hemp Hipsters Review Read More »

Hot Hiking Gear Deals: End of Summer Clearance!

Hello hiking friends, As summer winds up, Labor Day weekend is just around the corner.   That means it is time to grab some bargains as stores rush to make room for snowsports gear! Here are some fantastic deals to check out before you store away your summer gear: Labor Day Gear Deals REI has an …

The post Hot Hiking Gear Deals: End of Summer Clearance! appeared first on Hiking Lady.

Hot Hiking Gear Deals: End of Summer Clearance! Read More »

AirForce Veteran Shoots Fatally Shoots Armed Robber Who Attacked Him.*Graphic*

The sign hanging in the store is just icing on the cake. A would be robber faced karma after attacking a retired airforce veteran working as a clerk. The Veteran opened fire on his attacker striking him as he fled. We just talked to the clerk who was pistol whipped during a robbery last night. […]

The post AirForce Veteran Shoots Fatally Shoots Armed Robber Who Attacked Him.*Graphic* appeared first on Tactical Sh*t.

AirForce Veteran Shoots Fatally Shoots Armed Robber Who Attacked Him.*Graphic* Read More »

Europe Diagonal: Great Britain Coast to Coast

The European long-distance path E8 continues through Great Britain as the Transpennine Way. When I had a close look at this trail preparing this trip I discovered that this is not a very scenic route. Always close to civilization and mostly on concrete. Therefore I decided to hike Wainwright’s Coast to Coast instead which is a bit further north but the exact same length. Right from the start this turned out to be the right decision. After a hearty  English breakfast in a traditional B&B I started with a walk along spectacular coastline – alas in rainy weather. The couple in the picture could not believe that I was camping: “Your backpack is so much smaller than ours and we don’t camp!” Well, they had not heard about ultralight backpacking yet.

This mostly unmarked trail then continued through the Lake District, a real gem! Despite a lot of rain this stretch was a real highlight and I could not take enough pictures. Unfortunately, in on of the most beautiful places I got so soaked in a cloud burst that I could hardly take any pictures any more. The touchscreen of my smartphone was wet and I did not have any dry cloth to clean it. Plus my fingers were so wet and frozen … It was still a wonderful day despite the fact that I had to put on soaking wet and cold clothes the following morning. I rewarded myself with a breakfast of champions outside the little supermarket in Grasmere and ate an entire package of chocolate trifle.

Idyllic campsite with unexpected visitors

One night I arrived at a spectacular lake with no one else around. Apparantly this was a popular campsite and as wild camping is usually tolerated in this National Park I set up my tent at this fantastic site despite the fact that there was goose shit all around. I soon regretted this: In the middle of the night I heard some crackling noises right outside my tent and I just see some small animal runnig away. Closer inspection revealed that a fox had dragged a bag of nachos and my trash bag out of the front pocket of my backpack! It was too dark to see what had happened to both but in the morning I had to collect empty wrappers and used toilet paper that was lying around. The nachos of course were completely gone … A British friend told me later that something similar had happened to him at the exact same spot.

After a sort of connecting day I was in the Yorkshire Dales National Park and had reached the Pennines. More spectacular scenery, a lot of sheep and cattle – but unfortunately only chocolate brown drinking water that slightly tasted of iron but looked colorwise like peach ice tea. There were a lot of industrial remnants in this area which was a mining centre in the 18th and 19th  century. What looks almost like wilderness now was a busy industrial area once. Coast to Coast (C2C) is a popular trail and I came across several churches that offered drinks and snacks at cost price for hikers and there was even some trail magic boxes along the way. Very welcome in the rainy weather!

Drinking chocolate brown swamp water

One morning I was shocked to discover that my charging cable was gone with my phone only 20% charged up! A horror scenario for me whose smartphone is my backup navigational device. I found it half an hour later when packing 10 metres away. It had fallen out of my backpack when setting up the tent in the dark. I had my one and only rest day on the C2C in Richmond where I had booked myself into a rather posh B&B. The owner’s husband was more than delighted by German native speaker because he had been forced to apply for a German tax number and could not figure out the application form. I ended up spending almost two hours translating and explaining it to him … He rewarded my with a very substantial discount on the room price …

Paragliders in the North York Moors

After another connecting day I arrived at North York Moors National Park where paragliders were taking advantage of the nice weather – which unfortunately turned very bad the next day. In fact so bad, that a lady walking her dog told me that even her dog did not want to go outside this day. I desperately tried to find some kind of accommodation for that night but every place I called was already fully booked. I was so distressed that I even went into a pub and ordered a cup of tea and something to eat. I was the first customer of the day and my backback left a huge puddle on the floor. Eventually I managed to find a room, but the landlady asked me: “When does your luggage arrive?” I had visions of my backpack walking on its own, but she just referred to the fact that most hikers have their luggage transported for them by commercial providers.

The place turned out to be a palace but unfortunately a very dusty one. She only rents out rooms occassionally and therefore the room really smelled as old as the house was. At least weather was a bit better on my last day when I reached the coast at Robin Hood’s Bay. I had just reached the little village when I saw the bus rounding the corner – and even caught it. Therefore my hike on the C2C ended kind of abruptly … Before I left Britain I met up with Colin, an old hiking friend of mine who gave me some new hiking ideas – as if I did not have enough of them already …. Then I had to return to Germany for a brief stint as a best woman at my best friend’s wedding before resuming my hike.

Coast to Coast was the real highlight of this hike and I can highly recommend it!!!! I had hiked across Britain before from John O’Groats to Land’s End and had not liked it a lot. With that experience I did not have high expectations for the Coast to Coast but I was literally overwhelmed by how great it was. One of the big advantages of the C2C is how easy wild camping is!!! It is tolerated in the three national parks and wasn’t a problem in the connecting stretches in between. Although C2C is a popular trail I did not meet a lot of other hikers probably due to the fact that I had started on a Monday and mostly camped wheras most hikers stay in town.

Europe Diagonal: Great Britain Coast to Coast Read More »

White Child Brutally beaten and hospitalized in Violent Hate Crime on School Bus over a Trump Hat

White Child Brutally beaten and hospitalized in Violent Hate Crime on School Bus over a Trump Hat

In yet the latest hate crime ignored by the mainstream media, a white 14-year-old child was brutally beaten by 8 black thugs on his school bus. […]

This Article White Child Brutally beaten and hospitalized in Violent Hate Crime on School Bus over a Trump Hat is an original article from OFFGRID Survival If it is appearing on any other site but OFFGRID Survival, that site does not have our permission to use our copyrighted content!

White Child Brutally beaten and hospitalized in Violent Hate Crime on School Bus over a Trump Hat Read More »

Cravat Bandaging: Series Post 2

This is a Guest Blog post by Jim Ausfahl .

Disclaimer: This material has been modified from the public domain US Military field manual, FM 5-80.

Last week, we looked at using a
triangle, or cravat, bandage for a tourniquet, splints and slings.  As a reminder, the triangle bandage is a
piece of cloth, often unbleached muslin, that is a right triangle with legs about
40″ (102 cm) long, and a hypotenuse, or long side, around 56.6″ (144
cm).  It is folded on itself three times
to make a cravat bandage.  Remember: for
all wounds, the first thing to do is to control the bleeding, clean and cover
the wound with gauze padding, and if it is available, some antibiotic ointment.
The bandage is used to lock the gauze in place. 
In looking at the bandaging below, it will be assumed that has already
been done. This week, let’s look at bandaging parts of the arm, starting with
the hand.

THE HAND

Start by laying out the triangle
bandage with the long side toward the person to be bandaged.  Place the wounded hand, usually with the hand
on top of the gauze, so that the edge of the triangle bandage is a about one to
two inches past the wrist toward the elbow. 
The long finger of the hand should point to the right angle of the
bandage.  The diagram below will make
this clearer.

Bandaging of the Hand

Bring the point of the right
triangle back over the hand, then tuck the sides, clear to the points of the
triangle, which will narrow the two bits of cloth going to the sides; again,
the diagram should clarify this.  With
that done, wrap one side over the hand and under the wrist, being careful to
keep a bit of pressure on the gauze without disturbing it.  Do the same thing with the other one, gently
tighten things up and then tie the two loose ends over the wrist with a square
knot.  If there is a bit of the bandage
sticking out from under the knot, it can be wrapped over the knot and tucked
under it.

Sometimes, however, it is not
necessary to bandage the fingers and desirable to keep them free.  There is an alternative bandaging to permit that.  Fold the triangle bandage into a cravat, then
lay the middle portion of the cravat on the gauze padding.  Bring the free ends under and over the hand
then back under the wrist and over the hand. 
Finally, loop the free ends under the wrist again, bring them back over
and fix in place with a simple square knot. 
The diagram below makes this much clearer.

Alternate Bandaging of the Hand

THE ELBOW and ARM

Bandaging the elbow also starts
with folding the triangle bandage into a cravat.  The injured elbow needs to be positioned to about
90 degrees, and the middle of the cravat placed at the point of the elbow.  One side of the cravat is wound once or
twice, overlapping about an inch, over the upper arm; the other one, over the
part of the arm below the elbow.  The
free ends of the bandage are tied in a square knot on the inside of the bend of
the elbow.  The diagram of this procedure
is below.

Bandaging of the Elbow

A nearly identical procedure will
work to bandage the forearm or upper arm. 
The middle of the cravat goes over the gauze, then one end is wound
around the arm going upward, overlapping an inch or more, with the other going
around and down.  The free ends are tied,
diagonally across the bandage, in a square knot.

Next time, the topic will be bandaging parts of the leg.

Jim Ausfahl is a physician in active medical practice, in Peoria Heights, Illinois, studying the art of surviving in a challenging environment and sharing what he knows.

The post Cravat Bandaging: Series Post 2 appeared first on WillowHavenOutdoor Survival Skills.

Cravat Bandaging: Series Post 2 Read More »

Preparedness Notes for Monday — December 16, 2019

December 16th is the anniversary of the Boston Tea Party, in 1773. — And December 16th, 1928, was the birthday of Philip K. Dick, who died March 2, 1982. He penned a remarkable number of sci-fi novels and novellas that have been adapted into movies, including Blade Runner, Total Recall, Screamers, Impostor, Minority Report, Paycheck, A Scanner Darkly, Next, and The Adjustment Bureau. Though he had a troubled personal life (with drug use and several failed marriages), his captivating books certainly had a knack for envisioning potential futures.

The post Preparedness Notes for Monday — December 16, 2019 appeared first on SurvivalBlog.com.

Preparedness Notes for Monday — December 16, 2019 Read More »

5 Ways to Fix a Rusty Knife

Owning a knife can be really helpful, especially if you go camping or engage in any other outdoor activities that may require you to use a knife. Still, a knife comes with many benefits regardless of use – and this is why you have to protect it properly or know what to do when such a tool has been rendered useless.

Naturally, we refer to rust – Iron (III) Oxide which is formed when the Iron of the knife’s blade combines with the Oxygen present in the atmosphere. While some of you may prefer using a survival knife, given that these don’t rust easily, most of the knives we own will most likely be affected by rust – depending on the environment we keep them in.

Therefore, in today’s article, we’ll be taking a closer look at rust, rusty knives, and we’ll give you 5 tips to help you fix a rusty blade and make your knife look brand new!

The Cause of Rust

Before talking about how to fix it, it’s important to know what exactly causes rust so that you know how to prevent it from happening.

There are three main ingredients that cause your knife to rust, namely water, oxygen, and iron. Obviously, all of them are required to come in contact. Iron is found in the knife’s blade, oxygen is everywhere around the knife itself, and water – mostly in the form of moisture – will favor the formation of rust.

Naturally, you have no influence over the first two ingredients. You can’t keep the oxygen away from a knife and you certainly can’t use it if it has no blade. What you can keep away from the knife is moisture.

However, keep in mind that moisture does not have to be liquid, so to speak. For example, humid air is enough to cause rust. 

Basically, you have to keep these three ingredients away from each other if you don’t want your knife to rust – shortly put, keep your blade away from moisture.

Types of Steel

The material from which the blade of a knife is made can influence the time when rust forms. The blade can be made of either Stainless steel or Carbon steel. Carbon steel comes with additional carbon in its composition (around 0.5% to 1.5% carbon), while Stainless steel comes with Chromium (12.5% to 13.5%).

Carbon steel knives, while durable and very strong, are also prone to corrosion if they are not being taken care of. Such knives will easily rust in acidic or humid environments.

On the other hand, the Chromium inside a Stainless-steel blade creates an oxide layer on its surface, preventing the steel from further oxidation. Therefore, the corrosion is slowed down – hence the name Stainless.

Ways to Fix a Rusty Knife

Given that a high-quality knife is a valuable – and sometimes pricey – tool, you must know how to fix a rusty one. However, if you don’t, then you’ve come to the right place.

In the following lines, we’ll show you five of the best ways to deal with a rusty knife and make it as sharp and shiny as it was when you first bought it.


  • Baking Soda


The use of baking soda is one of the easiest ways through which you can fix a rusty knife. First, you have to apply water to the rusted area and then sprinkle some baking soda on it. 

The baking soda that comes in contact with the wet area should stick to it. You should also remove any excess baking soda by gently tapping the knife.

After a couple of minutes, scrub the area covered by baking soda with a wet scrubbing pad. Remember that the scrubbing pad must be wet at all times while doing this so that the blade doesn’t get damaged.

With a few minutes of scrubbing, the rust should come off. If required, you can repeat the process. After the rust is gone, rinse the knife with water and then wipe it dry.


  • Vinegar


Just like baking soda, this is yet another item that you can find in your kitchen – no need for you to go shopping.

Start off by pouring white vinegar into a pan or a wide container. Then, take your knife and soak it in the vinegar – you can choose whether to soak the entire knife or just the blade. Keep it there for about 5 minutes. 

After that, wipe the blade with a cloth, rinse it with water, and then dry the knife.

Do not leave the blade in vinegar for too long, as the latter can damage or stain it.


  • Chemical Solvents


Naturally, you can find numerous chemical solvents that can be used to remove rust from the blade of a knife. However, you have to make sure that they are not toxic, especially if you plan on preparing food with that knife.

Before spraying the knife with any solvent, make sure to clean it with oil in order to remove impurities or stains. After spraying it, use thin sandpaper to remove the rust stains. 

Repeat this process until the rust is gone, then wipe, rinse with water, and dry the knife.


  • Sandpaper


Keep in mind that sandpaper is usually used for small rust stains. The rust stain has to be rubbed gently with a piece of fine sandpaper. Thicker sandpaper can damage your blade and larger rust stains can take quite some time to remove.

We recommend you use a 3000-grit product when scrubbing off the rust – any bigger value could remove the finish of the blade, scratch it, dull it, and damage it.


  • Natural Products


Some methods don’t require any special products or equipment. For example, you can simply stick your knife in a potato and leave it there for a few hours. Potatoes contain oxalic acid, which is known to dissolve rust.

You could also stick the blade in rich soil – actually, plunge it in dirt – and then wipe and rinse it. However, make sure that the soil isn’t too rough, or you’ll damage the blade.

If you have a lemon available, cut it in half and rub it across the part of the blade that has rust on it. If you have to deal with a larger rust stain, you can let the lemon sit on the stain for an hour or so. Remember to scrub after you’re done!

Finally, if you don’t mind some tears, then you can stab an onion with your rusty knife, saw back and forth into it, and then scrub off the rust. The sulfenic acids within the onion will help dissolve iron oxide – the main compound of rust.

The Bottom Line

As you can see, you don’t need any special products to fix a rusty knife. In an emergency, you can just plunge it into the closest patch of rich soil and see the results for yourself.

Still, even if fixing a rusty knife seems quite easy to do, it is important that you know how to prevent rust from forming on the blade. In short, keep moisture away from it – avoid storing the knife in humid environments and, obviously, don’t leave it outside during the rainy season.

5 Ways to Fix a Rusty Knife Read More »