Camouflage for Survival – A Comprehensive Guide
Camouflage is a skill and art that is often thought to go hand-in-hand with prepping and survival. If we are trying to survive or run away from some disaster that might see our societal norms and rule of law collapsed, it makes sense we want to avoid detection by other people as much as possible, unless of course we want to be noticed but that’s another story.
Whatever your purpose, whatever your reasons, if you want to remain undetected, you cannot wing it: you need to know what you’re doing. If you don’t, you don’t want to make the situation worse, and make yourself even more visible, or at least no less visible than you were at the outset.
Considering that you might be the prey, and some other malicious human might be the hunter, the stakes could be high. Your very survival may depend on remaining undetected and unseen.
Camouflage is an ancient art and one that has been continually refined since time immemorial all the way through today. In today’s article, we’ll be giving you all the info on camouflage theory, application and practice.
Why Camouflage?
There are two “whys” to camouflage. The first is the answer to the question: you use camouflage when you want to remain unseen. Considering that the primary sense of human beings is vision, camouflage is your first and best option for remaining undetected by other humans, at least at any kind of distance.
Humans lack almost entirely the keen sense of smell that other animals, particularly predators, use for discerning what is around them and for tracking potential prey animals.
The second “why” is you use camouflage because without it you are terribly easy to spot? Everything about the average person, on the average day is easy to detect against the backdrop of nature or a cityscape.
From easy to pick out shapes to brightly colored reflective surfaces your usual wardrobe has not a drop of guile to it. What that means is that if your situation changes from everyday life to one where remaining undetected is a key component for attaining a positive outcome you might have a problem.
In kind times or bad ones, there are activities that call for camouflage to ensure success even if you wouldn’t normally employ it. One such activity that everyone understands is hunting.
Animals of all kinds, especially common prey animals, have very sharp senses and will easily detect and elude a sloppy, bumbling hunter. Another activity requiring camo might be discreet observation, an activity where detection may spoil your surreptitious intelligence gathering.
The more you think about it, the more times you’ll discover where camouflage may make the difference between success and failure.
Camo: The Art and Science
Camouflage is big business, and that means big money. Millions upon millions of dollars are funneled into camouflage research every year by both commercial and governmental interests.
Hunters are always on the lookout for that next best pattern so they can get the drop on their quarry the military, obviously, has a huge interest and camouflage performance for increasing the safety of their forces and thereby helping to ensure mission success.
Even a 10% increase in camouflage effectiveness may net a significant improvement in survivability.
But for the vast fortunes that get poured into its development camouflage are still more art than science, though the science helps.
To understand camouflage performance is to understand the science of vision and beneath that umbrella experts in biophysics, optics, hyperspectrometry, visual neurophysiology, signal detection theory, chemicals, textiles and biomechanics all grab a seat at the table, put their doctorates together and try to crack the code on the next big camouflage breakthrough.
Despite all that, and despite the gulf in prestige and formal education, it is entirely possible that nearly flawless camouflage offering almost perfect concealment could be cooked up and applied using nothing more than cheap spray paint, natural foliage, burlap and a discerning eye by a young man living in the foothills of eastern Tennessee, his craft refined by long experience tramping in the backwoods in pursuit of deer and rabbits.
That is because camouflage is a theory in its purest form: it is a set of principles, a set of ideas that are describe and must be interpreted by an individual, in a certain environment, in pursuit of a certain objective.
They’re all guides, not rules. You’ll never be guaranteed success by following them to the letter. What works in one environment may not work in another, or may have the opposite effect.
The only thing that matters with camouflage is results. A camouflage pattern you purchase or a camouflage pattern you apply yourself is only judged on merit and nothing else.
In that way, a DIY-savvy prepper like you may be afforded just as much performance from your $10 homebrew camo job as the latest artificial intelligence-designed, multimillion-dollar think tank camo cranked out by DARPA.
You can do it. And the way you’ll do it is by understanding the principles of camouflage. Specifically, what visual signatures you are employing the camouflage to mitigate or manage.
Understanding Visual Signature
If you’re unfamiliar with camouflage theory, you might think that someone is camouflaged or they’re not. Either or, like a uniform. Basically you’ll either see them- “aha! There they are!”- Or you won’t. It doesn’t quite work that way.
Without delving too deeply into the neuroscience that would make up a series of articles all its own your brain will rarely discern an object, be it an animal or a person, and its entirety in one swoop.
Instead, it uses a sort of shorthand to speed up processing looking for “tells” that are characteristic of an identified with the object you’re looking for and expecting to see.
Ask any hunter and they’ll tell you: if you look for the deer, you’ll miss it. If you look for a part of the deer, you’ll see it. Many will regale you with stories of seeing not the deer all at once, but the flicker of a white tail or the movement of a majestic set of antlers. Then they saw the deer in toto.
This is a good lesson in understanding a few parts of visual signature together, specifically color, movement and shadow. We’ll get into those and more right now
Shape
This ties right in with our analogy above. The brain of our valiant hunter above is not looking for a deer, the concept, the animal; it is looking for the shape of a deer amidst all the other objects in the field of vision.
One of the simplest and most fundamental aspects of camouflage is breaking up the shape of an object so that it will not be recognized immediately as the object it is.
You should know that the human form as one of the easiest shapes to recognize out in the world, and people are very adept at picking other people out of the background.
Disrupting the shape of an object can be done through a variety of means: you can use obstructions, or even local vegetation to disrupt your shape at a distance. Boldly contrasting large form shapes painted over another object can confuse or distort its shape.
Silhouette
Silhouette is closely linked to shape, and is the outline of an object against a background. One common and iconic example is skylining, or the shadow outline of a figure against a much darker sky.
Great way to get seen for miles away and also a great way to get shot. You can also silhouette yourself against a contrasting background, be it a wall, a dense bank of foliage or the broad and grassy expanse of a hillside.
Even if you’re covered from head to toe in camouflage, the silhouette of the camouflage blob moving against the background will say “human.”
An obvious silhouette is a common camouflage mechanic failure; you can do a lot of other things right, but if you don’t account for your silhouette against the surrounding environment you are sure to be spotted.
Color
Color is perhaps the most fundamental element of camouflage and the one people think of immediately when the topic comes up. If you’re in the woods, you want to be in browns.
If you’re in the snow, white and perhaps some black is your best bet. A desert environment dictates any variety of tan or ochre depending on the locale. And if you are in the jungle of course you better be wearing green.
An entirely inappropriate color for camouflage can spoil all other efforts. The human eye is inclined towards recognizing bright primary colors, and less sensitive towards dull earth tones.
There’s a reason why so many safety cones and traffic signs are either that eye-melting yellow-green color or construction site-orange; they are both very easily perceived by the eye!
Now consider the case of our dear up above; that dusky tan color makes deer effectively invisible if they aren’t moving. As it turns out there are far more tans, browns and grays in nature than any other color, including black.
if you do nothing else but cover up, or get rid of, bright obnoxious colors on your outfit and your gear you’ll have gone a long way towards hiding yourself from observation.
Keep in mind that a solid color, chosen well, may serve as adequate camouflage in a specific environment but rarely is anything in nature of any size a flat, solid expanse of a single color. Going to add a few related colors to the mix, to achieve maximum concealment.
Shine
Certain colors are one thing that will unduly attract the attention of the human eye, another thing is light. Since a certain amount of light is necessary for the eye to work at maximum performance, we are keenly attracted to its presence.
What can spoil your camouflage is light reflecting off any shiny surface. Anything metal is a common culprit, as are glossy plastics. Human skin, even those gifted with an abundance of melanin, are also glossy compared to the environment around them.
You want to cover exposed skin with something that is not reflective, like mud or dirt, or camouflage greasepaint to tone down any shine.
Also pay attention to lenses on scopes and other optics, and flashlights that may be inadvertently left on inside a pouch or pocket even something as innocuous as paper or sweat-soaked fabrics. All can reflect light, moonlight or sunlight, unnaturally and get you detected by the bad guys.
Movement
Movement is the last “hot button” for the human eye, any unnatural movement, especially fast, jerky movement, will lock eyes on to you like heat-seeking missiles. Everyone sees the deer that takes off running.
A person that stands up and bolts out of a restaurant will instantly have all eyes on them. At longer distances reaching up to brush away a fly, wipe away a bead of sweat or scratch your nose could be noticed.
If someone has optics at their disposal- telescope, binoculars, and rifle scope, whatever- even small movements are far more likely to be noticed a much greater distance.
Now, moving isn’t everything when it comes to camouflage, but your granddad knew one thing about hunting, specifically about not being noticed.
If you sit still, real still, deer and man alike will walk right past you and never know you’re there. And he went out hunting in a red plaid jacket more likely than not! Something to think about.
Camouflage also makes a difference when you’re moving. Sound bizarre? It’s true. While it is almost always temporary, a proper camo job may confuse the eye of the observer as to your direction while you are moving.
Are you moving towards them or away from them? And how big are you exactly? Presently, there is no Predator-style camo that will cloak you while you are moving, but camo can still make a little difference.
Shadow
Shadow can be used both for and against your camouflage efforts. You can take advantage of actual shadows, or simulated shadows using paint and darker colors in your palette, to blend in seamlessly to an environment among the interplay of light and dark.
But beware! Shadow can work against you, both the shadows you cast and the shadows cast by other things in your surroundings.
Failing to account for the shadow you cast can get you noticed very quickly even among an otherwise cluttered background when using good color and pattern selection.
Likewise interrupting the play of shadow cast by something near you can stick out to the eye, and draw attention. With attention comes scrutiny and with scrutiny often comes… detection.
Learning to work with and not against natural and simulated shadows is one of the more difficult elements of mastering camouflage theory, but masters it you must if you want to be successful.
Your Simulated Survival Situation
Now, if you are otherwise prepared for a major disaster, complete with bug-out kit, a repertoire of skills to help you survive in an austere environment, and high overall fitness levels I’m not going to knock you if your gear is all off-the-shelf stuff in a variety of bright and cheery colors suitable for camping.
You are still more prepared than 99% of people in America. That being said, it would be untruthful for me to tell you that your colorful getup is not a liability in certain circumstances. That’s because it absolutely is.
Consider this theoretical scenario: it is two months after The Big Crash, a black swan event consisting of a massive economic depression and all that attends in conjunction with the assassination of the President of United States.
Historians will later say it did not turn into a Second Civil War so much as it did absolute pandemonium from coast to coast. Life in society as you know it has ceased to exist.
Armed partisan groups are conducting ideological purges even now. Police and military forces have been given a long leash to restore order and have been on edge for the duration.
You must also contend with flocks of the downtrodden, the starving, the crazy and the desperate, all are people who want what you have. Tell me this and answer truthfully: do you want to be more or less noticeable to any and all of those groups named above?
If you have a functioning brain, you probably answered “less visible”. Think of it this way, there’s nothing to be gained by remaining less noticeable than the people that potentially want to detain you, hurt you, steal from you or even kill you.
You can always make yourself more noticeable should you need to be and is a far sight easier than making yourself less noticeable.
So, it’s time to reduce your profile. You’ll have a lot to do. You’ll need to camouflage yourself, your gear, your vehicle (if you’re using one) and potentially your shelter. Where do we start?
Your Camouflage Options
All the principles of camouflage above will combine to form one of several techniques for camo application. There’s more than one way to skin the cat, and there’s more than one way to camouflage something effectively in a given environment.
Some options work better in certain environments than others. Some work equally well, so long as you pay attention to the principles, in any environment. And still others are highly environmentally specific.
Blending
Blending is a camouflage option that defeats and counteracts silhouettes and the outlines of shape. Great examples of blending in nature are stick bugs, and the rocky, mottled skin of certain species of octopi that blend in with the rocky floor of the oceans and coral reefs.
Blending also has a strong dependency on color: the most seamless match of outline in shape will not sell if the colors are wrong. You might blend into a forest floor by relying on the same fallen leaves all around you to mask your own shape and color.
men, material and vehicles can be blended by using a combination of foliage and other natural materials from the environment around them as well as man-made camouflage options like camouflage netting and mesh. Texture is also an important component of blending, so make sure to take that into account when devising your camouflage solution.
Countershading
Countershading is a process by which camouflage defeats the shadow signature of an object against another background, encouraging the eye to ignore it or slide past it. Countershading is an easily done and popular form of camouflage, and examples abound in nature and among the technologies of mankind.
Remember the deer from our example above? Deer along with many other animals are countershaded. Their tan back and flanks taper to a creamy taupe color on the belly and hind quarters.
You can see the same effect on squirrels, which have a dusky tan or gray upper coat of fur that transitions to white on the underside. Reflect for just a moment on how hard to spot these animals are in their natural environment unless they are moving! That is the power of countershading.
Countershading is also a popular camouflage pattern for military vehicles, especially aircraft. Helicopters and airplanes often have an earth tone topside and a gray, white or even sky-blue belly; the intended affect on those observing the aircraft from above, other aircraft, will miss the craft as it flies along the similar colors of the ground below them.
Those observing it from below, men and vehicles, will not be able to detect it as it blends into the sky they are gazing up into.
Mimicry
Mimicry is camouflage by way of looking like something else, anything else other than what you are. Mimicry can be extremely technical, or very simple.
Hunters use duck blinds with their appearance of reeds printed on them and synthetic reeds attached all around them to fool waterfowl into ignoring them while they fly into shotgun range.
Military vehicles are commonly camouflaged to resemble something else other than what they are to fool observers. Primitive hunters once use the pelts of animals they were hunting along with crawling on all fours to crudely mimic their prey, allowing them to get closer before springing upon them.
Mimicry, done right, is one of the best available forms of camouflage. You could flex your mimicry skills by setting up a blind entrance to your shelter that appears to be just a pile of logs or even a boulder.
Something as innocuous as a dumpster or shipping container can be converted into a discrete observation site, or even a shelter. On a personal level, you can make use of mimicry on your clothing and gear.
Camouflage that is hunting specific often mimics foliage, like tree bark and other flora, in exquisite detail to fool the keen eyesight of animals.
Be warned: mimicry done poorly will attract attention, not evade it. As an extreme example, a trash can in the middle of a field, or conspicuously parked car looks exactly like what they are- suspicious.
Ruption
Ruption is an odd word that simply means to break up the shape of something. Think “rupture”. Ruption is most commonly observed in the mottled skins of reptiles, and many classic camouflage patterns have odds swirls and shapes of interlocking and contrasting colors due to adherence to this technique.
The effect, at a modest distance, busts up the human shape. Ruption can also be applied to vehicles by using the same techniques on a larger scale.
A great example of ruption specific camo is the classic U.S. Army Woodland camouflage pattern. This greatly beloved classic pattern is so great, and so beloved, because it works well on a small scale or large-scale.
Chances are the last time you saw a military parade, or watched any military documentary you noticed the same pattern, more or less, was applied to vehicles as it was on the uniforms of troopers, just scaled-up.
The net result was the same: at a distance, the man or tank looks less like a man or tank. Ruption is also one of the simplest camouflage concepts to apply in the field using improvised methods.
Camouflaging Your Body and Clothing
Camouflage starts with your person. Changing your clothing to something suitably low profile is the first step towards attaining camouflage, but it’s not the last.
The simplest thing you can do is buy a set of camouflage clothing consisting of jacket or shirt and trousers there are specific to the environment and season you’re in.
Don’t forget to take care of any underwear that may be revealed, specifically your t-shirt and socks. a bright white fruit of the loom shirt peeking out from under your digital camouflage button down shirt is not only a bad look, but it’s a great target indicator.
Next consider your footwear. There are not too many camouflage pattern boots out there, or similarly camouflaged shoes. Your smartest decision probably is just to get a set that is a low profile matching color for the environment you are in, either black or tan, though brown is acceptable.
Most any environment you’re walking through will see you pick up some dirt, grit, mud and other natural debris on your footwear that willl help to camouflage it. Whatever you do, don’t wear sneakers or trail shoes that have those damned reflectors on them. Talk about built-in shine, and not the good kind!
Next you’ll have to address exposed skin. The simplest options are gloves for your hands, and a lightweight or heavyweight gaiter (depending on weather) for your face and neck. Any kind of hat will work for covering up the bulk of your head, though the less rigid in shape it is, the better.
One option for covering exposed skin with a high degree of fidelity is camouflage greasepaint, so depending on your objective and how serious the consequences are for detection you might skip this step since it is messy and requires constant touch up and reapplication.
If you’re in doubt about a camouflage pattern for your environment you can fall back on single-color drab clothing; tan is always best in most environments but dark gray-greens can work, too.
Take the time to add some contrast with generous hand-rubbed applications of the local dirt, dust and a little bit of mud. Alternately you can lightly dust the clothing randomly with lightly contrasting spray paint to get the same effect.
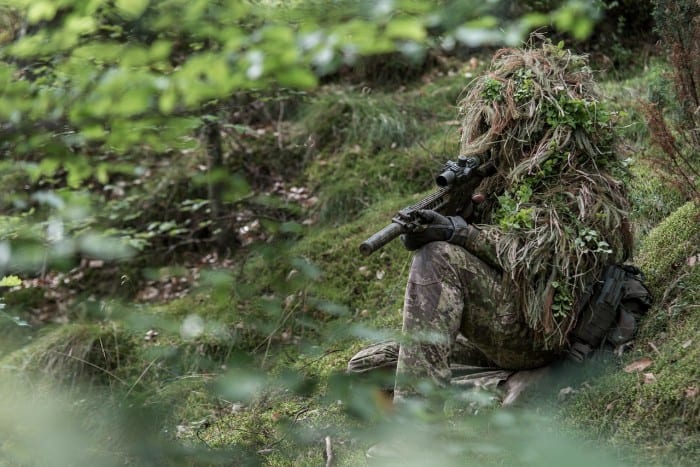
If you’re going to be in one place for a long period of time, say on guard or observation duty, you might consider a ghillie suit. Long seen as sort of the crown jewel of personal camouflage, a ghillie suit is actually a specific-application tool best employed from a fixed hide or observation site.
Ghillie suits are often heavy, hot and bulky, and they become very heavy when soaked with water or sweat, so you probably don’t want to be wearing one as your general purpose Prepper Tuxedo!
Ghillie suits are likened to a jumper, cape or web-like body suit that has all kinds of shape and outline-busting materials woven in to it. One dons a ghillie over their clothing like an outer garment when it is needed.
A proper ghillie suit is always handcrafted, and often uses real vegetation and other materials from the surrounding area to ensure 100% fidelity with the environment.
The creation of a ghillie suit is another article entirely and requires a considerable amount of study and practice to do it well. One thing I can tell you though, is you should never rely on an off-the-shelf ghillie suit.
One-size-fits-all doesn’t when it comes to camouflage and these floppy, Chewbacca-looking commercial suits will rarely work well in any environment. Save your money!
Camouflaging Your Gear
You need to camouflage your gear the same way you do your body. The most expedient method is just by purchasing gear that comes already camouflaged in some pattern suitable will for your environment, or by choosing a generic single or two color combo that does not draw attention to itself.
One quick note about black: black is often thought of as a sneaky color, and especially good for nighttime use. This is actually not true as black appears very, very rarely in nature except as deep shadow.
Even at night, black clothing and gear can also appear darker than the darkness around it, leading to a sort of “black hole effect” that makes you even more visible at night then you would be otherwise!
Compared to clothing it’s a little easier to camo gear that is not suitable for low profile use. Web gear made from cordura and other heavy duty nylons can easily be painted with spray paint or other fabric specific paints to imbue camouflage properties.
Backpacks, even ones that are otherwise brightly-colored, can be stuffed inside camouflage rain flies for water resistance and reduction of observable profile.
A simple way to camouflage your backpack is to rattle can it with a muted tan, and then attach some general purpose surplus military camo netting over and around it. This will take care of color, shape and outline in one fell swoop.
Any gear that is hand-carried should likewise be camouflaged. Firearms are the most obvious items that spring to mind, as a man carrying a rifle is an extraordinary high-profile object to the human eye, being comprised of the easily-recognized human form married to a sharply contoured long object that is similarly recognizable.
You can spend a fortune having your firearms dipped, Cerakote’d or otherwise professionally camo’d, or you can spend about $10 on spray paint and a few hours in an afternoon to camouflage them yourself.
Considering that firearms that are used hard and regularly will often see their finish worn away no matter what, I would rather spend more money on practice and ammunition than fancy-pants professional coatings. I personally spray paint all of my firearms with homebrew camo patterns.
Remember that metal and lenses are two of your biggest violators when it comes to shine and light reflection. Any exposed metal that can glint in the light can be seen from a long way away, so make sure you stow it or finish it in anti-reflective coating.
Camouflaging your Vehicle
Camouflaging a vehicle is obviously a much larger undertaking than camouflaging yourself and all your gear. You can use many of the same techniques, but they must be scaled up significantly to work on vehicles.
Additionally, a vehicle’s greater size and surface area mean techniques must be modified and you can only expect to camouflage it effectively when is viewed from a greater distance.
If a vehicle is not screened by proper line of sight-blocking concealment, anyone that is really looking for it will likely see it. Keep that in mind.
The fundamental way to camouflage your vehicle is by applying camouflage paint specific to the environment. The simplest variation on this technique is a single color coat of tan or green. Advancing on this basic technique, you can get in to two-, three- and even four-color camouflage patterns.
Be advised: camo patterns that have small, repeating elements don’t work as well for vehicle camouflage because their greater surface area makes the pattern more conspicuous to the eye, not less, thus defeating the purpose of the camouflage. Large-scale, simple, macro pattern camo works best on vehicles.
Another way to conceal your vehicle is by using natural vegetation again: branches, leaves, vines and similar materials may be attached to a vehicle to break up its outline or laid on it and near it when it is parked to prevent observation.
As with personnel-size camo solutions, camouflage netting, mesh and tarps can be used to good effect for the same purpose and have the advantage of completely covering the vehicle in very short order.
Camouflaging a Shelter
The effectiveness of camouflaging a shelter depends entirely on what kind of shelter you’re talking about. A tent or lean-to won’t be much of a problem. Fixed structures are another story.
Something small like a cabin or shed is doable. Larger proper homes will probably only really be camouflaged from aerial observation, if that, or observation from extreme distances.
For anything on the very small-scale like a tent, you can use techniques that you would for yourself. The same rules for pattern and color apply, as do those for making use of local vegetation to break up the silhouette of the tent.
If your tent is made from a synthetic material that has a reflective index you might want to spray it down with something that will damp the shine, or just smear a thin veneer of dirt or mud on it.
It will be expensive, but for larger structures you can do what the military does and make extensive use of that shredded-looking camo netting, along with painting any exposed surface a low profile color.
The only way to achieve total concealment for a structure is to bury it so you only need camouflage a much smaller entrance, or disguise it as something else entirely through mimicry.
A Note on Urban vs. “Wilderness” Camo
A common question when discussing camouflage theory and application is what you should do about camouflage if you live in or will be moving through an urban environment verses in more rural or wilderness setting.
After all, you don’t get much different than those two environments! Broadway looks a lot different than the middle of the woods! The principles, though, remain the same, and you might be more surprised that the colors are not much different either.
Generally in an urban setting a dark gray-green is your best bet. If that is not an option, a dusty sepia colored tan is workable. You definitely don’t want to go with the all-too-common white, gray and black “urban” camos so widely available.
Why not? Isn’t that the most common pattern you see advertised for urban operations? Yes, indeed it is, but these patterns are marketed to the unwary or people who just like how it looks.
White is only ever a good idea when snow is the predominant ground-covering. Black we have discussed above, and it is too dark to be much good when it’s used in abundance. gray can be a good camouflage color for an urban setting but the ones found in advertised urban camo are usually far too light.
If you’re ever in doubt about urban camo anywhere in Europe or North America (barring desert environments) you really cannot go wrong with classic OD green or a darker gray green similar to World War II-era German feldgrau.
Frankly, urban environments offer challenges for all kinds of camouflage. With a huge variety in both color and texture among all the high-contrast backgrounds we call buildings, your camouflage can literally be good one block and bad the next.
Most urban camouflage technology has derived from vehicle camouflage research, and you’ve probably seen those on the internet; large, blocky, pixilated, so-called “dazzle” patterns.
While they work okay for making the type of vehicle hard to identify at a distance, those patterns are often worse than useless on a human scale. Avoid them!
Improvising Camouflage Solutions
You won’t always have access to purpose made camouflage gear, be it clothing, paint or netting. In keeping with the prepper M.O., being able to improvise what you need to get the job done is essential for success, and that definitely holds true for camo.
Luckily, good camo can be easily achieved with a good eye for color and careful assessment of the environment you are moving through or hiding in. Below I’ll provide some of my favorite tips and tricks for DIY camo solutions for home or field use.
- You don’t have to spend a fortune on camo uppers and lowers for yourself: a cheap camo jacket and waders, either from the discount rack at a sporting goods store or a military surplus store can work fine.
- In a pinch, you can paint your clothing with camo-specific fabric paint or spray paint. Don’t be wearing your clothes while you do this!
- Alternately, if you are in a big hurry, you can smear soil, mud or clay on your clothing in a thin layer for locale-specific color camouflage. This can even get you a nice two tone effect if your base clothing color contrasts well.
- A similar technique as above works on vehicles: a thin veneer of dirt or dust will reduce glare on windows and windshields as well as chrome or metal trim. Make sure you can still see out of them before setting off!
- You can make large masking material out of many things, including old carboard, sheets, blankets and coarse fabric like burlap.
- Small masks can be cut from paper or cardboard, or made from butcher paper.
- Improvised camouflage netting is easily made from canvas tarps for large-scale requirements, or cheap mesh laundry bags dyed a drab color for small scale purposes. Either is a great, quick way to bust up the profile of yourself or your gear while adding attachment points for vegetation.
Field Expedient Paint
Sure, camo paint is cheap and plentiful now, but what will you do if you have an urgent need of paint to make your neon green Jeep disappear, pronto, but every shop and store in 50 miles has either been burned, ransacked or is sold out? Simple: make your own!
Paint is one of those things that most people never stop to think that they can make themselves, but you surely can, and you can make some pretty good paint at that!
Now, it probably won’t win any awards from Southern Living or Home & Garden, but for making a vehicle or other piece of equipment disappear in a hurry these are just the ticket. Best of all, all of them use extremely common and plentiful materials.
Below are three recipes for improvised camo paint taken directly from the U.S. Army’s Camouflage and Concealment Field Manual (FM20-3).
WARNING: You must use caution when employing any paint made with motor oil or other flammable materials. Take care to keep it off your skin and neither the author nor this website make any assertion’s as to this techniques safety when correctly or incorrectly employed.
Recipe #1 – Flat Gray Drab
- Ingredients: Soil, bar soap, water, soot, paraffin.
- Directions: Combine soot and paraffin. Combine appx. 8 gallons of water with 2 bars of soap. Add soot/paraffin mixture to soap and water. Mix well, then slowly stir in soil.
Recipe #2 – Metal Gloss Paint (Color varies based on color of clay and soil)
- Ingredients: Motor oil, clay, water, gasoline, soil
- Directions: Combine 2 gallons of water with 1 gallon of oil and 2 gallons of clay. Add earth. Mix. Thin mixture with gasoline or water.
Recipe #3 – Dull Paint (Color varies based in color of clay and soil)
- Ingredients: Oil, clay, bar soap, water, soil
- Directions: Combine 1 bar of soap with 3 gallons of water. Add one gallon of oil. Stir. Add clay. Stir. Add in soil and clay in various amounts to altar.
That’s all there is to it. You will also be interested to know that the U.S. Army advises you can use canned milk or powdered eggs in any of these recipes to increase the binding properties of the paints.
Perfect for tricky to coat surfaces. You can also add in fine gravel or sand to increase texture to better suit your specific environment.
Using Vegetation to Your Advantage
Throughout this article, I have repeatedly talked about making use of vegetation in various forms to aid your camouflage efforts, either on your person, your gear or your vehicles.
It works well, that’s why militaries around the world employ the technique. But there is more to know about it if you want to do it right beyond sticking some fresh cut branches in your headband.
The type of vegetation makes a big difference as does the condition of the surrounding vegetation where you are. It might make you laugh, but these rapidly-wilting pieces of plants require care and maintenance, too, lest they actually raise your visual signature.
I have assembled a crash course on the subject below:
Making Use of Living Vegetation: You can get living plants in most climates and biomes, and its combination of locally appropriate color and “live” texture makes it a great choice for blending.
But living vegetation begins to die as soon as you cut it or pull it up and it will need replacement. Take care when orienting vegetation on your person or gear so it matches its normal growing orientation.
Making Use of Dead Vegetation: Dead plants, things like dry grass, fallen branches, dead leaves, hay, straw, etc. Work great for texturing and can work well for blending if the surrounding environment is also similarly dead. Dead vegetation can save you work since it isn’t going to “die harder” and it will require only infrequent replacement.
A few more tips on selecting and employing vegetation:
- Choose healthy branches from living vegetation if that is what you need. Branches free from disease, injury and insect infestation will not wilt as rapidly.
- Any vegetation taken from a plant that grows in direct sunlight will be tougher and last longer than shade-dwelling plants.
- Try to choose plants with leaves that feel tough and coarse to the touch; these are another plant that you can rely on to stay fresh longer.
- Try to gather your live foliage during high moisture periods- at night, during rainy periods, during foggy periods, early morning when dew is present, etc.- as, you guessed it, they will last longer.
- If at all possible, choose plants that are coniferous as opposed to deciduous.
Conclusion
Good camouflage seems to be a work of wizardry, making someone disappear into the background with almost no effort. While it is an art, it is not an arcane one, and it is one you can learn.
Considering all the other threats will be facing in a SHTF situation you’ll be wise to learn camouflage theory, technique and application.
Camouflage for Survival – A Comprehensive Guide Read More »