A Catastrophic Natural or Manmade Disaster Can Quickly Turn Money Into a Thing of the Past. In a society where transactions are driven by credit cards and the occasional use of cash, barter seems like a quaint recollection of the past. But in many economies around the world, barter is still a very active method […]
The Bright Angel Trail to Plateau Point hike takes you on the Grand Canyon’s most popular hiking trail to the peaceful and scenic Plateau Point, offering stunning views of the Colorado River. It’s a tough hike, but the Bright Angel Trail is the safest and most well-maintained trail in the park. Regular water stations, park rangers, and shelters make this hike manageable without being a desert expedition. This guide arms you with everything you need to know to hike to Plateau Point successfully.
November 24th marks the day that John Knox died, in 1572. (He was born in 1514.) AtheistAgendaPedia says: “Born near Haddington Scotland. He was influenced by George Wishart, who was burned for heresy in 1546, and the following year Knox became the spokesman for the Reformation in Scotland. After imprisonment and exile in England and the European continent, in 1559 he returned to Scotland, where he supervised the preparation of the constitution and liturgy of the Reformed Church.” — SurvivalBlog Writing Contest Today we present another entry for Round 85 of the SurvivalBlog non-fiction writing contest. The more than $12,000 …
Security overload leads to apathy. How often do you hear a car alarm go off and roll your eyes hoping the owner would disable the blasted thing before the incoming headache comes a knocking? The primary objection I have to such systems is they work too well. Every week I hear an alarm being triggered […]
The inclusion of a manual safety on a handgun is an intensely personal choice for a shooter. There is no right or wrong answer as a safety lends itself better to certain kinds of shooters and certain situations better than others.
A shooter’s own preference for a safety is usually formed by the sum of their training and experience, though a strong like or dislike of a given pistol design may move the needle one way or another.
The use of a manual safety is not without drawbacks just as omitting one is not always a benefit. A safety may paradoxically be a hazard to those who do not train with it or train incorrectly, and a safety may enhance the capability of a skilled shooter fluent in its use.
The pros and cons of manual safeties can be subtle, nuanced, and may elude those with less experience. Since it is usually impossible to add or remove a manual safety to a pistol once purchased, it is in your best interest to buy the right tool the first time. In this article I will lay out the benefits and potential pitfalls of manual safeties for defensive handguns.
Manual Safety Defined
A manual safety is any control on a gun that when actuated will either prevent the gun from firing or allow it to be fired depending on the position.
The precise means by which it accomplishes this varies from design to design, but is often achieved by either physically blocking the trigger from moving or by disconnecting it from the rest of the fire control group.
Manual safeties take the form of levers most often on handguns, and are moved through a short arc in order to activate or deactivate the safety, known as going “on safe” or “off safe”.
Manual safeties are distinct in category from other user-actuated passive safeties such as grip safeties ala the 1911 or trigger safeties as made popular by Glock pistols.
Such features are activated by the fingers and/or hand, but are done so automatically in the normal course of gripping the pistol or preparing to fire; if no deliberate action and movement is required in the manual of arms to activate or deactivate the safety, it is not a manual safety.
No matter how the safety ultimately functions, the outcome is the same: when activated, the gun cannot be fired, be it from a deliberate trigger pull or accident. This sounds inherently smart to inexperienced shooters but this potential additional insurance against a discharge comes at a cost.
A manual safety is always an additional step in the manual of arms, no matter how you square it. Ideally, a manual safety would be deactivated in the ready position as the shooters makes the decision to fire and presents the gun out toward the target, not deactivated once the gun arrives at full extension.
After firing and deciding to bring the gun back to ready, the safety is reengaged. The tempo is like this: decision to fire, safety off as gun goes out, decision to return, safety on as gun comes back. Off and out, on and back, off and out, on and back.
In reality, many shooters, especially new shooters do not even do that. What these shooters will often do is treat the safety like an ignition or on/off switch for their gun.
For instance, they head to the range for some practice, get all bagged up with PPE and then, once on the range, click the safety off of their pistol.
They fire however many rounds they choose in practice with no additional manipulation of the safety at all and then, once practice is over, clear the pistol, click the safety on and depart for home or wherever. This is the pinnacle of poor use of a manual safety.
The problem with the latter example is this: that same gun will be used for self-defense and either kept at home or carried accordingly. The safety will be on while the gun is in a loaded, resting state.
Should an attack occur the shooter will have done nothing to bake-in the neural pathways and dexterity necessary to deactivate the safety.
What happens is a loaded, on-safe gun is presented toward the threat, a dead or limp trigger is fanned repeatedly (with no accompanying bang) and then, perhaps and hopefully, the defender realizes their mistake and desperately tries to move the safety to the fire position in time to save their own life.
This occurrence sounds humorous, like the stuff of action movies, but it is all too real and very common, even among poorly trained police officers. The results can be deadly.
A pistol so equipped with a manual safety must be practiced with often, consistently and correctly to ensure that, in a high-stress situation, the safety will be deactivated without conscious thought or fumbling on the shooter’s part.
Training to that level of fluency is simple, but it takes work and a commitment to proper practice at the range and during dry fire. The fear of the above mishap occurring leads a significant portion of new gun purchasers and shooters to select pistols that rely only on passive safeties.
The idea being that so long as the gun is loaded it is ready to be used instantly with no chance of fumbling a control that will prevent it from being fired. The tradeoff is, naturally, that while such guns may be drop safe, anything at all that impinges upon the trigger can result in a discharge.
When you consider the stress levels involved in an attack and how much little time you’ll have to make an effective response, you may be best served by a pistol with nothing stopping you from getting it into gear.
Advantages of Manual Safeties
A manual safety gives the user an additional facet of complete control over part of the gun’s function, specifically the fire control. An engaged manual safety will totally prevent any discharge from occurring no matter if it is a finger or a foreign object in the trigger guard.
This additional level of safety and assurance is welcome during all kinds of activity, but most especially when reholstering where the risk of a “crash on landing,” one of the most common ND’s, is very high.
You can try to logically contort around it all day long: a gun with a manual safety engaged is inherently safer to handle administratively than one without. With trigger blocked or disconnected, any mishap that would result in a negligent discharge from an accident or from plain, ol’ human error will be covered by an engaged manual safety.
We never want to make a habit of relying on the manual safety, and the Four Cardinal Rules of Gun Safety are the keys absolute, but should we happen to make a mistake or suffer an accident, the manual safety will back us up. Think of it like a reserve parachute.
A manual safety is also a hedge against a gun takeaway. There are many tales and recorded incidents of cops and some citizens who had their guns taken from them by attackers who proceeded to try and murder them with it.
Guns that feature no manual safety are no impediment at all to the bad guy in this instance assuming they are loaded, and tragedy has followed in the wake of those incidents.
Guns that featured manual safeties were many times credited with saving the victims’ lives since the attackers could not figure out how to make the guns fire.
It is easy to dismiss the above perk as a fringe advantage or one that you would never need take advantage of, but in my opinion there are far, far too many civilian gun carriers who live blithely unaware of how their fight might really look.
Most of us would like to imagine a classical stick-up with some standoff with our attacker squared up to us and in broad daylight on an empty street. Reality shows us that he will be much closer, and the chances that you both will come to grips with each other are high. Do you really think that you’ll never need to defend against a gun takeaway?
A safety does not need to be a pain to use. Many modern and vintage guns have very well designed and placed safety levers that do not require any contortion of the shooting grip to actuate. For many guns, a shooter’s excuse of “the safety is too hard to run!” is just that, an excuse.
A pistol with a properly shaped and located safety is almost effortless to activate, one needs only to put in enough practice to make activating it second nature. The benefits a safety confers, both in a real situation and when handling the gun administratively, is significant, and well worth consideration.
Other Thoughts about Safeties
A pistol that utilizes a manual safety should at least have a good one. What is a good safety? A good safety is one that is ergonomically placed for easy, intuitive activation by the shooting hand thumb (or rarely a finger) and is easily and smoothly moved across its arc of travel before settling into its resting position with a distinct tactile sensation.
A safety that is small, tough to get purchase on and either stiff or mushy in actuation is a liability, and can be fumbled when time is precious.
Most guns with stiff controls like that can be “massaged” into cleaner, crisper function by a competent gunsmith as a pretty simple job, and such operations are well worth the time and money if you plan on sticking with the subject pistol.
Other safety enhancements are things like extended levers in the case of a too small control or a thinned or relieved lever if the stock control is way to prominent.
Lest you think there is no such thing as a too-large safety after I just got done waxing about the hazards of a fumbled attempt at deactivation, think again; a safety lever that is too large is vulnerable to inadvertent activation in the hand and in the holster. The last thing you want is to be babysitting a holstered and safed pistol.
You should also pay particular attention to holster selection when carrying a pistol with a manual safety. An ill-fitting holster or one that is generically sized can allow movement that will engage or disengage the safety without your knowledge.
This is not the end of the world with a double-action pistol but is a significant hazard with a single-action one. If you are carrying a pistol with a manual safety you must place it in a properly fitted holster and check it for function.
An example of an ideally placed thumb safety is the one on the venerable 1911 and its progeny. Located far to the rear on the frame and ideally situated for easy activation with its long lever, the 1911 safety is pushed down into the fire position and up into the safe position, with down being very easy and anatomically correct for the majority of shooters.
This design is echoed in the excellent Smith & Wesson M&P series pistols that feature a manual safety. Designs of this type are very easy to train into and are rarely mishandled once a shooter has take time to practice with them.
Some guns have a similarly located safety in the form of a combination control lever that functions as both a safety and decocking lever when depressed past its on-safe position. The H&K USP and P30 series guns are two well known examples.
Another common and far less favored safety is that of the slide mounted type, best known today from the Beretta M9 and 92 series of guns as well as its younger siblings in the Px4 Storm line.
This type of safety is much maligned as for its seemingly opposite function in contrast to the way our thumbs work (up for fire, down for safe), and for being very easy to accidentally re-engage in the safe position from fire when one is cycling the slide by hand.
Without considerable practice (or knowing the trick) such safeties can be very frustrating and fumble prone.
The aforementioned trick is not to push the safety up and away with the tip of the shooting hand thumb in a hitchhiking type move, but to keep the thumb high and straight and sweep down into the lever as the shooting grip is acquired.
This will quickly and surely pop the safety off much easier than the alternate method. That little trick comes from Beretta guru Ernest Langdon, so I cannot take any credit for that.
Who Should Use a Safety? Who Should Avoid Them?
There is no easy, fast answer here. Generally I can say that shooters who are not going to practice regularly and deliberately with their guns are best served by a design lacking a manual safety; the time investment and repetitions needed to completely ingrain deactivation of the safety upon presentation is a factor.
Similarly, you do not want a gun with a trigger that is too light and too short, since these lesser-trained shooters are far more likely to suffer from a wandering trigger finger.
Shooters who are willing to put in the time to train and then practice with their firearm can effectively use any design, including one with a safety.
It perhaps seems a bit of a catch-22 that inexperienced and less enthusiastic shooters would perhaps receive the most benefit from a manual safety but they are the most likely to bungle it in actual use, whereas seasoned gunhands can make the best use of a manual safety but are the least likely to need it.
For those reasons, I would say that the choice of whether or not you should select a firearm with a manual safety should be boiled down to two essential factors:
1. Understand what is important to you when it comes to your pistol’s functionality. There is no one true answer. If you like the idea of having the extra margin of error and assurance from negligent discharges and gun takeaways that a manual safety can provide, you should consider one.
Conversely if you want deployment of your pistol to be as glitch-free as possible, you should avoid them.
2. Know thyself! If you do not go to the range to practice with your pistol regularly, or get in routine dry fire practice, you should probably skip a manual safety.
Guns with extra steps between “draw” and “bang” commonly betray their wielders when the chips are down. If, however, you make proficiency with your weapons a part of your mission than you should proceed.
There is no special magic you need to harness to utilize a pistol with a manual safety effectively. It is simply a lot of proper repetition and practice presentations.
But these presentations must be done deliberately; sitting there clicking the safety on and off while you watch TV mindlessly is not dry practice, and you should not delude yourself that it is.
Good Pistols with Manual Safeties
There are approximately a billion excellent pistol designs on the market presently. Okay, I am probably exaggerating a bit, but not by much! We certainly suffer no famine of choice and that is to the betterment of all.
No matter what precise, specific combination of features you want, there is a factory option out there to accommodate you.
The following two guns I have listed are some of my favorite designs with proven track records and known for their reliable and consistent performance.
All just also happen to have manual safeties, or at least feature them as an optional variant. It should be said that a safety does not make a pistol good or bad, it is just another feature that one may find value in or not.
Smith & Wesson M&P / M&P Compact with thumb safety
S&W’s flagship striker-fired guns need no introduction, and several of you will have no doubt read my musings on these great handguns here and elsewhere. The M&P was one of the first of later generation striker guns to include a manual safety as a factory variant.
Even then this was seen as something of an oddity, since the handgun market was trending more and more toward extremely simplified and streamlined operation with a minimum of additional steps to perform in the manual of arms both before and after the shot.
It would appear that a decade’s worth of ever lighter, ever shorter striker-fired triggers have left a significant sect of shooters with some concerns; DA/SA guns and striker pistols with manual safeties have reemerged in greater numbers with strong followings.
It turns out that guns bound for real world use beyond Instagram fame like, you know, actually being pointed at people require different solutions than a striker gun with a trigger as short as a mouse click.
The M&P’s safety is identical in placement and actuation to the 1911, that is to say it is excellent. This pistol retains all of its other superb characteristics only with the added function of a manual safety. A great gun.
Beretta Px4 Storm
I know you are scratching your head because I just got done seemingly dogging these pistols up above.
Recall that I did say there is an easy trick to smooth sailing with Beretta’s slide mounted safeties; after you wrap your head around their “backwards” activation, actually activating them is a simple affair, and the movement of the safety lever itself is very positive, with a “just right” amount of force needed to defeat the detent at either end, and a crisp, fast, slick travel.
The Px4 was apparently the sleeper DA/SA gun of the decade, and is earning a reputation only now as a soft-shooting and reliable service handgun after languishing in obscurity here stateside.
If you don’t mind its top-heavy looking slide, the Px4 is a light, highly modern polymer DA/SA gun that also features a manual safety as a factory variant. Expect to see these gain more steam with dedicated double-action shooters as time goes on.
Conclusion
A manual safety is not a padlock to hamper you getting the pistol into action nor is it a panacea against negligent discharges. It is, like anything else on a pistol, a device to help you control the gun and make it work for you, not against you.
Manual safeties are not for everyone, and they do require training and practice to get the most from them, but what they do offer cannot be gained in any other way.
A lot of people spend thousands of dollars on firearms and accessories, but when it comes to training or protecting their investments, they tighten up. A good hard case may cost a couple hundred dollars but will probably save you money and heartbreak in the long run. Think of it as insurance; if you take your rifle to the range, travel, or fly, a good case is a must have.
By J. Bridger, contributing author to Survival Cache and SHTFblog
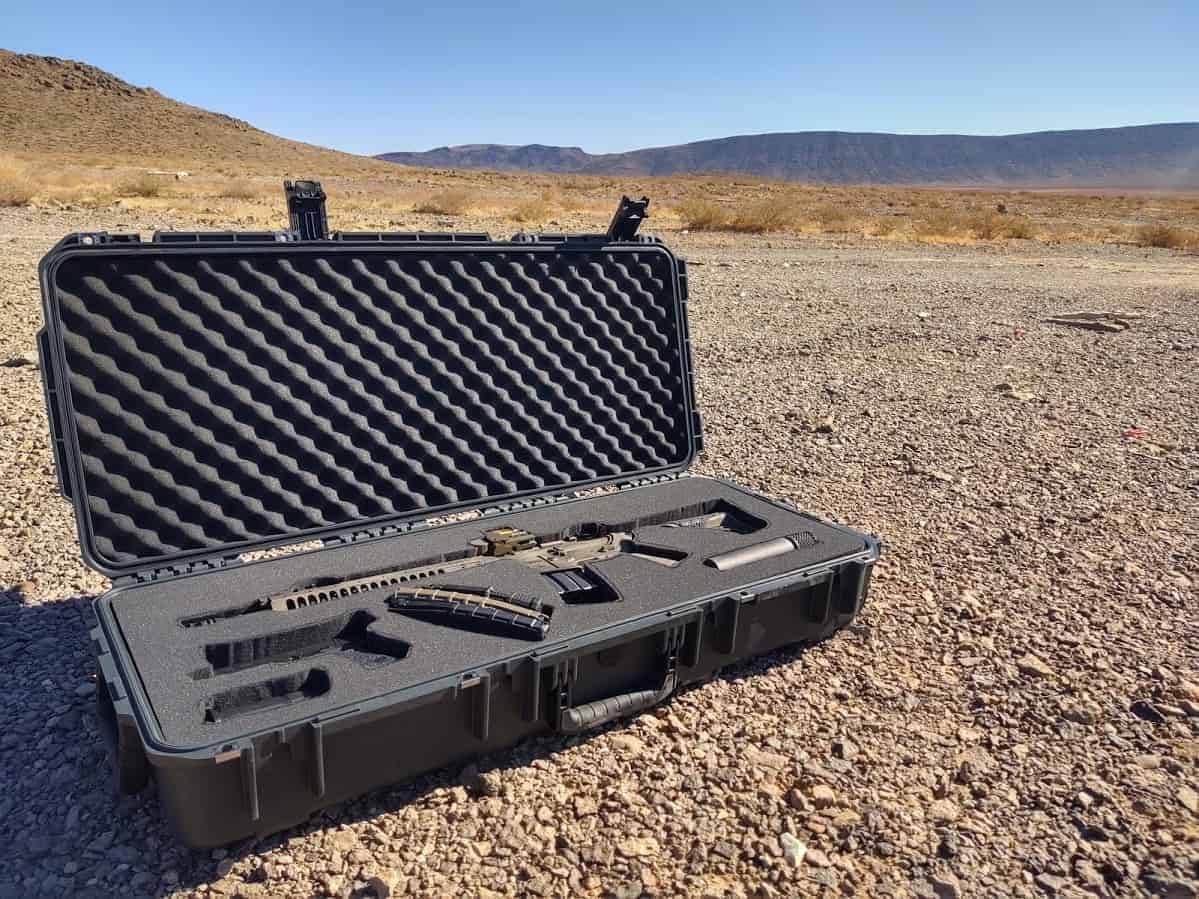
Enter the 5.11 Tactical Hard Case. Taking this case out of the box, it was obvious right away that it is very well-made. It looks great. It has four beefy hinges and four latches. The outside dimensions are approximately 38.5”x 17”x 7″, and it weighs a hair over 17 pounds when empty (this differs slightly from the website specs). The case is injection molded from high strength polypropylene co-polymer resins. It is dust proof, crush proof, and watertight. The lid has foam glued inside. There are two removable foam inserts – one 1.75” thick, and one foam pad 0.5” thick. With inside dimensions of 36.5”x 14.5”, The 5.11 Tactical Hard Case can easily accommodate a 16” AR style rifle with the stock retracted, and its associated goodies.
The 5.11 Tactical Hard Case has two wheels on one end. I’ve never used a roller bag, but I could get used to this! It’s much easier to roll than carry, especially if you’re walking a long way in an airport. There are 4 metal reinforced padlock holes, and a pressure valve to regulate pressure inside the case. This is for pressure changes due to elevation and temperature fluctuation, to prevent damage to the case. The case surpasses current applicable Military Standards MIL-STD-810G and MIL-STD-648C.
The 5.11 website says this Tactical Hard Case is waterproof (to MIL-C-4150 Standards), even if fully submersed. As soon as I read that, I knew I’d have to test it out! Here’s some knowledge for you: Archimedes’ principle says the buoyant force exerted on a body in a fluid is equal to the weight of the fluid it displaces. Water weighs 62.4 pounds per cubic foot. If you have a box that displaces 1 cubic foot of water, you would have to put 62.4 pounds of force on that box to submerge it. That means, since this case is 38.5”x 17”x 7”, or 2.65 cubic feet, it would take 165 lbs to fully submerge it. Because the case weighs 17 pounds, assuming the case was a perfect rectangle, and with my weight being a lean 160 pounds, well, the case should sink if I stood on it. So, in theory, you can load this 5.11 case down with as much gear as you want (short of lead ingots) and it will still float. (And you probably didn’t think you’d learn anything here today). I filled the tub and tossed the case in. It floated without any problem. I stood on the 5.11 rifle case to submerge it, and waited until I got bored, which honestly didn’t take long. I took the case out of the bath, and upon opening, found that everything inside had remained bone dry. From what I’ve tested, you can rest assured this case is waterproof. However, it did sink under my weight, so you will need to buy a separate stand-up paddle board.
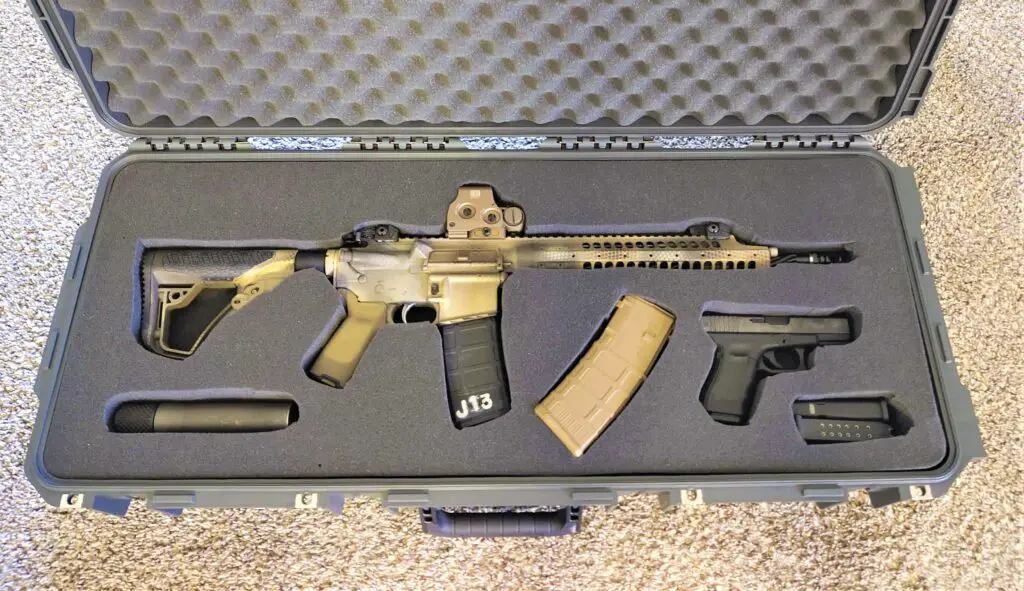
Using this case is absolutely a delight! I use it to carry my guns to and from the truck when I go shooting in the desert. It fits behind the seats perfectly. I don’t have to worry about my optic going out of zero while it’s getting banged around on dirt roads. It keeps the harsh Vegas sun off my fine Rust-Oleum finish and the dust out of my Glock magazines. The handles are decently sized, well placed, and comfortable. People think the custom looking foam cutouts are right out of a John Wick movie (excellent Instagram material, btw). This 5.11 hard-sided case is light years ahead of my soft case. If you have the means, you absolutely should treat yourself.
Cutting the Foam
To cut a silhouette of your firearm and accessories, you should start by placing them on the foam to get an idea of how much room you have and how you will arrange them. I tried to keep at least two inches of foam between items, but it didn’t always work out. That’s okay. I arranged my goodies on the foam mirrored from how I wanted them; that way the sharpie lines wouldn’t be facing up. There are several ways you can cut the foam. You can try a long-bladed utility knife, filet knife, electric knife, or a hot wire. I decided to use an electric knife from Walmart, just to make my life easier. It was only $15, and it gave me an excuse to look at gun magazines and buy a corndog. The electric knife made cutting the foam a breeze. Don’t force the blade through the foam, just let it do its thing and trace slowly around the inside of your lines. If you cut exactly on your lines, the cutout will be too big. I recommend cutting at least ¼” inside your tracing. When you pull your firearm from the case, the top layer of foam may come out with it. You can glue the top layer to the layer underneath, if you wish. Spray glue or Gorilla Glue are two options I am considering.
Flying with a Firearm
There are a lot of reasons to fly with a firearm. A hunting trip, a training course, so you can carry your CCW at your destination, or just for the hell of it. It still is America, after all (in most places). Because the 5.11 Tactical Hard Case is a lockable rigid case with wheels, it is perfect for transporting via aircraft. Flying with a firearm is still easier than you might think.
First, check your local laws. Some places are not as gun friendly as others (we all know where I mean). Just to be clear, you cannot bring a firearm in your carry-on bag…even if you have a CCW, and even if the firearm is locked up. You cannot take magazines, gun parts, or ammo in your carry-on bag. However, per the TSA website, you CAN take rifle scopes in your carry-on bag.
Secondly, I would definitely check your airline’s website. They may have specific information on how much ammunition you can bring with you, and where and how to declare your firearm.
Lastly, you need to check your firearm when you get to the terminal. I strongly dislike checking bags, but in this case, you will have to. This is a pretty easy process. All you must do is declare the case and firearms at the ticket counter. The idea of carrying my firearm into an airport made me pretty uneasy the first time; these days, people lose their minds over gun shaped Pop Tarts (I’m not kidding). Just be sure to keep the firearm locked up. You can call ahead at the airport if you gives you a warm and fuzzy.
When you arrive at your destination, all that’s left is to pick your firearms case up at the baggage claim at your destination. Just to be on the safe side, I take a picture of everything in the case and make sure I have the serial numbers written down. If you have a personal article policy through your insurance provider, they may cover your goods in the event something happens. Regarding locks, per the TSA website, “Only the passenger should retain the key or combination to the lock unless TSA personnel request the key to open the firearm container to ensure compliance with TSA regulations.” The TSA also states: “You may use any brand of or type of lock to secure your firearm case, including TSA-recognized locks.”
As far as ammunition goes, the amount you can fly with varies by airline. 11 pounds seems to be pretty standard. That’s about 350-400 rounds of 5.56 NATO or 9×19, give or take (despite their size differences, the two cartridges are pretty close in weight). The ammunition must be completely enclosed in a box (cardboard, plastic, etc.) or magazine. I take that to mean Magpul P-mags with the dust cover in place are OKAY, but aluminum GI mags that are open at the top are NOT okay. The TSA agent of the day will have the final judgement call on that. The ammunition can be transported in the same case as your firearm, and the firearm must be unloaded (no magazine inserted).
Back To Your Regularly Scheduled 5.11 Tactical Hard Case Review
If you can afford a good rigid case, I highly recommend it! A hard case will make your life easier and will help you exercise your second amendment rights away from home. 5.11 also carries 42” and 50” rigid cases for your longer hunting rifles or shotguns; they even offer handgun and camera sized rigid cases. If you’d like something soft with more storage, 5.11 offers options for you as well. And here’s my favorite detail: they’re made in the USA!
What do you think? Does a hard sided case make your SHTF plan or get daily use? Sound off in the comments below!
MIL-C-4150J, MILITARY SPECIFICATION: CASES, TRANSIT AND STORAGE, WATERPROOF AND WATER-VAPORPROOF (29 NOV 1989). Scope: This specification establishes the requirements for rigid, reusable, fire retardant, waterproof and water-vapor proof, rectangular cases manufactured from ferrous or non-ferrous metals or non-metallic materials.
MIL-STD-648C, DEPARTMENT OF DEFENSE DESIGN CRITERIA STANDARD: SPECIALIZED SHIPPING CONTAINERS (11 FEB 1999). Scope: This standard establishes general design guidelines and associated tests for specialized shipping containers used by the Department of Defense. Definitive requirements for specific containers will be defined by the individual specification, acquisition, or task order. This standard is intended to be used as the basic reference document in all specifications and standards prescribing performance requirements to be applied to a shipping container.
MIL-STD-810G, DEPARTMENT OF DEFENSE TEST METHOD STANDARD: ENVIRONMENTAL ENGINEERING CONSIDERATIONS AND LABORATORY TESTS (31 OCT 2008) (24 MB)., Scope: This standard contains material acquisition program planning and engineering direction for considering the influences that environmental stresses have on materiel throughout all phases of its service life.
A boot full of blood. Tenons and bones severed. A tourniquet to stop arterial bleeding.
After watching the video footage of the ax striking my foot, all of the above should have happened but didn’t. I kept working on the log cabin. In fact, a whole month passed before a coworker noticed and asked how I sliced my boot.
“Huh?”
“Your boot. How’d you cut it?”
Inspection at school.
I really had no idea. I would have remembered almost lopping my foot off. No recollection of me bent down like a toddler filling his diaper, mouth gaping in terror, in search of blood. I racked my memory.
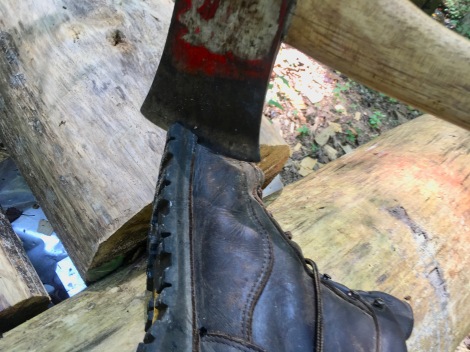
An axman should remember and learn from close calls. I dug into old video footage and found the ax-boot encounter.
In all my years of swinging axes, I’ve never been bit seriously. Blood has dripped from minor nicks while handling an ax or in the sharpening process. But never in full swing.
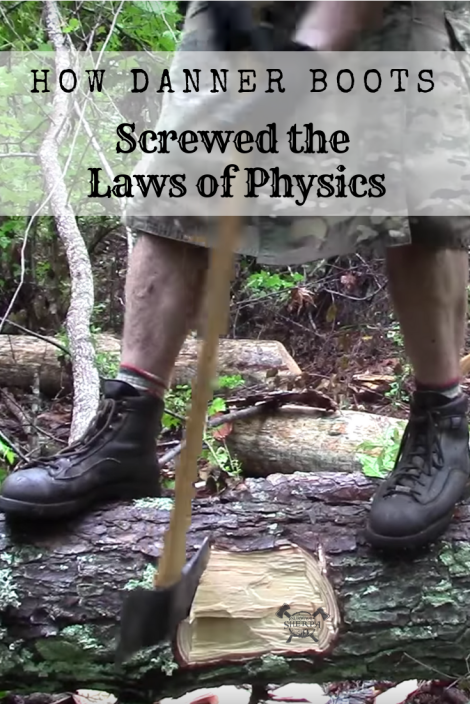
At the 1:22 mark in the video below, you’ll see how I violated the Frontal Zone Rule by dangling my foot over the log like bait over the rail of a deep-sea fishing boat.
Did Danner Defy Physics?
Newton’s Third Law of Motion states that for every action, there is an equal and opposite reaction. Forces occur in pairs. Each force is of equal strength but in opposite direction. Even though the two forces are equal, this does not mean that they will cancel each other and stop movement.
Nothing defies the physical laws of nature except comic book superheroes. My Explorer boots reached Superman status after stopping a speeding ax.
Dan, a buddy of mine, said I should bronze the boots and place them on my mantle as a family heirloom. He has a good point. Even with the ax gash, I still wear them to school everyday to teach traditional outdoor skills. On weekends building my log cabin, they remain watertight and too comfortable not to wear.
Boots still on the ground in our outdoor classroom.
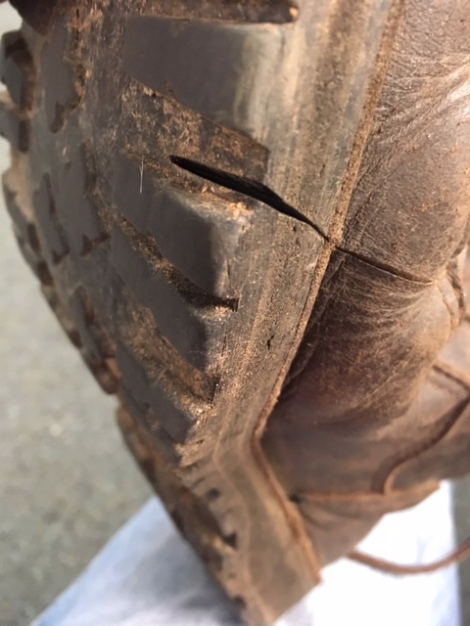
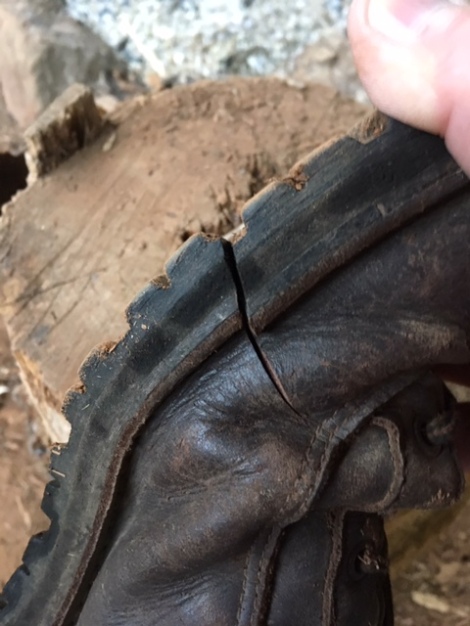
American Made Craftsmanship
I keep my working axes honed and shaving-sharp. The ax strike separated the inside edge of my boot sole, surgically splitting one stitch, and slicing the leather upper. I really expected the adjacent stitching to begin to fail. Two and a half months of daily wear since the ax-ident and not a stitch has unravelled. These Superman boots are built to last. Thanks to Danner’s superior, Made in America craftsmanship, my foot is not a nub!
Thank you, Danner!
Buy Once, Cry Once
“Price is what you pay and value is what you get.”
~ Warren Buffet
Buying high quality boots is like old-fashioned window shopping. The item catches your eye. You really want it. Then you see the price tag. There’s no way you can pay that price. But you still go out of your way to walk past that window daily to get another look and dream of owning the thing.
Your desire hasn’t changed, you’re just not willing to pay the price.
Price is painful once but value lasts long-term. You see, I wanted a pair of high-quality, American-made boots, that could be resoled after many years of tramping in the woods. Even after the ax sliced my boot, not one tear rolled down my face. My foot is worth more than the price of these fine boots! I’m a lifetime customer now. If Danner can’t re-craft the sliced leather upper, I’ll continue to wear them as a sober reminder while swinging axes.
Fit, Finish, Break-In
Opening the box and holding these brand new boots made me smile. The seams were double-stitched with precision. One feature I like about these Explorers is the minimum amount of seams in the boot. This can only reduce the chances of leakage or snags when tramping through rough terrain and bogs. Even the laces are made of quality material.
The Vibram sole grips wet and dry soil like a mama hugging her son returning from war. The wide rubber sole adds stability and amazing traction. I typically trim pine bark off the top of logs where I’ll place my feet when under bucking with my double bit ax. This step is not needed since I bought the Explorers. The aggressive treads hold my feet in place securely on the bark. The only surface I’ve found they don’t grip is freshly peeled inner pine bark (see above blooper video). A man would need hobnail boots to stand on this slick stuff!
Nature’s slippy slide
I kept an old pair of boots in my truck the first week I wore my Explorers. Never needed to use the spares. No hot spots on my heels or other suspected pressure points I would normally feel from snug fitting leather boots. I played around with the lacing to fine tune the fit over that first week. The full-grain leather upper began mating to my feet like the soft breath of wool socks on a winter day. These rugged boots love my feet and punish rocks and roots – even axes.
If you want a boot that can handle the rigors of building an off-grid log cabin, rugged backwoods adventures, and still look good at the office, pay the price and get yourself a pair of Explorers. If you want lightweight, synthetic, Vegan friendly, foreign-made footwear, look elsewhere. Danner Explorer full-grain leather bootsare handcrafted from top to bottom in Portland, Oregon (Made in USA).
One of my grandsons will receive my Superman boots when I’m gone with the story of how they saved my foot that hot July day in Georgia.
P.P.S – If you find value in our blog, Dirt Road Girl and I would appreciate your vote on Top Prepper Sites! You can vote daily by clicking hereor on the image below. Check out all the other value-adding sites while you’re there…
Note – I am bringing this around again for two reasons. First this item is currently on sale at 36% off with a total savings of almost 15 bucks. Also this would make a great Christmas gift for any coffee …Continue reading →
Need a helping hand to cut the chores at home? For busy professionals, having a robot cleaner at home frees you from the hours of cleaning which you could have …
Hello Pack. Winter has arrived on our survival homestead folks, or at least it feels like it. Only in Ohio could you go from wearing sleeveless clothing to cracking ice in a poultry waterer in such a rapid amount of time. One day this past week we had 60 degree weather, the next day we had temperatures below freezing. In this state, you better be prepared for multiple season wardrobe changes in…


 A lot of people spend thousands of dollars on firearms and accessories, but when it comes to training or protecting their investments, they tighten up. A good hard case may cost a couple hundred dollars but will probably save you money and heartbreak in the long run. Think of it as insurance; if you take your rifle to the range, travel, or fly, a good case is a must have.
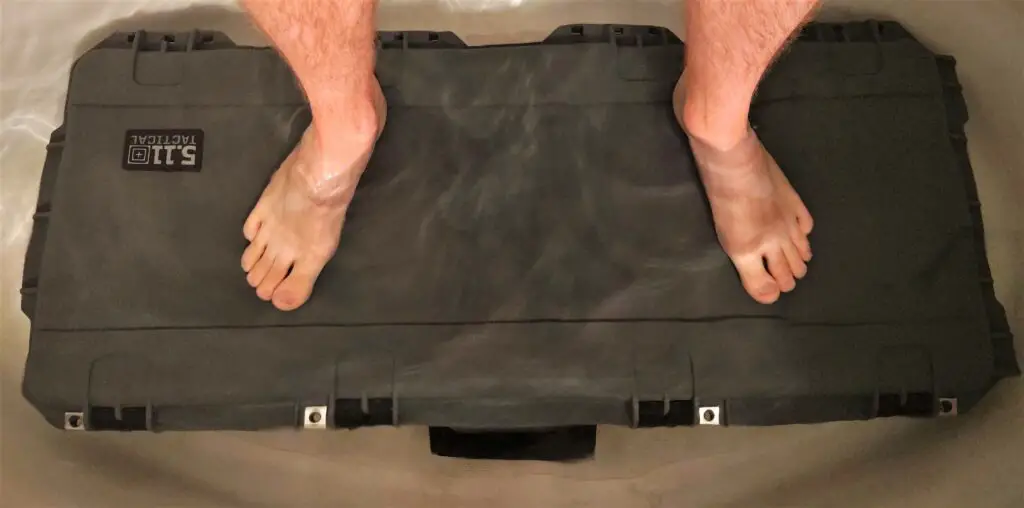 The 5.11 website says this
 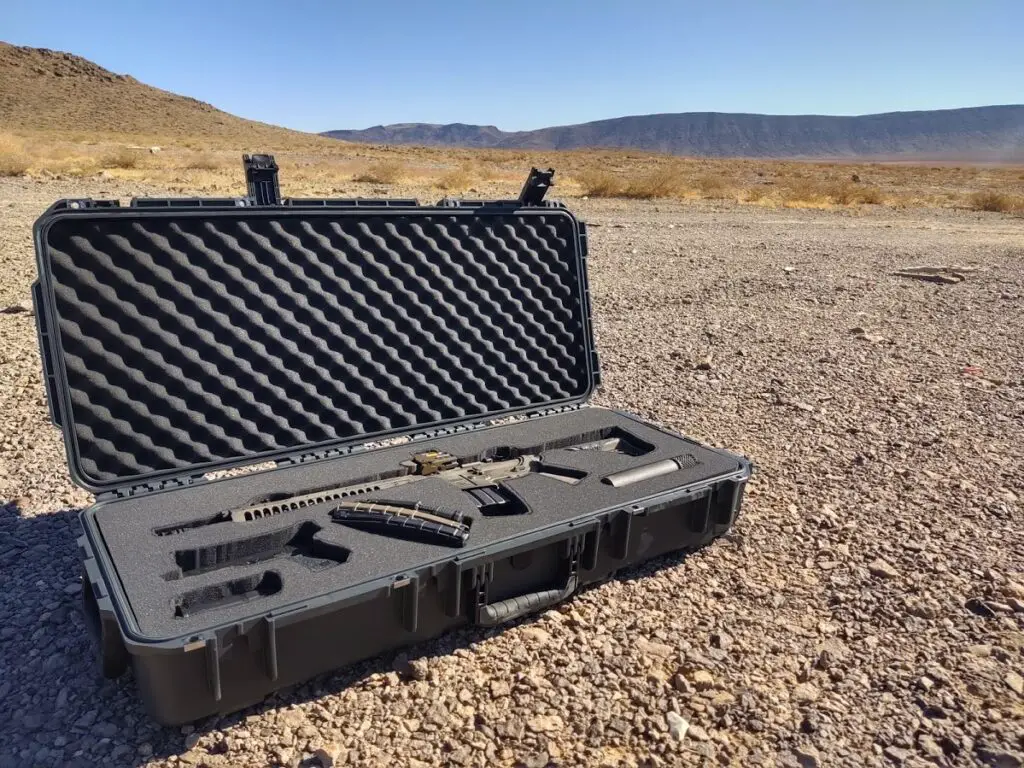 Using this case is absolutely a delight! I use it to carry my guns to and from the truck when I go shooting in the desert. It fits behind the seats perfectly. I don’t have to worry about my optic going out of zero while it’s getting banged around on dirt roads. It keeps the harsh Vegas sun off my fine Rust-Oleum finish and the dust out of my Glock magazines. The handles are decently sized, well placed, and comfortable. People think the custom looking foam cutouts are right out of a John Wick movie (excellent Instagram material, btw). This
 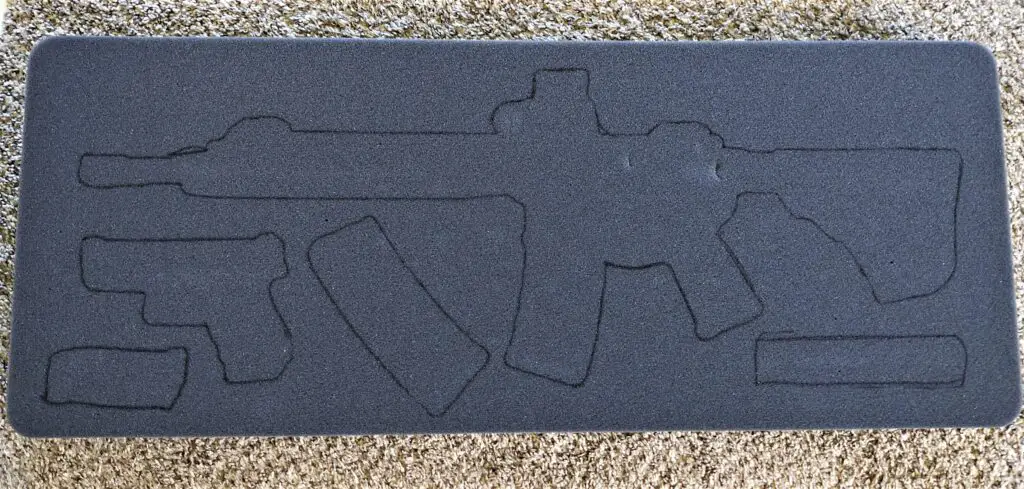 To cut a silhouette of your firearm and accessories, you should start by placing them on the foam to get an idea of how much room you have and how you will arrange them. I tried to keep at least two inches of foam between items, but it didn’t always work out. That’s okay. I arranged my goodies on the foam mirrored from how I wanted them; that way the sharpie lines wouldn’t be facing up. There are several ways you can cut the foam. You can try a long-bladed utility knife, filet knife, electric knife, or a hot wire. I decided to use an
 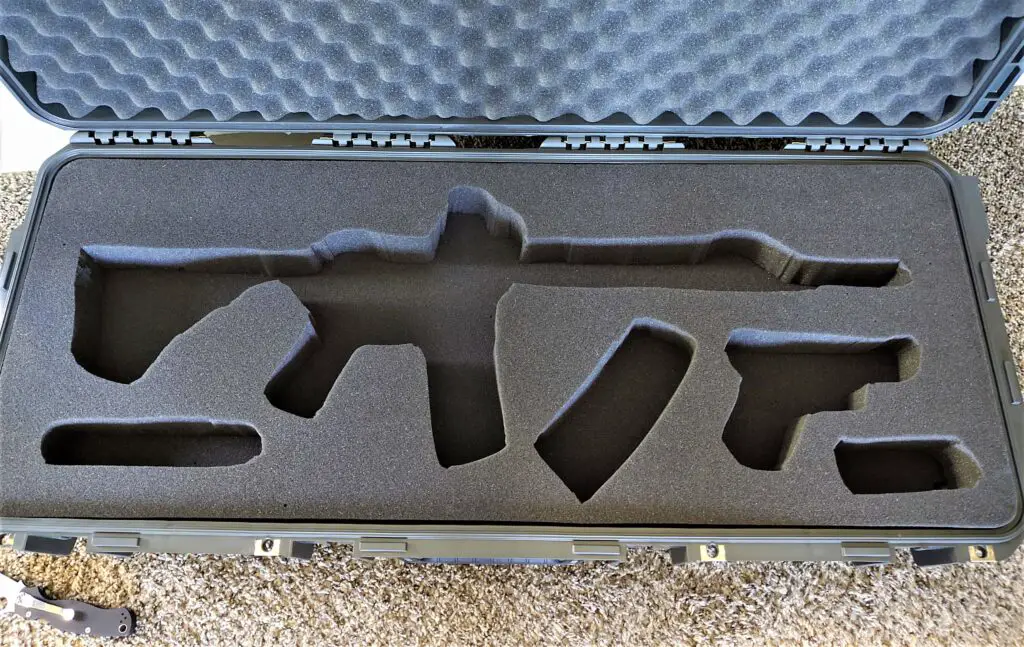 The electric knife made cutting the foam a breeze. Don’t force the blade through the foam, just let it do its thing and trace slowly around the inside of your lines. If you cut exactly on your lines, the cutout will be too big. I recommend cutting at least ¼” inside your tracing. When you pull your firearm from the case, the top layer of foam may come out with it. You can glue the top layer to the layer underneath, if you wish. Spray glue or
 First, check your local laws.
 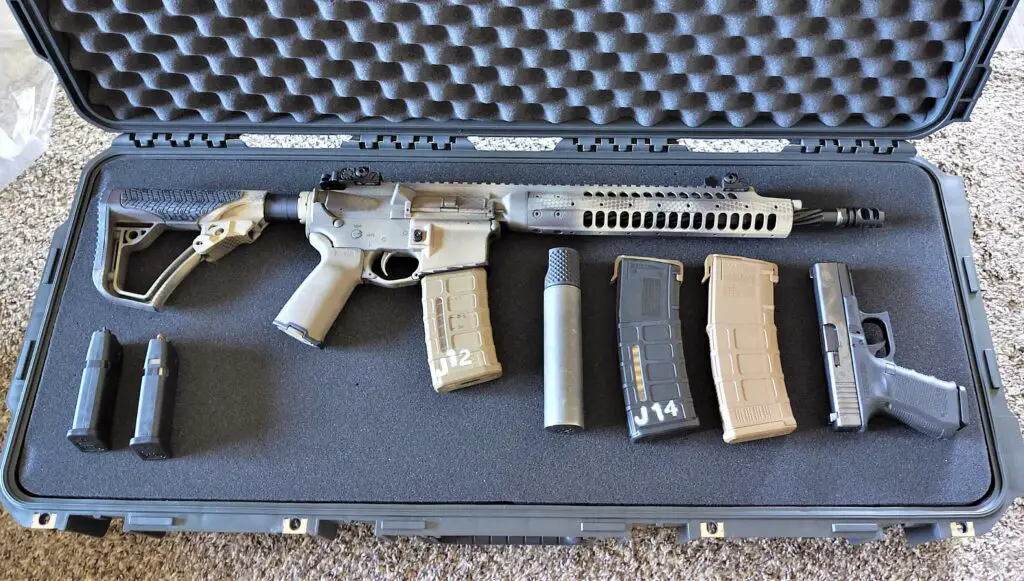 When you arrive at your destination, all that’s left is to pick your firearms case up at the baggage claim at your destination. Just to be on the safe side, I take a picture of everything in the case and make sure I have the serial numbers written down. If you have a personal article policy through your insurance provider, they may cover your goods in the event something happens. Regarding locks,