Fire Safety

Isobaa Merino Women’s 180 Long Sleeve Crew

Isobaa Women's Merino Base Layer: Off-set shoulder seams

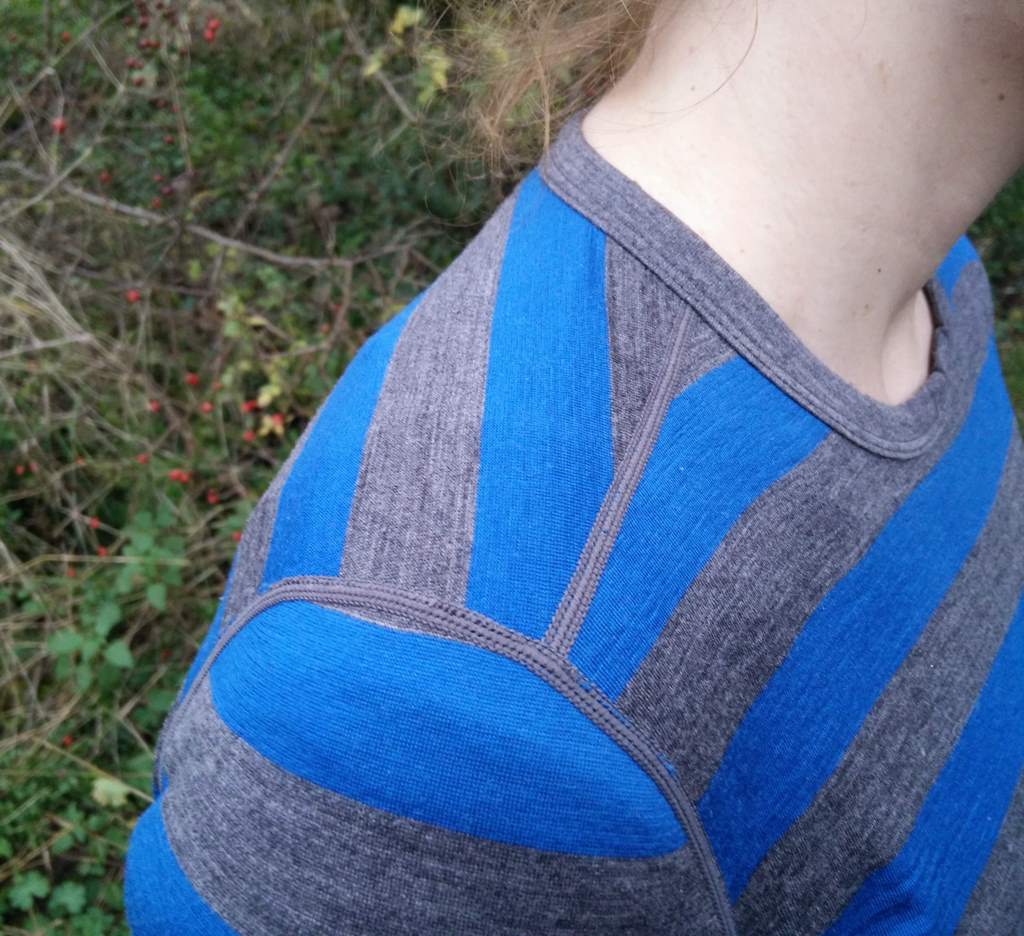
Isobaa Women’s Merino Base Layer: Off-set shoulder seams

At Best Hiking we can’t get enough of Merino base layers, but so far it has mainly been base layers for men we have been asked to test and review. Therefore, I was head over heels when I got the opportunity to test the Isobaa 180 crew-neck base layer. I really appreciate the brand’s philosophy on sustainability where they advise their customers to not “be sheepish, purchase with purpose” and “wear longer, wash less, reduce your impact”. This is exactly what we advise our readers to do in the article How to reduce the environmental footprint of your outdoor clothing. Isobaa has also taken the ethical choice of only sourcing the Merino wool from sheep which have not been subjugated to the painful mulesing process. Furthermore, the brand’s garments come in packaging made of recycled materials – in this case, a cute egg tray-like box in which I now keep envelopes and stamps.

I received the Isobaa base layer in late summer – a perfect time to begin testing this long-sleeved mid-weight Merino top. I have since then worn it both on hikes and in everyday life, and concluded that the Isobaa Merino 180 Long Sleeve Crew is suitable for:

  • Hiking
  • Mountaineering
  • Backpacking
  • Trekking
  • Travelling
  • Climbing
  • Everyday use

Material

The Isobaa Merino 180 crew-neck base layer is, as the name indicates, made of 100% Merino wool with a fabric density of 180 g/m2 which makes it a mid-weight fabric, albeit in the lighter end. The Merino fibers used for the fabric are of the superfine quality by being just 18.5 micron in diameter. Being 100% Merino wool, this high-quality fabric of course has all the qualities listed in the article Why you should wear Merino Wool – like softness, breathability, anti-microbial (anti-odor) properties and natural UV protection.

Since it is a mid-weight base layer, I would recommend it for all seasons but summer – although those sensitive to cold might wear it when the rest of us would go for a light-weight Merino fabric (<150 g/m2). In general, Merino wool keeps you warm when it’s cold and comfortably cool when it’s warm (but not hot hot) weather. The Merino fabric is also quite stretchy which proved to be crucial for me fitting into the base layer both before and after the birth of my first child.

Comfort, fit and sizing

I was almost eight months pregnant when I received the Isobaa base layer and was thus a bit anxious whether I really would fit into the size M that I had asked for – and if so, if I would fit into it after giving birth as well. My fears turned out to be groundless as the top fitted me perfect both before and after birth due to it being rather long in the torso and the fabric being quite stretchy. I gained around 14 kg (31 lbs.) in total during my pregnancy but had lost 10 of them already a week after the birth. With the majority of the extra weight centered on my mid-section, one could fear that the base layer would be too tight or short, but the stretchiness of the Merino fabric turned out to be just right. In fact, I ended up wearing the Isobaa top a lot during the last weeks of my pregnancy as it was one of very few tops which I could fit comfortably into while having my protruding belly covered. The Isobaa base layer is indeed rather long in the torso which was particular great during my pregnancy – but also afterwards as I’m a bit taller (1.73 m/ 5’8’’) than the average European woman.

I measured the length of the side seam from the hem and up to the armpit to compare it with the length of my other base layer tops, and sure enough – the Isobaa is 5-8 cm (2’’-3’’) longer than all of them. In addition, the base layer has a drop tail hem for a little extra coverage. The only downside of all this extra length is that also the sleeves are a bit too long for me. It’s of course no problem to simply roll them up at the cuffs, but the right cuff has Isobaa’s cute sheep head logo embroidered so it’s bit of shame having to roll it up. All in all, the extra length will probably be appreciated by taller persons while the petite should go for the smallest size they can possibly fit into.

Functionality

As such, the Isobaa womens base layer just looks like another long-sleeved crew neck top in a high-quality material, but it has several small but functional details which makes it even more comfortable to wear for outdoor activities as well as everyday use. Firstly, it utilizes flatlock seams which are crucial to avoid chafing when wearing a rather snug-fitting base layer as this is. The shoulder seams are also off-set in order to minimize any painful rubbing when wearing a (heavy) backpack.

There are also underarm gusset panels to avoid having any seams chafing the sensitive skin in the armpits. Now, these gussets are made of a solid color (grey) fabric while the rest of the base layer is a grey/blue striped fabric, and I couldn’t help but think if sweat stains would be more or less visible if the gussets were made of the same fabric as the rest of the shirt… Maybe Isobaa researched it? In any case, the gussets provide good freedom of movement, and the drop tail hem prevents the top from riding up – even if you have to stretch while climbing, scrambling etc.

Isobaa has also eliminated the potential of any chafing from labels as the neck logo and washing instructions are printed directly on to the fabric itself. There is only a folded hem logo label and the embroidered sheep head logo at the right cuff which didn’t bother me the slightest.

Washing and drying

As usual with Merino garments, the Isobaa base layer should be washed in cold water (30⁰ C or less, whether by hand or machine) and air-dried, preferably flat. You should avoid using fabric softener and bleach and tumble-drying the garment – especially the latter will significantly decrease the lifespan of any Merino garment. Isobaa also has a page dedicated to describing how to best care for their apparel where you can for example read about a trick to avoid piling on the wool fabric – which is to occasionally wash your Merino garments with apparel of coarser fabrics such as denim, as this will help to remove loose fibers and keep the surface smoother. I didn’t know this trick, but I will definitely try it out as I can’t stand piling on any garments. For now, however, there is no such problem with the Isobaa base layer, but I will of course update this review, if there should come any durability issues later.

Verdict

I was so happy with the Isobaa 180 base layer that it has become a staple in my wardrobe – both for outdoor activities and everyday use. I think it will slowly but securely take over from my other Merino base layer which was the patient under scrutiny in the article How to repair Merino garments, but is slowly unravelling, nevertheless. No Merino garment will last forever, but with proper care a high-quality base layer like the Isobaa 180 crew neck will last for several years.

If you have any questions about this product, drop me a line in the comments below.

Isobaa Women's Merino Base Layer: From the side

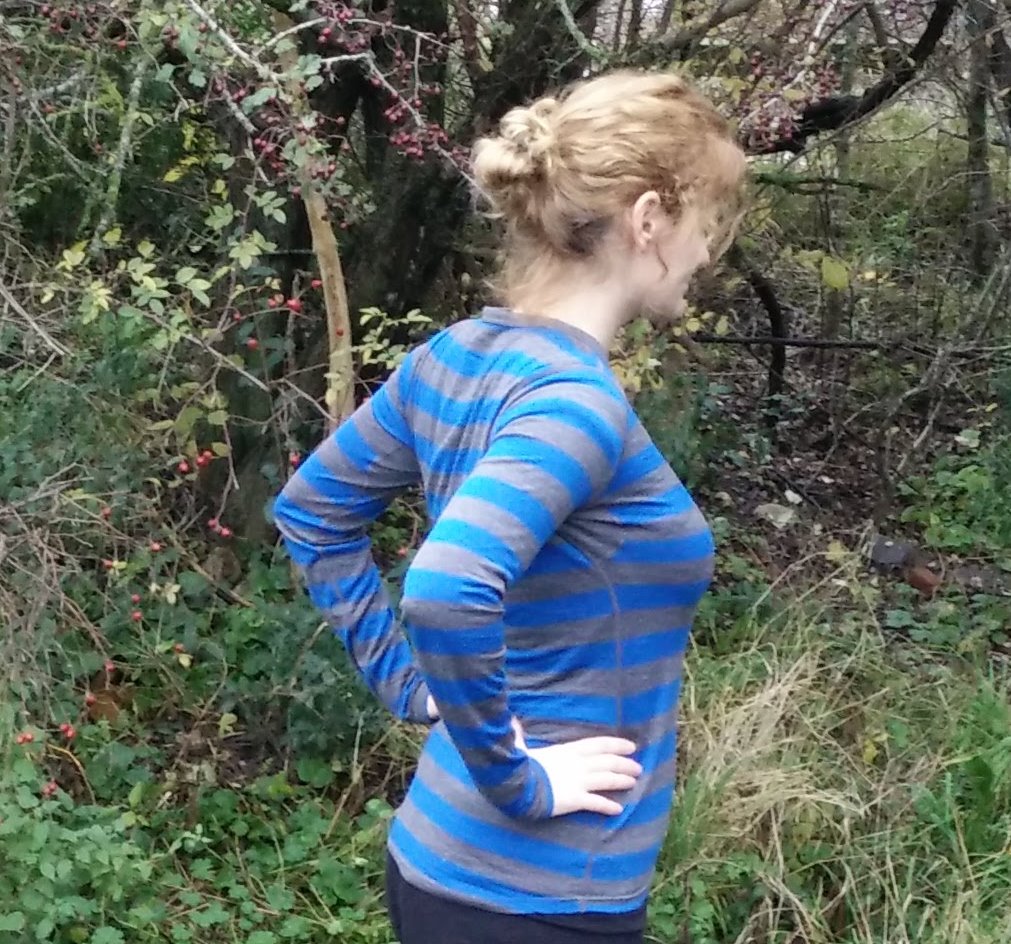
Isobaa Women’s Merino Base Layer: From the side

Isobaa Women's Merino Base Layer: Drop tail hem

Isobaa Women’s Merino Base Layer: Drop tail hem

Isobaa Women's Merino Base Layer: The sleeves are slightly too long

Isobaa Women’s Merino Base Layer: The sleeves are slightly too long

Isobaa Women's Merino Base Layer: Embroidered logo at right cuff

Isobaa Women’s Merino Base Layer: Embroidered logo at right cuff

Isobaa Women's Merino Base Layer: Underarm gussets

Isobaa Women’s Merino Base Layer: Underarm gussets

Isobaa Women's Merino Base Layer: Hem logo label

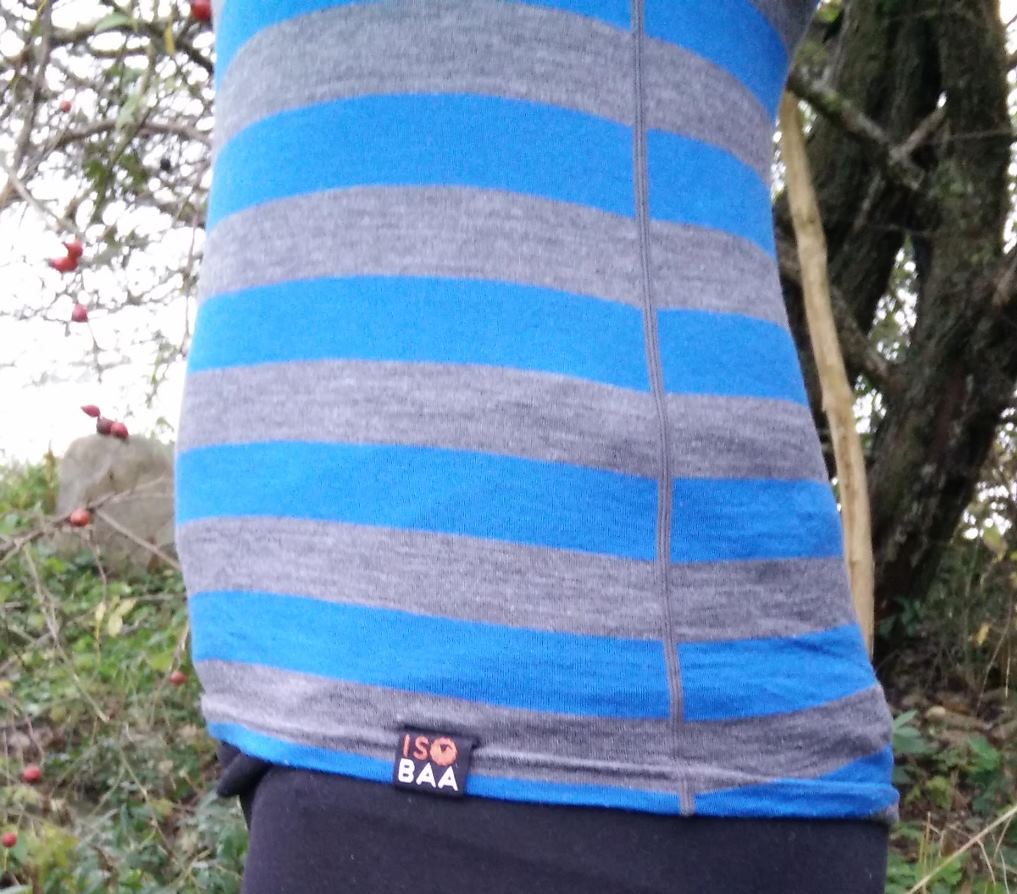
Isobaa Women’s Merino Base Layer: Hem logo label

Isobaa Women's Merino Base Layer: Neck logo and flat-lock seams

Isobaa Women’s Merino Base Layer: Neck logo and flat-lock seams

Isobaa Women's Merino Base Layer: Washing instructions

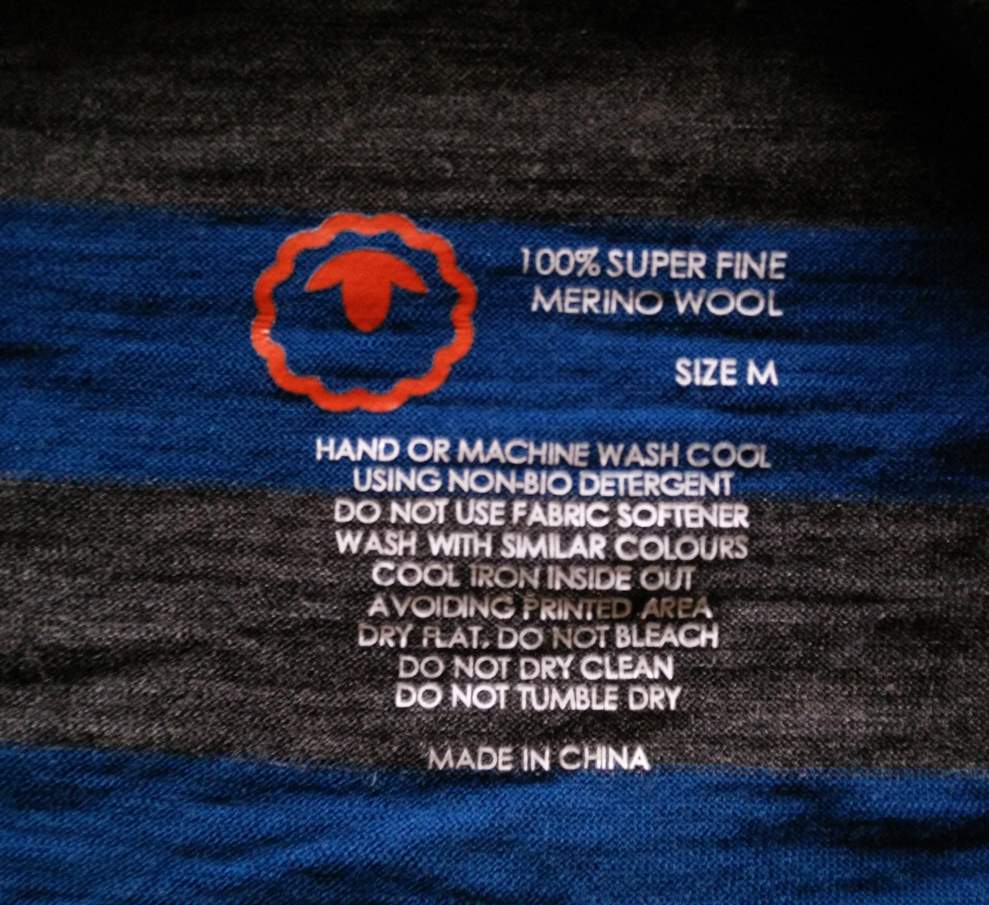
Isobaa Women’s Merino Base Layer: Washing instructions

Rating

Design
Quality
Comfort
Functionality

About Rating

Pros:

  • Quality
  • Breathability
  • Moisture-wicking
  • Droptail hem
  • Soft and smooth fabric
  • Torso length

Cons:

  • Slightly too long sleeves


Details

Tested by: Laura P.

Review date: 2019-11-07

Product: Isobaa Women’s Merino 180 Long Sleeve Crew

Final rating: 5 out of 5

{
“@context”: “http://schema.org”,
“@type”: “Product”,
“brand”: {
“@type”: “Organization”,
“name”: “Isobaa”
},
“image”: “https://besthiking.net/wp-content/uploads/2019/11/7.-Off-set-shoulder-seams.jpg”,
“name”: “Isobaa Women’s Merino 180 Long Sleeve Crew”,
“review”: {
“@context”: “http://schema.org”,
“@type”: “Review”,
“author”: {
“@type”: “Person”,
“name”: “Laura P.”
},
“creator”: {
“@type”: “Person”,
“name”: “Laura P.”
},
“publisher”: {
“@type”: “Organization”,
“name”: “Best Hiking”
},
“reviewRating”: {
“@type”: “Rating”,
“ratingValue”: “5”,
“bestRating”: 5,
“worstRating”: 0
},
“datePublished”: “2019-11-07”,
“name”: “Isobaa Merino Women’s 180 Long Sleeve Crew”,
“headline”: “Isobaa Merino Women’s 180 Long Sleeve Crew”,
“itemReviewed”: {
“@type”: “Thing”,
“name”: “Isobaa Women’s Merino 180 Long Sleeve Crew”
}
}
}

How helpful was this post?

Click a star to rate it!

1 vote(s) so far. Average rating 5 out of 5.

Post Author

Post Author

Laura P.

I loved to climb trees when I was a child – as an adult I use these skills for climbing and scrambling up mountain sides! I always wear a Merino baselayer, sunscreen and my hair tousled.

You may also like…

The post Isobaa Merino Women’s 180 Long Sleeve Crew appeared first on Best Hiking.

Isobaa Merino Women’s 180 Long Sleeve Crew Read More »

Cravat Bandaging: Series Post IV

A Guest Blog Post by Jim Ausfahl

Disclaimer: This material has been modified
from the public domain US
Military field manual, FM 5-80.

As a reminder, the triangle bandage is a piece of cloth, often unbleached muslin, that is a right triangle with legs about 40″ (102 cm) long, and a hypotenuse, or long side, around 56.6″ (144 cm). It is folded on itself three times to make a cravat bandage. Remember: for all wounds, the first thing to do is to control the bleeding, clean and cover the wound with gauze padding, and if it is available, some antibiotic ointment. The bandage is used to lock the gauze in place. In looking at the bandaging below, it will be assumed that has already been done.  This time, we’ll be bandaging the head and its associated structures; some of these will require two cravats.

THE SCALP

Bandaging the scalp is only
modestly more challenging than what we’ve already done.  Begin by folding the long edge over itself
three times, about an inch or an inch and a half wide.  Having done that, drape the bandage over the
scalp, with the right angle going down the back of the neck and the middle of
the folded part over the forehead.  Bring
the two ends of the folded part behind the head and to the middle of the scalp.  To minimize the risk of this slipping up, put
the folded part under the occiput—that’s the bump you can feel on the back of
your skull.  Tie a square knot in the
middle of the forehead to anchor the bandage. 
Then, take the right angle and fold it up, tightening the part over the
scalp then tucking the end into the folded part. If possible, and pinning it in
place with a safety pin It is much clearer if you look at the diagram below

Bandaging the Scalp

Clearly, this bandage not only will handle the scalp, it will do well for the forehead and the back of the head as well.

THE HEAD or EAR

There is an alternative approach
to bandaging the head, which would be used for the back of the head, the sides
of the head or the forehead or the ear. 
The bandage needs folded into a cravat. 
Depending on where the injury is, put the middle of the bandage on one
side of the head; if the injury is to the ear, put the middle of the bandage
over the injured ear.  Bring the ends of
the bandage around the other side of the head and back to the first side,
fixing it in place with a square knot.   
For bandaging the ear, the cravat should go up diagonally, to leave at
least one eye uncovered, then back to the bandage over the ear, where the
square knot is tied.  The diagram shows
the bandaging done for the head; adapting this to the ear is simple.

Bandaging the Head or Ear

THE EYE

Sometimes there is need to
bandage an eye. Doing this requires two bandages, both folded into cravats.  Drape one cravat over the head, covering the good eye, so it hangs down the back of
the victim’s neck and down his face. 
Take the second cravat, wrapping around both eyes and over the first
cravat, tying it in the front, over the uninjured eye.  Finally, take the ends of the first cravat
and loop them over the head, tying them on the scalp so that the second cravat
is lifted off the good eye.  The figure below
will help this all make sense.

Bandaging the Eye

THE CHEEK or JAW

Sometimes, there is need to
bandage a cheek, the area below the chin, a small area on top of the scalp or a
need to immobilize a jaw temporarily, as might be for a fracture of the jaw or
a dislocation of the jaw.  A single
bandage, fold into a cravat, is needed. 
Position the cravat under the jaw, with the more distant part of the
cravat a few inches longer than the near one. 
Bring the far side across the top of the head to the temple of the near
side, then twist them around each other a quarter turn, so the two sides are
horizontal, one pointing forward and the other backward.  At this point, the two free ends should be
about the same length.  Take the ends
around the victim’s head and knot them on the other side.  The process is illustrated clearly in the
figure below.

Bandaging the Cheek or Jaw

The next posting will handle bandaging the chest, hip, buttock and shoulder.

Jim Ausfahl is a physician in active medical practice, in Peoria Heights, Illinois, studying the art of surviving in a challenging environment and sharing what he knows.

Cravat Bandaging: Series Post IV Read More »

Garmin Fenix 6 In-Depth Review

Garmin Fenix 6 In-Depth Review

Okay, spoiler alert, the Fenix 6 is a great, if not the greatest, outdoors watch so far. In this review and how-to guide I’m going to focus on the hiking and outdoors applications of the Fenix 6. I’ll be specifically using the Fenix 6x Pro Solar, which I’ve had on my wrist 24/7 since the day it came out. I’ve owned every Fenix model since the 3, and the 6 Pro Solar doesn’t disappoint.

The post Garmin Fenix 6 In-Depth Review appeared first on HikingGuy.com.

Garmin Fenix 6 In-Depth Review Read More »

Compass Training

Women Who Hike Compass Training
It’s hard to be a Hiking Dude if you can’t navigate your way through the wilds. So, I spent my Saturday morning with a great group of Women Who Hike helping them hone their map and compass skills. The morning started a little drizzly but turned into a beautiful fall day to spend out in nature.

We met at a local nature center and spent almost two hours learning what a compass does (and does not do), how to take a bearing, orient a map, read topographic features, find direction without a compass, and following directions for specific distances. I thought it was a pretty packed morning and I really enjoyed meeting some new friends that I hope to see out on the trails.

Much of the information we covered comes from Compass Dude and there is a lot more detailed compass knowledge there, including some activities to try.

Compass Training

Once everyone was comfortable using their compasses, we played a compass game for about 15 minutes. They all said it was helpful in driving home the skills of following a bearing and estimating distance. You can print the Compass Game if interested. The winning pair of women each received a ‘compass’ merit badge.

It was nice that the sun came out to help with telling direction without a compass. We showed the Shadow Stick method, Moon method, and Wristwatch method because GPS devices can run out of electricity and compasses can break on rocks. Being able to estimate directions with no tools might be important some day.

If you’re a woman looking to start hiking, or looking for some friends to hike with, check out the Women Who Hike website or Facebook page. They have chapters in every state and tend to be a very supportive, helpful group.

Hike On!

Compass Training Read More »

Security Information Overload: From Panic to Apathy & the Remedy

Security Information Overload: From Panic to Apathy & the Remedy

Security overload leads to apathy. How often do you hear a car alarm go off and roll your eyes hoping the owner would disable the blasted thing before the incoming headache comes a knocking? The primary objection I have to such systems is they work too well. Every week I hear an alarm being triggered […]

This is just the start of the post Security Information Overload: From Panic to Apathy & the Remedy. Continue reading and be sure to let us know what you think in the comments!


Security Information Overload: From Panic to Apathy & the Remedy, written by Thomas Xavier, was created exclusively for readers of the survival blog More Than Just Surviving.

Security Information Overload: From Panic to Apathy & the Remedy Read More »

Safety & Health Expo is looking for speakers. Are you interested in joining the line-up?

Over 100 speakers will take to the stage and thousands of visitors are expected to listen to the talks. The event will take place from 19 – 21 May, at ExCeL London, and speaker applications are open until 31 January.

The post Safety & Health Expo is looking for speakers. Are you interested in joining the line-up? appeared first on SHP – Health and Safety News, Legislation, PPE, CPD and Resources.

Safety & Health Expo is looking for speakers. Are you interested in joining the line-up? Read More »

An Argument for DA/SA Pistols

Modern pistol design has embraced the striker-fired action as the current paradigm. There are good reasons for this, greater mechanical simplicity and a moderate consistent trigger pull being two of the most common.

Of course, the blockbuster success of a little pistol called the Glock (though not the first striker fired handgun by a long shot) also contributed much to the rise of this action.

Simply put, hammer-fired pistols are starting to go by the wayside, even as they see a minor resurgence among certain enthusiasts and connoisseurs.

More than a few shooters see hammer-fired guns as more work than they are worth whatever their other qualities are, either in the form of additional controls like safeties and decockers or a more complex manual of arms thanks to having two distinctly different trigger pulls in a DA/SA pistol.

In the famous words of one lady who became a beloved meme, “Ain’t nobody got time for that!”

This is regrettable because in the pantheon of pistols one design is uniquely well suited to the demands of defensive use of a handgun, not just mere shooting: the double-action single-action pistol.

Sometimes regarded as the “other” hammer-fired pistol type, this unique and occasionally maligned action brings a lot to the table in both safety and performance for those willing to put in the time to master it.

n this article, I’ll talk about a few perks you probably did not know about with pistols of this type and give you some pointers on how these guns can work for you. It’s time to stop worrying and learn to love the hammer.

Essentials of Pistol Selection

Arguing about guns never ceases to entertain. I am sure that wall the back in the dark days of history when the first primitive handheld guns were invented, and there was more than one model to choose from, people argued their comparative merits.

It’s just human nature I suppose. No matter how far our technology, metallurgy and design parameters pertaining to firearms have evolved, there are a couple of fundamental principles, rather characteristics that a defensive handgun must possess before any others in order for even warrant entrance into the brutal calculus of lethal force self-defense.

The key absolute is mechanical reliability and durability. A gun that is fussy, fragile or otherwise questionable when it is time to make it go bang is no gun you want to bet the farm on.

A defensive gun must also be possessed of adequate caliber for defense (against humans in our case) and should be designed in such a way that its controls are easily actuated without undue fretting and fumbling from the user. Not all designs kept foremost the human element among its tenets.

Why does all this matter for our discussion? Because frankly without those fundamental elements- reliability, adequate performance, ease of use- than no other quality matters. Without those bedrock characteristics for selection in place affirmatively, you should not consider a gun so lacking for self-defense.

I am here to tell you there are many DA/SA pistols on the market that have these vital traits, both new designs and older ones. So that being so, the question is now whether or not the action itself the reason to choose or disqualify an otherwise excellent gun from service? Another question: does a DA/SA gun bring anything to the table a striker gun does not?

The current gestalt among pistol shooters is that striker gun-equals-better gun for all the reasons I mentioned above; simpler, consistent, easier to shoot, etc.

Are those qualities all that matter in a defensive gun? Is raw “shooting” performance the first and only barometer of a good defensive gun?

I say no, that while it is certainly important there is far more that can and will occur when it is time for you to defend your life with a gun in hand, and the design and operation of that pistol will either contribute to keeping you safe or help set you up for failure.

There is a lot to unpack in that assertion and I’ll do so in the next section.

A Common Complaint about DA/SA Pistols

As with any gun, DA/SA pistols have their own legion of detractors who think they are just the worst. Some of these critiques are based in fact or experience and must not be discounted out of hand. Others are little better than propaganda and deserve to be put down with authority.

I have little doubt you will have heard the most common complaint before, but I feel it is important to unpack this claimed flaws fairly before making my case for pistols of this type.

By far the most common gripe concerning DA/SA guns is that they are simply too hard to shoot well and too complicated to use thanks to a complex and error-prone manual of arms.

A heavy first trigger pull, the subsequent light trigger pulls, plus you have to remember to decock when you are done, and then there is also potentially a safety to worry about! Sheesh! Let me get the flowchart for my gun!

Critics claim this alone makes DA/SA pistols a poor option because they are so hard to shoot in addition to training time needed to master them being excessive compared to other pistols.

My opinion? Yes, DA/SA guns do indeed take more work to shoot well than guns with light, crisp, consistent triggers. NO two ways about it. How much more work, though?

That is tough to say. There is no quantified data set for that among trainers, but in my own experience teaching I would say the average shooter needs only about 10-15% more effort and reps invested to attain near parity with guns utilizing a consistent trigger.

Two major contributing factors to reaching competency with a DA/SA pistol is 1.) optimized techniques for shooting a DA/SA gun well and 2.) the gun itself is possessed of a decent trigger.

I’ll assert plainly that you do not shoot all guns the same way. Sure, the fundamentals of marksmanship don’t change, but the way we attain them may.

A student with a DA/SA semi or DA revolver whose teacher preaches the old dogma of placing just the tip of the trigger finger on the trigger to shoot will quickly become frustrated with their lack of performance and annoyed with how difficult the gun is to operate.

You don’t pull one of those longer, heavier triggers the same way as you would a custom 1911 with a 3 lb. trigger. More leverage is needed to yield the control required to move these heavier triggers to the rear consistently.

The trigger itself is particularly important on a DA/SA pistol. Weight is often emphasized here, with lighter being better (and it often is) but of even greater importance is that the trigger be smooth and hitch-free.

A smooth, consistent trigger is easy to manage and shoot well with just a little bit of practice, even for beginners. Paying proper attention to grip and trigger finger placement is easily taught and more importantly easily executed. After that first shot and the gun transitions to single action mode most students are in for smooth sailing.

As far as the rest of the case against DA/SA pistols having a complex manual of arms, I refuse to subscribe to that notion in any way. Compared to the majority of striker-fired pistols that lack decockers or manual safeties, sure, a typical DA/SA gun is more complicated… By a matter of exactly one extra step!

Critics of these pistols would have you believe that running one additional switch, the decocker or safety-decocker, at the conclusion of shooting is simply too great a burden to bear and too hard to teach to your average adult.

This is hogwash. Yes, it must be taught, but the notion that this single extra step is beyond the capability of an armed professional or civilian of average intelligence has little grounding in reality.

DA/SA pistols are more complicated than typical striker fired guns, but this is a matter of inches and feet, not miles. Might that complexity render it a poor choice for some shooters? Sure, but it is in no way so complicated that even halfway decent instruction and practice will render its operation second nature.

Benefits of the DA/SA Pistol

A longer, heavier trigger is more likely to prevent an unintended discharge than a lighter one. No two ways about it. If a finger or foreign object should make its way into the trigger guard when no shot is intended and begin to apply pressure to the trigger, a short, light trigger will result in a discharge more often and more quickly than the aforementioned long pull. I can hear some hate simmering in the comments already…

I have heard from many peers, readers and dissenters who proclaim any modern handgun more than safe enough irrespective of action if only the user is well trained enough to keep their stinkin’ finger off the trigger. That is the key absolute to safety, they say, and will hear no discussion to the contrary.

Fair enough. Most unintended discharges are indeed negligent instead of truly accidental so their claim has merit. But what if I told you that their entire premise is a flawed one? And more than that that the vagaries and stress of a life-or-death encounter means managing your pistol entails far more than just getting a short mouse-click trigger press before sending lead downrange?

While I do not doubt that many readers are extremely well trained and take their practice as seriously as life itself, I do doubt very much their claims of flawlessness, that they won’t make mistakes and that sheer bad luck has never overtaken them.

I have trained and trained with too many shooters who I would consider excellent and reviewed too much video of both live events and seriously high-pressure force-on-force training to believe in perfection when it comes to trigger finger discipline any more.

Whether from extreme stress, fatigue or fear, a curious phenomenon manifests itself in these situations, which is that of the shooter quickly, briefly placing their finger down onto the trigger seemingly in an effort to ascertain that it is still there.

This pre-emptive positioning most often occurs with the shooter having no conscious knowledge of it occurring. During a later debrief when it is brought up to them they swear on all that is good and holy that they did no such thing.

But cameras do not lie, and the proof is positive: this curious glitch whatever you care to call it does occur, and should it happen on a gun with a light, short trigger when muscles are tense or the shooter is startled the result can be an ND.

The long, heavy pull of the first DA shot provides more feedback to the shooter between pressure accumulating on the trigger and bang that “something is happening,” and this can be enough to correct the deficiency.

Furthermore, a long trigger pull can allow a shooter to back off of a trigger in time before breaking the shot should the need to shoot vanish or new information change the scenario.

With light single-action and striker-fired pistols there is precious little that happens between “decision to fire” and “bang,” and while a double-action pull does not take that much more, it is sufficiently long and tactile to allow a shooter to cancel the shot should the need arise.

This is of special interest anytime you have a threat at gunpoint and are attempting to gain compliance or talk them down. You may be entirely warranted to have a bad guy at gunpoint and have your finger on the trigger, but that does not mean that you will be forgiven of any discharge classified as accidental or errant.

Your finger may move from the trigger to the frame and back again several times before that first, fateful shot is fired as the situation ebbs and flows. Remember: you will handle and point your pistol at people far more often than you will actually shoot it at people. I definitely want a trigger that will back me up in that regard.

Of course once the fight is on and the first shot is made, a DA/SA gun switches to single-action mode for subsequent shots. Here is another payoff of the system.

The light, crisp follow-up trigger pulls of the DA/SA pistol lend themselves to fast and accurate shooting once the conscious decision has been made to fire.

Once a shooter is acclimatized to it, the DA/SA system offers a best of both worlds: the inherent safety of a longer, heavier trigger pull as a hedge against unintentional discharges and the light, short single action pull for continued shooting. Once the fight is over, or over for the moment, the gun is decocked and the process begins again.

It’s All about Control

Somewhat akin to a stick shift in a car, a DA/SA pistol gives its user a greater degree of mechanical control over its functions. The exposed hammer of your typical DA/SA pistol can be physically restrained by the shooting hand thumb when holstering in order to completely block its reward travel in case something (like a finger or coat pull) should impinge on the trigger when holstering.

Remember, actuation of the trigger cocks and releases the hammer in double-action mode, or just releases it from the cocked position in single-action mode.

In either condition, the thumb can prevent hammer movement, thusly preventing discharge, and in the case of the hammer being cocked to the rear it is immediately apparent that the shooter skipped decocking of the gun before moving to holster.

Compared to a striker-fired pistol where, aside from the trigger, all the magic happens within the slide and frame the DA/SA pistol used properly provides true reassurance against an unintended discharge upon reholstering.

Once again, it is too easy to proclaim that it won’t happen to you, that you are safe, reholster carefully and verify the mouth of the holster is clear of any obstructions before proceeding. Yeah, you are that good, or maybe it is just hubris worming its way into your mind.

If this capability was only a fringe benefit as some have suggested why would companies like Tau Development group and their Striker Control Device, or “Gadget” be gaining a small but vocal and legitimate group of expert striker gun users in professional circles?

The Gadget, in case you are unfamiliar, is a replacement backplate for Glocks that features an articulated hinge or button that is depressed by the user’s thumb during reholstering in order to prevent the striker from moving to the rear, which in turn prevents the trigger bar from moving which in turn halts the trigger itself. This akin to what your thumb should do when holstering a gun with a hammer and accomplishes the same thing.

Sounds like capability like that is, perhaps, a good thing to have during what is statistically one of the most dangerous operations you can perform with your pistol- holstering it. Something to think about.

Author’s Soapbox

I do not deny that the striker-fired pistol is here to stay, and for good reason. I also do not deny my preference for traditional double-single pistols. For me, a DA/SA gun is no impediment.

Quite the opposite, a DA/SA pistol provides me capability that I frankly cannot get out of an average Glock or other striker-fired pistol without some significant modification and installation of one nasty trigger.

My trusty pistol can certainly bite me, and it is more likely than any other time when I am handling it administratively, that is in a non-fighting or non-shooting task. Well, any administrative task can become a shooting task if the gun is loaded…

For that reason and for the added assurance during a fight, or the buildup to a fight I prefer having a double action first shot for safety and at the same time having the pistol ready to fire instantly. Again, best of both worlds.

When the time to shoot is nigh, I don’t sweat that heavy pull; my pistol has no action enhancement, but from plenty of practice and plenty of rounds fired that DA pull is as smooth and crisp as I could practically want. It is like it is not even there.

After that first shot, the single action trigger pulls on my Sig are excellent compared to nearly any striker gun trigger; a bit of take-up, a well-defined wall and a crisp break with just a hair of overtravel.

More than adequate for fast and fancy accurate shooting, and I have proven as much in plenty of matches and training classes. You’ll find only a few striker-fired pistols with stock triggers that can match the average DA/SA gun in single action mode.

The ability to physically block the gun from firing when holstering is something I am adamant about. There has yet to be one person who can adequately explain how this is anything but a very good thing.

Holstering a pistol is always fraught with peril as I said earlier, and anything I can do to mitigate this peril especially when carrying IWB, especially when carrying AIWB, is an advantage you’d be smart to utilize.

So bottom line, with just a little more practice I can have a pistol that is safer and more forgiving of mishaps than a striker-fired pistol, that is still reliable and still a superbly capable shooter.

What is not to love? Forget what you think you know about this classic action and get ready to drop the striker gun so you can drop the hammer.

Conclusion

DA/SA guns are seeing resurgence in popularity but are still a long way from their heyday. Nonetheless, for discriminating pistol shooters the unique combination of advantages afforded by these guns adds up to more than the sum of its parts.

Hammer guns are not dead, far from it, and if you are willing to spend some time learning to run one properly, you might find its combination of assurance, safety and performance to be the ideal set of traits for your self-defense pistol.

da/sa pistols pinterest

An Argument for DA/SA Pistols Read More »