Photo

Almost everyone loves to travel as it introduces us to new experiences and create long-lasting memories. An increasingly popular trend in traveling is backpacking: traveling with simply a bag and its contents. Backpacking is usually dependent on public transportation, hitchhiking, and shelter is usually found at more public locations rather than homes for rent. Backpacking trips usually enrich you with the local culture, rather than simply visiting tourist attractions. For example, a backpacking trip to South America would have you interacting with local residents on a daily basis In addition, backpacking trips are usually much more extensive than normal vacations, meaning you’ll be away for a long time. So how exactly can someone get into backpacking and have a successful first trip? Here are five tips that should help you with your first backpacking trip.
Packing accordingly is important for any trip, but it is especially important for backpacking trips. Backpacking trips are much longer than traditional vacations, making packing extremely important. In addition, you will likely only be traveling with your backpack, meaning that there is even more importance placed on how you pack and what you pack. Make sure you have everything you need to get by on your trip, including food, clothing, water, and money. You obviously don’t have to go overboard as that would ruin the purpose of a backpacking trip, but you should still pack well enough to ensure that your first backpacking trip is a happy and healthy one.
Backpacking by yourself is quite the experience, but it can be dangerous if you don’t know what you’re doing. That’s why it is recommended that new and inexperienced backpackers bring a friend along for their first trip. Having someone with you while you’re backpacking allows you to have someone able to help you if something goes wrong, making the trip much safer. There are plenty of things that can go wrong while you’re traveling the world with minimal possessions, making backpacking a scary prospect. Due to this, you should probably backpack with a friend in order to learn the ropes before you immediately jump into a solo backpacking trip.
Being in peak physical shape is highly recommended for your first backpacking trip. While you’re backpacking you’ll be doing a lot of physical activity including walking, hiking, and lifting. If you’re not in peak physical condition, it could be quite difficult to complete your first backpacking trip. Being out of shape could cause you to stop early or be unable to complete your journey, as the physical toll of all that walking and hiking can be too much for some people. So if you plan on taking your first backpacking trip soon, ensure that you train your body and are in great shape.
Another important aspect of backpacking for the first time is buying the right gear to use. Obviously, you will need the right backpack, as you will need one that is large enough to fit all of your belongings inside of it. You will also need other gear such as hiking clothes like boots and comfortable walking shoes. You also may need things like flasks and containers in order to keep your food hot or cold depending on the situation. You also will likely need gear for shelter including a tent and a sleeping bag, allowing you to sleep no matter where your backpacking travels take you. Bringing the right gear on your first backpacking trip can make the trip much easier and safer for you.
One of the most important tips for first-time backpackers is to keep an open mind on the trip. Backpacking trips can involve lots of unexpected events. You never quite know what you’re going to see or who you’re going to meet. Due to this, it is important to keep an open mind while on your trip. You shouldn’t plan out your days too much or become too focused on getting specific things done. You should simply relax on your backpacking trip and go with the flow. Let things happen naturally around you and let the experiences naturally come to you. This will make your backpacking trip much more authentic and much more enjoyable.
5 Tips For Your First Backpacking Trip Read More »

The Cottonwood Lakes hike probably gives you the most bang-for-your-buck in the Eastern Sierra. The hike starts from the Cottonwood Lakes Campground, already at 10,000 feet, so your car does most of the legwork to get you to altitude. From there, the Cottonwood Lakes Trail gently makes its way through pristine alpine terrain to a series of several crystal-clear alpine lakes, all in the shadow of the high Sierra peaks like Mt Langley. Every step of this must-do hike is spectacular, so give it a try.
The post Cottonwood Lakes Hike appeared first on HikingGuy.com.
Cottonwood Lakes Hike Read More »
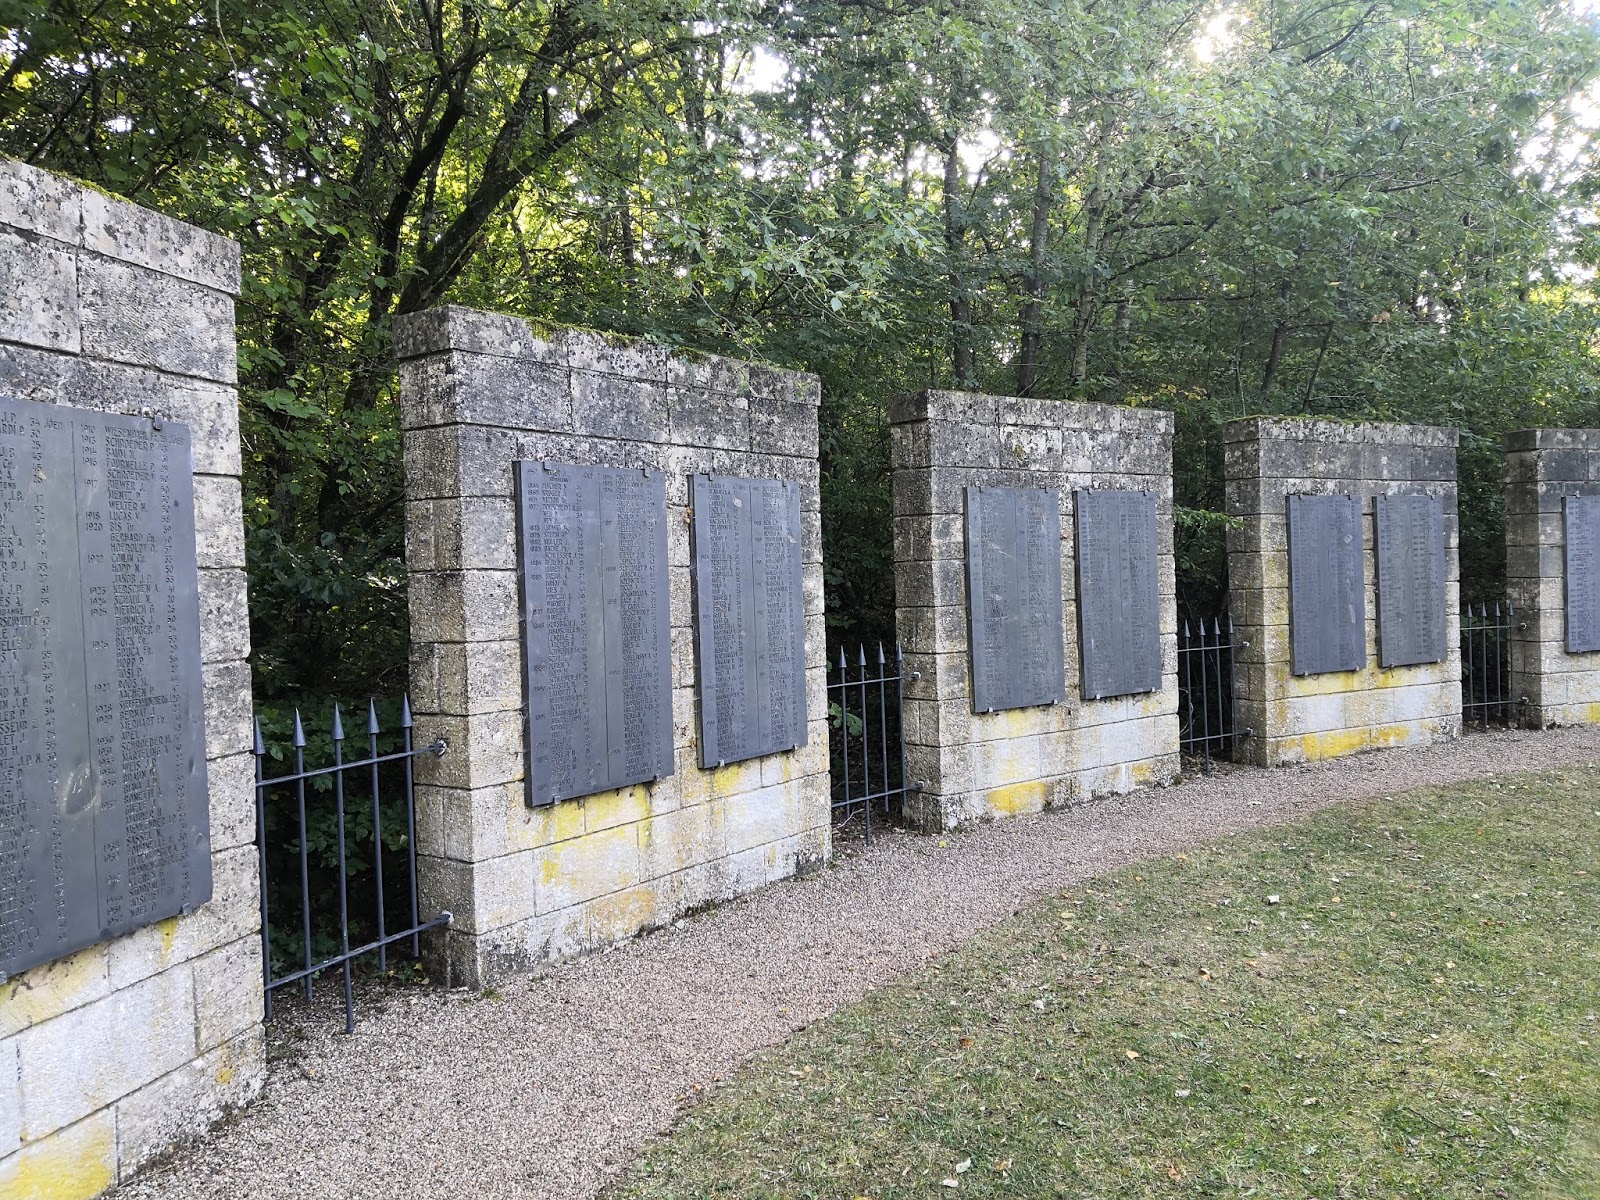
Luxembourg is kind of a hikers’ paradise with wonderful trail – but unfortunately these are all in the North of this small country. My route was leading me through the heavily industrialized South. Up to only decades ago mining was predominant in this area which was documented by a memorial for all the miners that had lost their lives in work accidents. It was interesting to see that the number of accidents significantly decreased over the years! Right nex to this impressive memorial is a much smaller one, a little chapel with the Madonna of Leiffrächen – a very popular pilgrimage site not only for miners.
 I was very lucky to have an invitation in Kayl
where one of my FB friends had invited me to her house. I was not only heavenly fed but could eventually ask all my questions about multilingual Luxembourg: The little country has its own language which is kind of similar to German so that I could halfway understand what is going on. When I tried some newlearnt words on my hosts’ dog it even obeyed! And most people here also speak German as a second language plus French as the third official language! Very impressive also the incredible apricot cake I was served for dessert. I liked it so much that I was given the leftovers when I departed next morning!
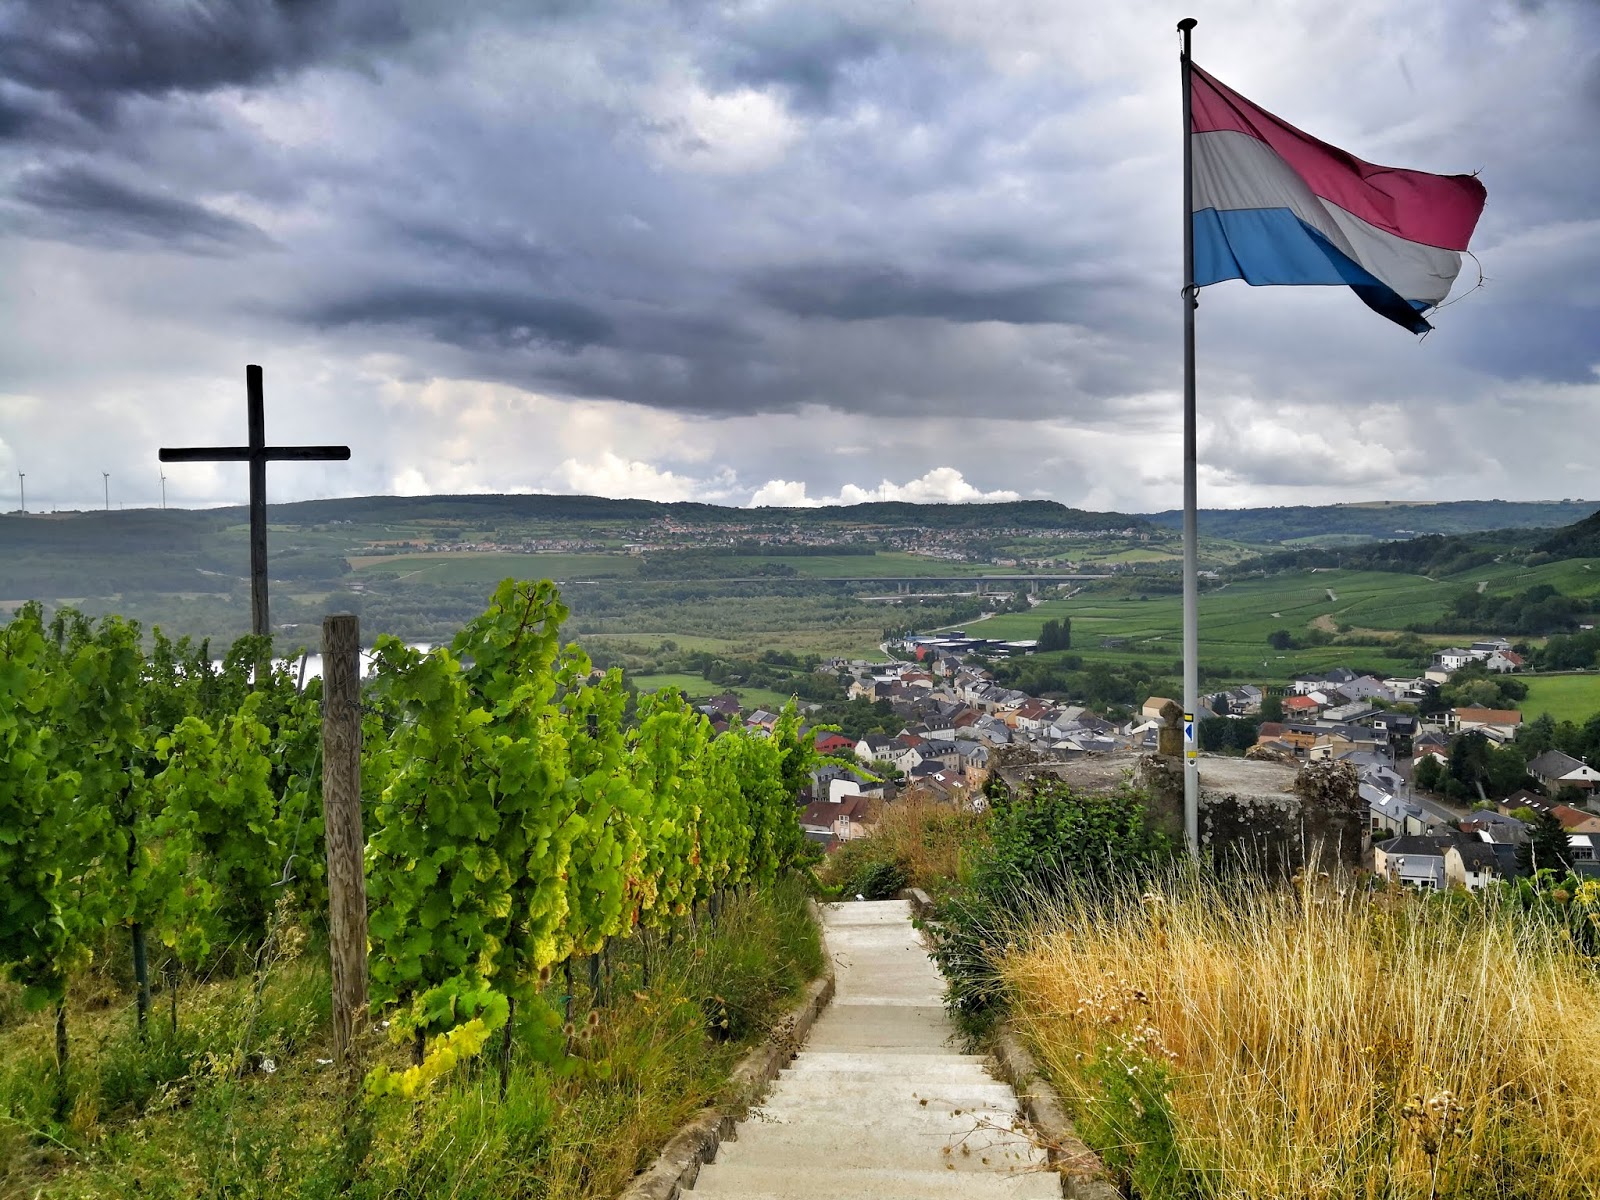
The rest of my route through Luxembourg was unremarkable. Nothing to write home about, but it was still amazing that the trail planners found some relatively unspoilt areas where to route the trail through. Sometimes the scenery was really pretty but I could always here a motorway or trainline. Scenic highlight was my arrival at the three country border at Schengen / Perl where I hiked through the vineyards of the river Mosel and couldn not resist to nick some grapes.
Europe Diagonal: Luxembourg Read More »
Did you know that today is “National Take a Hike Day”? Each year, on November 17th, National Take a Hike Day is observed by hikers across the country. Though the origins of this day seem to be a little murky, it appears that it may have been started by the American Hiking Society. Whenever and whoever started the day, hiking has its roots firmly planted in many of the same societal trends that shaped our country. According to the National Today website:
Hiking, while a major part of our culture today, wasn’t always the ubiquitous weekend warrior activity is today. Before Walden, Thoreau, and John Muir there was Romantic and Transcendentalism movement, art and cultural shifts to the natural order and time spent being outside. A reaction to the Industrial Revolution, train schedules, 90 hour work weeks and more.
The idea of taking a hike turned romantic and peaceful.
If you can’t actually make it onto a trail today, you can still download a copy of my book, “Ramble On: A History of Hiking,” to learn about the rich and amazing history of one of the world’s top pastimes, which will help to explain why today is now recognized as a “national holiday”.
Happy Take a Hike Day!
Jeff
HikingintheSmokys.com
RockyMountainHikingTrails.com
HikinginGlacier.com
TetonHikingTrails.com
Ramble On: A History of Hiking
National Take a Hike Day Read More »

Security overload leads to apathy. How often do you hear a car alarm go off and roll your eyes hoping the owner would disable the blasted thing before the incoming headache comes a knocking? The primary objection I have to such systems is they work too well. Every week I hear an alarm being triggered […]
This is just the start of the post Security Information Overload: From Panic to Apathy & the Remedy. Continue reading and be sure to let us know what you think in the comments!
Security Information Overload: From Panic to Apathy & the Remedy, written by Thomas Xavier, was created exclusively for readers of the survival blog More Than Just Surviving.
Security Information Overload: From Panic to Apathy & the Remedy Read More »
There is still considerable disagreement about the utility of the Tactical Reload. However, whether it has utility or not, it doesn’t have to be a clumsy technique. This is how the Tactical Reload is taught at the elite Rogers Shooting School and Dodd & Associates.
The magazines are handled by the thumb, forefinger, and middle finger. For visual clarity in this photo essay, the partially depleted magazine is depicted by an empty stainless magazine and the full replacement magazine by a blue magazine with a dummy round on top.


This method uses the hand’s two most dexterous digits, the thumb and forefinger, to catch the partially depleted magazine. Using the hand’s most dexterous digits makes it simple to handle even double column magazines.
Tactical Reloading Read More »
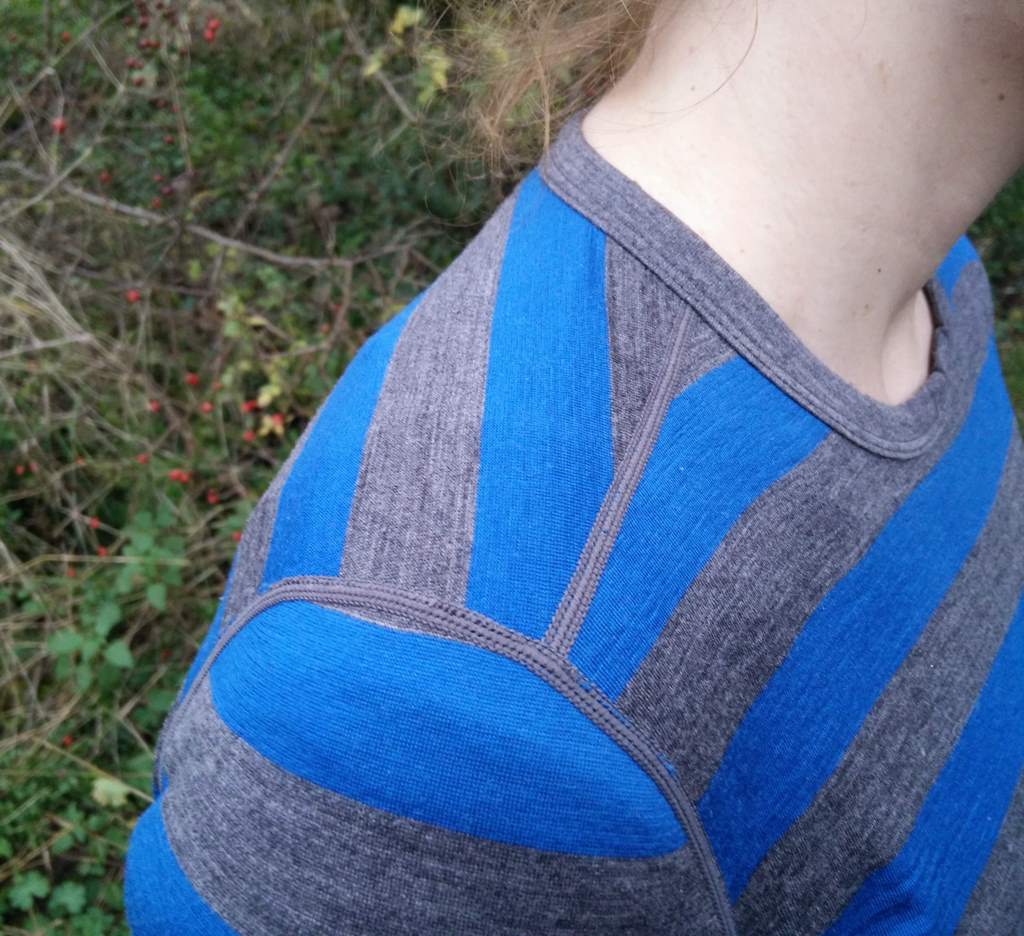
Isobaa Women’s Merino Base Layer: Off-set shoulder seams
At Best Hiking we can’t get enough of Merino base layers, but so far it has mainly been base layers for men we have been asked to test and review. Therefore, I was head over heels when I got the opportunity to test the Isobaa 180 crew-neck base layer. I really appreciate the brand’s philosophy on sustainability where they advise their customers to not “be sheepish, purchase with purpose” and “wear longer, wash less, reduce your impact”. This is exactly what we advise our readers to do in the article How to reduce the environmental footprint of your outdoor clothing. Isobaa has also taken the ethical choice of only sourcing the Merino wool from sheep which have not been subjugated to the painful mulesing process. Furthermore, the brand’s garments come in packaging made of recycled materials – in this case, a cute egg tray-like box in which I now keep envelopes and stamps.
I received the Isobaa base layer in late summer – a perfect time to begin testing this long-sleeved mid-weight Merino top. I have since then worn it both on hikes and in everyday life, and concluded that the Isobaa Merino 180 Long Sleeve Crew is suitable for:
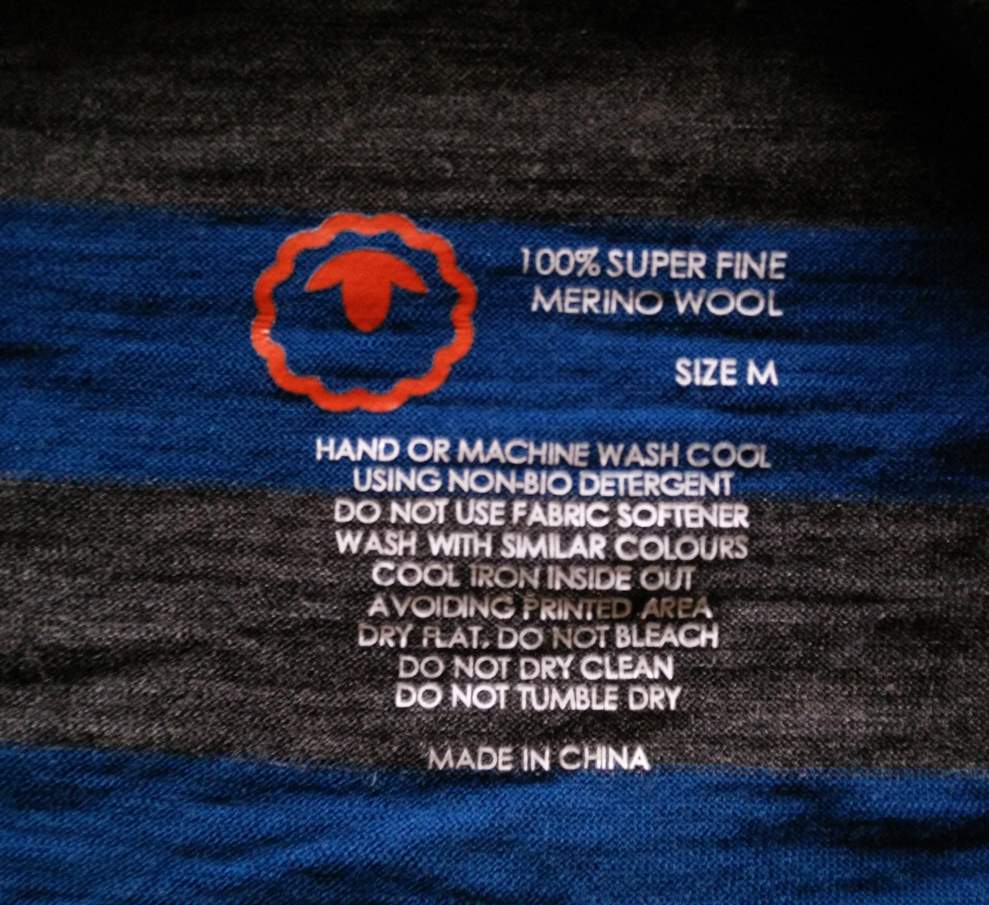
The Isobaa Merino 180 crew-neck base layer is, as the name indicates, made of 100% Merino wool with a fabric density of 180 g/m2 which makes it a mid-weight fabric, albeit in the lighter end. The Merino fibers used for the fabric are of the superfine quality by being just 18.5 micron in diameter. Being 100% Merino wool, this high-quality fabric of course has all the qualities listed in the article Why you should wear Merino Wool – like softness, breathability, anti-microbial (anti-odor) properties and natural UV protection.
Since it is a mid-weight base layer, I would recommend it for all seasons but summer – although those sensitive to cold might wear it when the rest of us would go for a light-weight Merino fabric (<150 g/m2). In general, Merino wool keeps you warm when it’s cold and comfortably cool when it’s warm (but not hot hot) weather. The Merino fabric is also quite stretchy which proved to be crucial for me fitting into the base layer both before and after the birth of my first child.
I was almost eight months pregnant when I received the Isobaa base layer and was thus a bit anxious whether I really would fit into the size M that I had asked for – and if so, if I would fit into it after giving birth as well. My fears turned out to be groundless as the top fitted me perfect both before and after birth due to it being rather long in the torso and the fabric being quite stretchy. I gained around 14 kg (31 lbs.) in total during my pregnancy but had lost 10 of them already a week after the birth. With the majority of the extra weight centered on my mid-section, one could fear that the base layer would be too tight or short, but the stretchiness of the Merino fabric turned out to be just right. In fact, I ended up wearing the Isobaa top a lot during the last weeks of my pregnancy as it was one of very few tops which I could fit comfortably into while having my protruding belly covered. The Isobaa base layer is indeed rather long in the torso which was particular great during my pregnancy – but also afterwards as I’m a bit taller (1.73 m/ 5’8’’) than the average European woman.
I measured the length of the side seam from the hem and up to the armpit to compare it with the length of my other base layer tops, and sure enough – the Isobaa is 5-8 cm (2’’-3’’) longer than all of them. In addition, the base layer has a drop tail hem for a little extra coverage. The only downside of all this extra length is that also the sleeves are a bit too long for me. It’s of course no problem to simply roll them up at the cuffs, but the right cuff has Isobaa’s cute sheep head logo embroidered so it’s bit of shame having to roll it up. All in all, the extra length will probably be appreciated by taller persons while the petite should go for the smallest size they can possibly fit into.
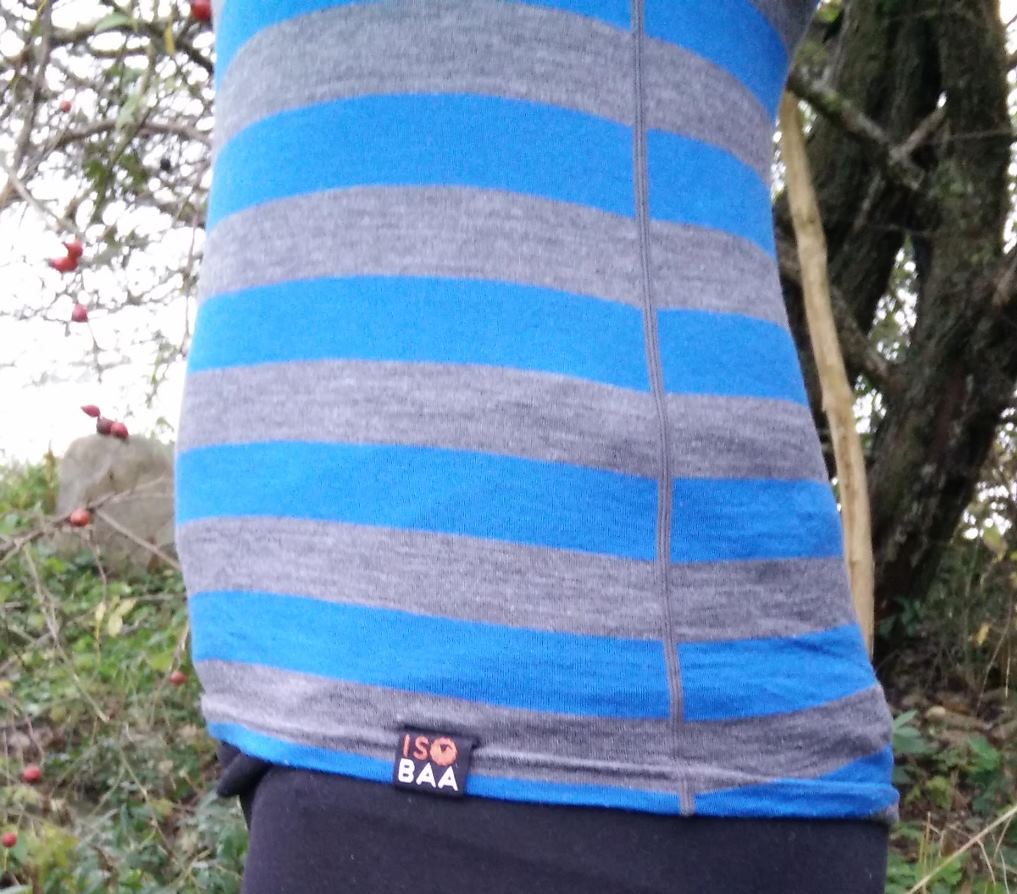
As such, the Isobaa womens base layer just looks like another long-sleeved crew neck top in a high-quality material, but it has several small but functional details which makes it even more comfortable to wear for outdoor activities as well as everyday use. Firstly, it utilizes flatlock seams which are crucial to avoid chafing when wearing a rather snug-fitting base layer as this is. The shoulder seams are also off-set in order to minimize any painful rubbing when wearing a (heavy) backpack.
There are also underarm gusset panels to avoid having any seams chafing the sensitive skin in the armpits. Now, these gussets are made of a solid color (grey) fabric while the rest of the base layer is a grey/blue striped fabric, and I couldn’t help but think if sweat stains would be more or less visible if the gussets were made of the same fabric as the rest of the shirt… Maybe Isobaa researched it? In any case, the gussets provide good freedom of movement, and the drop tail hem prevents the top from riding up – even if you have to stretch while climbing, scrambling etc.
Isobaa has also eliminated the potential of any chafing from labels as the neck logo and washing instructions are printed directly on to the fabric itself. There is only a folded hem logo label and the embroidered sheep head logo at the right cuff which didn’t bother me the slightest.
As usual with Merino garments, the Isobaa base layer should be washed in cold water (30⁰ C or less, whether by hand or machine) and air-dried, preferably flat. You should avoid using fabric softener and bleach and tumble-drying the garment – especially the latter will significantly decrease the lifespan of any Merino garment. Isobaa also has a page dedicated to describing how to best care for their apparel where you can for example read about a trick to avoid piling on the wool fabric – which is to occasionally wash your Merino garments with apparel of coarser fabrics such as denim, as this will help to remove loose fibers and keep the surface smoother. I didn’t know this trick, but I will definitely try it out as I can’t stand piling on any garments. For now, however, there is no such problem with the Isobaa base layer, but I will of course update this review, if there should come any durability issues later.
I was so happy with the Isobaa 180 base layer that it has become a staple in my wardrobe – both for outdoor activities and everyday use. I think it will slowly but securely take over from my other Merino base layer which was the patient under scrutiny in the article How to repair Merino garments, but is slowly unravelling, nevertheless. No Merino garment will last forever, but with proper care a high-quality base layer like the Isobaa 180 crew neck will last for several years.
If you have any questions about this product, drop me a line in the comments below.
![]()
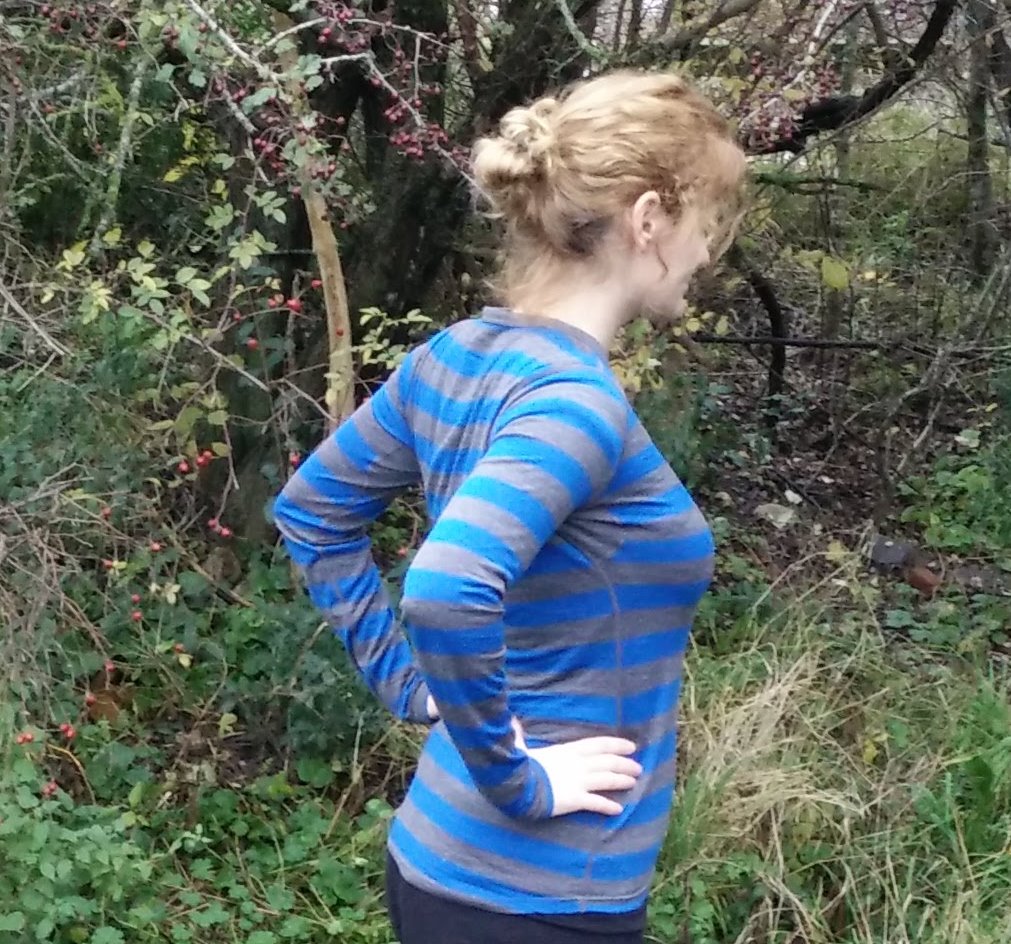
Isobaa Women’s Merino Base Layer: From the side
Isobaa Women’s Merino Base Layer: Drop tail hem

Isobaa Women’s Merino Base Layer: The sleeves are slightly too long
Isobaa Women’s Merino Base Layer: Embroidered logo at right cuff

Isobaa Women’s Merino Base Layer: Underarm gussets
Isobaa Women’s Merino Base Layer: Hem logo label
Isobaa Women’s Merino Base Layer: Neck logo and flat-lock seams
Isobaa Women’s Merino Base Layer: Washing instructions
Rating
| Design |  |
| Quality |  |
| Comfort | |
| Functionality | |
About Rating
Pros:
Cons:
{
“@context”: “http://schema.org”,
“@type”: “Product”,
“brand”: {
“@type”: “Organization”,
“name”: “Isobaa”
},
“image”: “https://besthiking.net/wp-content/uploads/2019/11/7.-Off-set-shoulder-seams.jpg”,
“name”: “Isobaa Women’s Merino 180 Long Sleeve Crew”,
“review”: {
“@context”: “http://schema.org”,
“@type”: “Review”,
“author”: {
“@type”: “Person”,
“name”: “Laura P.”
},
“creator”: {
“@type”: “Person”,
“name”: “Laura P.”
},
“publisher”: {
“@type”: “Organization”,
“name”: “Best Hiking”
},
“reviewRating”: {
“@type”: “Rating”,
“ratingValue”: “5”,
“bestRating”: 5,
“worstRating”: 0
},
“datePublished”: “2019-11-07”,
“name”: “Isobaa Merino Women’s 180 Long Sleeve Crew”,
“headline”: “Isobaa Merino Women’s 180 Long Sleeve Crew”,
“itemReviewed”: {
“@type”: “Thing”,
“name”: “Isobaa Women’s Merino 180 Long Sleeve Crew”
}
}
}


The post Isobaa Merino Women’s 180 Long Sleeve Crew appeared first on Best Hiking.
Isobaa Merino Women’s 180 Long Sleeve Crew Read More »
A Guest Blog Post by Jim Ausfahl
Disclaimer: This material has been modified
from the public domain US
Military field manual, FM 5-80.
As a reminder, the triangle bandage is a piece of cloth, often unbleached muslin, that is a right triangle with legs about 40″ (102 cm) long, and a hypotenuse, or long side, around 56.6″ (144 cm). It is folded on itself three times to make a cravat bandage. Remember: for all wounds, the first thing to do is to control the bleeding, clean and cover the wound with gauze padding, and if it is available, some antibiotic ointment. The bandage is used to lock the gauze in place. In looking at the bandaging below, it will be assumed that has already been done. This time, we’ll be bandaging the head and its associated structures; some of these will require two cravats.
Bandaging the scalp is only
modestly more challenging than what we’ve already done. Begin by folding the long edge over itself
three times, about an inch or an inch and a half wide. Having done that, drape the bandage over the
scalp, with the right angle going down the back of the neck and the middle of
the folded part over the forehead. Bring
the two ends of the folded part behind the head and to the middle of the scalp. To minimize the risk of this slipping up, put
the folded part under the occiput—that’s the bump you can feel on the back of
your skull. Tie a square knot in the
middle of the forehead to anchor the bandage.
Then, take the right angle and fold it up, tightening the part over the
scalp then tucking the end into the folded part. If possible, and pinning it in
place with a safety pin It is much clearer if you look at the diagram below

Clearly, this bandage not only will handle the scalp, it will do well for the forehead and the back of the head as well.
There is an alternative approach
to bandaging the head, which would be used for the back of the head, the sides
of the head or the forehead or the ear.
The bandage needs folded into a cravat.
Depending on where the injury is, put the middle of the bandage on one
side of the head; if the injury is to the ear, put the middle of the bandage
over the injured ear. Bring the ends of
the bandage around the other side of the head and back to the first side,
fixing it in place with a square knot.
For bandaging the ear, the cravat should go up diagonally, to leave at
least one eye uncovered, then back to the bandage over the ear, where the
square knot is tied. The diagram shows
the bandaging done for the head; adapting this to the ear is simple.

Sometimes there is need to
bandage an eye. Doing this requires two bandages, both folded into cravats. Drape one cravat over the head, covering the good eye, so it hangs down the back of
the victim’s neck and down his face.
Take the second cravat, wrapping around both eyes and over the first
cravat, tying it in the front, over the uninjured eye. Finally, take the ends of the first cravat
and loop them over the head, tying them on the scalp so that the second cravat
is lifted off the good eye. The figure below
will help this all make sense.

Sometimes, there is need to
bandage a cheek, the area below the chin, a small area on top of the scalp or a
need to immobilize a jaw temporarily, as might be for a fracture of the jaw or
a dislocation of the jaw. A single
bandage, fold into a cravat, is needed.
Position the cravat under the jaw, with the more distant part of the
cravat a few inches longer than the near one.
Bring the far side across the top of the head to the temple of the near
side, then twist them around each other a quarter turn, so the two sides are
horizontal, one pointing forward and the other backward. At this point, the two free ends should be
about the same length. Take the ends
around the victim’s head and knot them on the other side. The process is illustrated clearly in the
figure below.

The next posting will handle bandaging the chest, hip, buttock and shoulder.
Jim Ausfahl is a physician in active medical practice, in Peoria Heights, Illinois, studying the art of surviving in a challenging environment and sharing what he knows.
Cravat Bandaging: Series Post IV Read More »
