Home Safety

Shooting at A&M Texas Commerce Mass Shooting Vigil

Shooting at A&M Texas Commerce Mass Shooting Vigil

Gunshots were fired Sunday night during a vigil for the so-called “victims” of a mass shooting during a twerking party at Texas A&M Commerce. […]

This Article Shooting at A&M Texas Commerce Mass Shooting Vigil is an original article from OFFGRID Survival If it is appearing on any other site but OFFGRID Survival, that site does not have our permission to use our copyrighted content!

Shooting at A&M Texas Commerce Mass Shooting Vigil Read More »

Survival Cache Podcast Episode 15: Survival Knives

survival knife podcast

When knife companies want to find out if their products are up to the task? The seek out Doc Montana’s opinion on their design and steel. So maybe you have you been dying to survival knife podcasthear Doc talk about survival knives? Then this is your episode. Doc and Drew talk all things knives. Types, actions, locks, steels, blades, grinds, sharpening, it’s all here.

Want to comment about this podcast? Sound off below in the comments.

A fun episode with lots of opinions, click on one of the links below to listen now or download to your phone and listen later. Also, if you love the podcast, please leave us a review on iTunes, Stitcher, or Podbeam. It really helps!!!

SHTF podcast for preppers

Best Survival Podcast


The post Survival Cache Podcast Episode 15: Survival Knives appeared first on Survival Cache.

Survival Cache Podcast Episode 15: Survival Knives Read More »

Europe Diagonal: Rheinland-Pfalz

I was now on the Saar-Rhein-Weg, another completely unknown German hiking trail. Although the area and the route was quite nice, I was unfortunately passing through on a week-end – and parallel to the trail was a little stream and a narrow winding road where dozens of loud motorbikes were cruising along … When I approached a village I heard hunting horns and stumbled upon a village fair. The local horn group was playing, I rewarded myself with Blackforest cake and even chatted with some other tourists who admitted of having heard from me on TV …

But this was going to be a long day … When I came closer to my planned camping area I passed this lovely village pond. It was already so late that no other swimmers were around. Despite the road right next to the beach I stripped down and skinny dipped. Some locals watched me from afar but I was just happy to be clean again which cannot be said about the beach which was full of goose shit … The closer I came to my camping forest the louder I heard music in the distance. I already started panicking because it would be hard to fall asleep with an open air concert nearby. But the music source turned out to be tractor and a trailer full of kids who were celebrating  God knows what. And they were moving – slowly but steadily away from me and the nice flat spot in the forest where I finally settled down.

The Pfälzer Wald was a nice area but alas without any cell phone reception at all. I decided to make a short detour into France again and went shopping in Wissembourg. Next I had to overcome a big obstacle: the river Rhine which was problematic, because there are not too many bridges crossing it. I followed the Rhine bike trail to the Rhine ferry where I was passed by hundreds of cyclists who shot me pitiful looks. I hiked more than 40 km that day because walking on flat bike paths was dead easy and the ferry ride did take less than 10 minutes! I could already see the Black forest looming on the horizon once I had crossed the river!

Europe Diagonal: Rheinland-Pfalz Read More »

Audubon Invites You to Celebrate 120 Years of the Annual Christmas Bird Count

For the 120th year, the National Audubon Society is organizing its annual Christmas Bird Count. Between December 14 and January 5, tens of thousands of bird-loving volunteers will participate in counts across the Western Hemisphere. The twelve decades’ worth of data collected by participants continue to contribute to one of only two large existing pools of information notifying ornithologists and conservation biologists about what conservation action is required to protect birds and the places they need.

Audubon’s Christmas Bird Count is one of the longest-running wildlife censuses in the world. Each individual count takes place in a 15-mile-wide circle and is led by a compiler responsible for organizing volunteers and submitting observations directly to Audubon. Within each circle, participants tally all birds seen or heard that day—not just the species but total numbers to provide a clear idea of the health of that particular population.

When combined with other surveys such as the Breeding Bird Survey, Audubon’s Christmas Bird Count provides a picture of how the continent’s bird populations have changed in time and space over the past hundred years. The long-term perspective is vital for conservationists. It informs strategies to protect birds and their habitat, and helps identify environmental issues with implications for people as well. For example, earlier this year, Science published a study using decades of Audubon Christmas Bird Count data to describe a grim picture: a steady decline of nearly three billion North American birds since 1970, primarily as a result of human activities. Christmas Bird Count data have been used in more than 300 peer-reviewed articles.

A brand new feature for this year’s 120th Christmas Bird Count will be “CBC Live”, a crowd-sourced, hemisphere-wide storytelling function using Esri mapping software. This “story-map” will ask users to upload a photo taken during their Christmas Bird Count as well as a short anecdote to paint a global picture of the Christmas Bird Count in real time.

Last year, the 119th Christmas Bird Count included a record-setting 2615 count circles, with 1975 counts in the United States, 460 in Canada and 180 in Latin America, the Caribbean, Bermuda and the Pacific Islands. This was the ninth-straight year of record-breaking counts. In total, 79,425 observers out in the field and watching feeders tallied up over 48 million birds representing more than 2600 species different species—more than one-quarter of the world’s known avifauna. Approximately 5 percent of the North American landmass was surveyed by the Christmas Bird Count. Last year included two new species for the Christmas Bird Count list of birds seen in the United States: a Little Stint in San Diego and a Great Black Hawk in Portland, Maine.

The Northern Bobwhite, the only native quail in the eastern United States, continues its downward spiral. This species has essentially disappeared from the Northeast and faces massive declines due to loss of shrubland habitat exacerbated by increased droughts. On the flip side, Red-breasted Nuthatches and Purple Finches staged major irruptions southward during the 119th CBC.

Beginning on Christmas Day in 1900, Dr. Frank M. Chapman, founder of Bird-Lore – which evolved into Audubon magazine — proposed a new holiday tradition that would count birds during the holidays rather than hunt them. Conservation was in its beginning stages in that era, and many observers and scientists were becoming concerned about declining bird populations. So began the Christmas Bird Count. 120 years later, the tradition continues and still manages to bring out the best in people and contribute valuable data to the worldwide scientific community.

To sign up for a Christmas Bird Count and ensure your bird count data make it into the official Audubon database, please find the circle nearest you and register with your local Christmas Bird Count compiler on this map here. All Christmas Bird Count data must be submitted through the official compiler to be added to the long-running census.

The Audubon Christmas Bird Count is a community science project organized by the National Audubon Society. There is no fee to participate. Counts are open to birders of all skill levels and Audubon’s free Bird Guide app makes it even easier to learn more. For more information and to find a count near you visit www.christmasbirdcount.org.

Jeff
HikingintheSmokys.com
RockyMountainHikingTrails.com
HikinginGlacier.com
TetonHikingTrails.com
Ramble On: A History of Hiking

Audubon Invites You to Celebrate 120 Years of the Annual Christmas Bird Count Read More »

Outdoor Expo Talks

Looking for something to do in Minneapolis, MN this coming weekend? The 2019 Fall Outdoor Adventure Expo is going on at Midwest Mountaineering. There are dozens of interesting 1-hour presentations about everything from Alaska to Africa and Kayaking to Climbing. You pick and choose what you want to attend, and it’s all free!

Climbing Kili

Kelly and I would love to have you visit with us on Sunday at our two presentations of treks we did this year. See Info about our talks, but here’s what’s what:

Climbing Kilimanjaro
Climbing Kili: Sunday, Nov. 24, 10:30am in UofM Hanson Hall room 104
Find out what happens when 21 flatlanders from Minnesota (plus 1 from Australia) climb the highest mountain in Africa.

Paul and Kelly share how they prepared for, summited, and thoroughly enjoyed Mt. Kilimanjaro using the Lemosho Route, and offer up tips and advice on how to maximize your chances to do the same.
Free Tip: ‘Porter Dodging’ is a mandatory skill!

Cloud Peak Wilderness Backpacking
Cloud Peak Wilderness: Sunday, Nov. 24, 1:00pm in UofM Hanson Hall room 104
Looking to get away from trail crowds and above the trees? Wyoming wilderness has beautiful trails and BIG mountains only a day’s drive from MN. Whether you want to summit a 13K+ peak, catch a hundred trout, or whirl around in an alpine meadow like Julie Andrews, the Cloud Peak Wilderness is perfect!

Kelly and Paul share highlights of their 6-day backpacking adventure and how to plan your own trek.

You should also check out All the Midwest Mountaineering Expo presentations to find others you’d like to attend.

Hike On!

Outdoor Expo Talks Read More »

The Caveman Catalyst in Your Tinderbox

by Todd Walker

The Caveman Catalyst in Your Tinderbox - TheSurvivalSherpa.com

The human love affair with fire is intimate and ancient. Over the flames we cook, celebrate, spin tales, dream, and muse in the swirls of wood smoke. Fire is life. Its warming glow draws us like moths to a flame.

It’s not a stretch to believe that a Stone Age chemist recognized the idea of using carbon for future fires. Disturbing the leftover carbon ashes from the night fire, she stares at sparkles of light glowing like the pre-dawn stars above. She carefully nurses a baby “star” back to life to warm her hearth and home.

It ain’t rocket surgery. Even cavemen knew the importance of the sixth most abundant element in the universe.

Carbon and Future Fires

The game of chasing lightning strikes for each fire was no longer required. This unreliable practice was abandoned for twirling sticks together to create enough heat to initiate the combustion of blackish, carbonized dust. Even with a dependable friction fire apparatus, a more elemental plan was stumbled upon for their next fire. Carbon was the caveman catalyst for future fires.

The Caveman Catalyst in Your Tinderbox - TheSurvivalSherpa.com

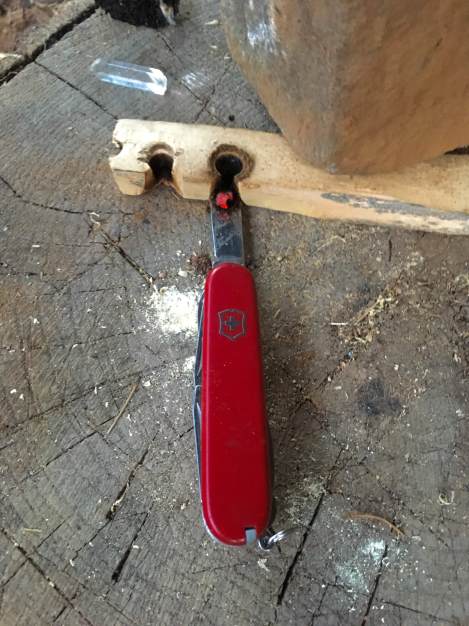
Carbonized dust glowing from friction.

Charcoal speeds up that wonderful exothermic reaction of combustion. Align a convex lens perpendicular to full sun on different non-charred tinder material. Smoke will rise in a minute. Do the same with charred material and a glowing ember is birthed in seconds. Weak flint and steel sparks produce the same glow.

When material containing carbon is heated without enough oxygen, charred material is the result. We teach our students to make char cloth at school. One side of the Fire Triangle is neglected by heating material in a closed chamber (Altoids tin). [I have a class set of Altoids tins stored in an old cassette tape container. Only a few students have ever heard of these “ancient” musical devices.] The lid hinge vents the volatile gases as the material is heated. When baked, the black charred material takes a spark from flint and steel.

Un-Burned Carbon in Ashes

Over the years, David West sparked my interest in the role of wood ash impregnated in tinder through his experiments on his channel. View his entire Ashed Tinder Playlist here. This, my pyro friends, has been a game-changer for me. Rubbing wood ash on any tinder material accelerates the combustion process.

Saving wood ash from previous fires has become an important part of my fire kit. A few years ago at a Georgia Bushcraft Gathering, I had a young kid ask during a Rudiger Roll (fire roll) demonstration why I added ashes to the cotton ball before rolling between the two boards. I had no real scientific explanation. I just did what I saw David West do.

Here’s my theory. Though wood ash looks nothing like charcoal, enough non-burned carbon remains in ash to significantly lower the temperature required to ignite tinder. Saturating any un-charred tinder (inner bark, jute twine, plant fiber, cotton material) with wood ash provides an excellent fire extender. In the video below, David shows a 4 foot strip of ashed denim burning/smoldering for 3 hours in time-lapse.

Following the lead of Stone Age chemists, making plans for future fires was smart. The thumb drill (lighter) was several millennials away from store shelves. Fire was not automatic. I make it a habit of separating burning logs in the fire pit at the end of each class at school. These partially charred sticks of cellulose are the stepping stone for the next morning’s fire lay. No need to start from scratch each day when charcoal is plentiful in the fire pit.

Carbon Steel and Rock

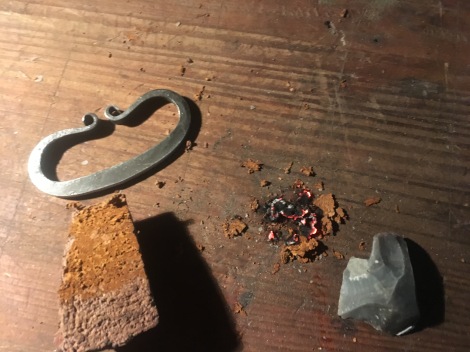
Flint and Steel was the most popular fire-making method up until matches and lighters lit up our world. Even without iron strikers, sparks could be delivered to charred material using the right combination of stones. The common catalyst in all primitive fire methods is carbon.

Modern re-enactors and nostalgic woodsmen continue to use flint and steel as fire starters. The method takes less energy and practice than fire by friction. The typical flint and steel kit consist of a high-carbon steel striker, a sharp rock (doesn’t have to be flint – any hard, silica based rock will work), and char cloth in a metal container.

However, cotton cloth does not grow in the woods. For a flint and steel kit to be sustainable long-term, natural materials can be carbonized.

My best experiences using charred natural material include:

  • Punky wood – Decaying wood which is spongy when squeezed between thumb and finger. My favorite is the sap wood of Eastern Red Cedar (Juniperus virginiana). I’ve had good luck finding it on the underside of blown down cedars in the right stage of decay.
The Caveman Catalyst in Your Tinderbox - TheSurvivalSherpa.com

Punky cedar sap wood has a stringy consistency which makes great char material.

  • Pithy weed stalks – Crack open the woody stalk of dead Mullein (Verbascum) and remove the spongy pith. Cook it in a container like char cloth for an excellent F&S spark-catcher.
  • Natural tinder/cordage – Tulip Tree (Liriodendron tulipifera) twisted cordage has worked but not as well as the previously mentioned materials. Yucca (Asparagaceae) cordage works as well.

The only non-charred natural material I’ve found to consistently take a weak spark from F&S is:

  • Chaga (Inonotus obliquus) – This fungus grows on birch trees in higher altitudes. It is called True Tinder Fungus as it will catch a spark from F&S. It also will smolder for a long time for a fire extender.
The Caveman Catalyst in Your Tinderbox - TheSurvivalSherpa.com

Thin slices of chaga ignited with flint and steel sparks.

I have friends who have achieved F&S embers using other non-charred material. Phillip Liebel, instructor at Flint and Steel Critical Skills Group, discovered that the inner lining of gourds will take a spark from F&S. It’s a very fine, papery material which burns rapidly. Joshua Enyart, founder of Flint and Steel Critical Skills Group, has used the Milkweed (Asclepias) pod to make fire with F&S. I’m sure there are other non-charred natural material out there that will work. Just recently I attempted the following with no success…

  • Dog hair – Moose, our oldest rescue dog, sheds fine clumps of hair. A few sparks landed and fizzed out without catching. Looked promising.
  • Cattail duff – White fluffy stuff is always worth trying. Still a no-go for me.
  • Mullein pith – Did not work. I sliced some to form a fine, triangular edge. Sparks landed on the edge with no glow.

The above works well when carbonized, except dog hair. In my experience, any natural tinder material you’d normally use to build a tinder bundle will take a spark from F&S when charred. The exception to this is fat lighter’d (aka – fatwood). Don’t char fat lighter’d in a tin. You’ll end up with resin coating the bottom of your container.

Non-charred and Un-natural F&S Ignition 

Good luck finding the elusive steel wool tree in the wilderness. I keep a pad of 0000 steel wool in my pack for cleaning axes and tools in the field. For stubborn tinder, add a pinch of steel wool and strike it with F&S. Once the spark catches and begins to spread like tiny dynamite fuses, the tinder becomes super-heated from rapid oxidation.

Gun powder will also ignite with F&S sparks. Flintlock rifles utilized this technology to explode powder and launch projectiles down range. A modern woodsman will likely have a cartridge of some kind which contains gun powder. Carefully remove the bullet from the brass cartridge and pour out a small amount of powder charge. Be ready to transfer the heat from the lit powder to your tinder material. It goes up in a flash.

Carbon Ash Experiments Coming

The South African tonteldoos pocket tinderbox I made rides in my F&S kit. It works well as long as the charred surface is charred well. With sporadic use, the dark char turns brownish from knocking around in my kit. In a future post, I plan to experiment with the mop head strands to see if impregnating them with wood ash will aid in ignition on brownish charred ends. This should be interesting.

The Caveman Catalyst in Your Tinderbox - TheSurvivalSherpa.com

A student achieving ignition with the Tonteldoos.

We’re also planning a post on making charred material without the typical metal container. Stay tuned.

Keep Doing the Stuff of Self-Reliance,

~ Todd

P.S. – You can also keep up with the Stuff we’re Doing on TwitterPinterestYouTubeInstagram, and Facebook… and over at our Doing the Stuff Network.

P.P.S – If you find value in our blog, Dirt Road Girl and I would appreciate your vote on Top Prepper Sites! You can vote daily by clicking here or on the image below. Check out all the other value-adding sites while you’re there…

Thanks for Sharing the Stuff!

Copyright © by Survival Sherpa: Content on this site (unless the work of a third-party) may be shared freely in digital form, in part or whole, for non-commercial use with a link back to this site crediting the author. All links in articles must remain intact as originally posted in order to be republished. If you are interested a third-party article, please contact the author directly for republishing information.


The Caveman Catalyst in Your Tinderbox Read More »

Deja vu: Building an Off-Grid Log Cabin… Again

by Todd Walker

Deja vu: Building an Off-Grid Log Cabin... Again

Three 21 foot logs, the crowning roof logs, lay on the ground debarked with pine sap oozing like beads of sweat. They would serve as my ridge pole and two top plate logs. Then it happened…

The landowner’s son, my good friend, walked to the cabin site and told me that the family was putting the land up for sale. I was shocked, not so much about the fate of my “practice” log cabin, but because he was raised on this beautiful land his entire life. He apologized about all the work that I had put into the cabin.

“It’s a practice cabin, buddy,” I said.

A year and a half of felling, bucking, skinning, stacking and pinning logs together. My options were limited. Let it sit unfinished and eventually rot to the ground. Or move it. DRG and I moved to the property across the road just a few months ago. Yep, that would be its new location.

Weeks before the news, I had arranged a work day with a group of our friends to finish up the walls. The building party turned into a demolition day. Each log was labeled and numbered to make reassembling the log puzzle less confusing. Stick by stick, the team worked all day to tear down 1.5 years of work, some of which they helped build.

Deja vu: Building an Off-Grid Log Cabin... Again

Many thanks to these fine friends on demolition day!

Deja vu

After the dust settled, the job of rebuilding began. I figured reassembly would take less time. I was right.

Foundation

I decided to go back with dry-stack stone piers for the foundation. This would save money since the land had plenty of stones for stacking. Boulders I couldn’t physically lift, there were several, I used my rope come-a-long to inch them onto a trailer. My friend’s tractor would have made this task a breeze, but it was in the shop for repairs.

One lesson learned from the first stone foundation was I didn’t need to be exact on stacking each pier. I got them close to level using a water level and tweaked them as needed once the sill logs were on top. Dimensional lumber would require each pier to be exactly the same height. If you enjoy putting puzzles together, this job is for you.

Deja vu: Building an Off-Grid Log Cabin... Again

Dry-stack piers

Sill Logs

I needed to start stacking logs. The challenge was to transport the two 1,000 pound, 18 foot sill logs from the previous site to their new home. My log hauling operation consisted of Donkey Kong (4-wheeler) and Junior (LogRite Arch). This duo had successfully hauled all the other cabin logs across the creek, up a 75 yard incline which makes young men huff and puff, and across the road to my place.

I crossed my fingers and headed toward the creek with a sill log in-tow. Donkey Kong crossed the creek and stalled with its front tires off the ground. The opposite end of the long log was stuck on the other side of the creek. I knew then that I was in for a long afternoon of winching up a steep hill. After five winching episodes, we made it to the top! And in 90+ degree Georgia heat with high humidity. I was soaked.

I rebuilt my lifting tripod at the new site, hung the chain fall, and started setting sill logs. The first row is important and takes the longest to get set. To square the corners, the Pythagorean Theorem was used to form a 3-4-5 triangle at each corner.

Log Cabin Update: Sill Logs and Hand-Hewn Floor Joists ~ TheSurvivalSherpa.com

From the first build: The corner nail is near the head of the hammer where the two chalk lines intersect. The tape measure forms the hypotenuse of the right triangle.

Deja vu: Building an Off-Grid Log Cabin... Again

Five sill logs set and squared at the new site.

Log Courses Going Up

Before disassembling the cabin, each log was labeled to make putting it back together a no-brainer. It’s like paint by numbers.

Deja vu: Building an Off-Grid Log Cabin... Again

Logs staged in order for assembly.

Deja vu: Building an Off-Grid Log Cabin... Again

Deja vu: Building an Off-Grid Log Cabin... Again

A fine sight!

Deja vu: Building an Off-Grid Log Cabin... Again

Four rows complete!

Every log you see was felled and bucked with an ax, with a few back cuts using a one-man hand saw. Logs were debarked with a barking sud or draw knife. Most of the assembly on the original site was done with a brace and bit and sledge hammer. I chose this pioneer method the first time around. On the rebuild, I’m running power tools with a generator. The use of modern tools has sped up the process considerably. I even have a shop fan to move hot air around the new site.

Floor Joists

Those who have followed this log cabin build may remember the hand-hewn log floor joists on the first build. I made the decision to abandon this floor system. Why? Two reasons…

  • During disassembly, we discovered that one sill log notched to accept the floor joists had significant decay. This log came from a dead-standing pine tree which seemed to be solid. I opted to replace it with another log.
  • Even if the sill log had remained solid, I quickly realized that the alignment of the two notched sill logs had to be perfect to accept the hewn log joists.

Pressure treated lumber was used as joists. It was cheaper on some boards than non-treated. Plus, I’m not sure how long it’ll take to get a roof over the cabin. The old plywood subfloor was salvaged and tacked on the new joists as temporary flooring.

Deja vu: Building an Off-Grid Log Cabin... Again

Shimmed and screwed rim joists.

Installing flat boards on round logs had a few challenges. There are gaps between the two, some almost 1.5 inches. I used shims to keep the 2×8’s rim joists plumb. Six inch screws secured the joists where large gaps appeared. Joist hangers were set on 16 inch centers for the 10 foot run on the floor.

Deja vu: Building an Off-Grid Log Cabin... Again

Temporary flooring with lifting tripod .

Deja vu: Building an Off-Grid Log Cabin... Again

The front porch joists are 2×6’s to cover a span of less than 6 feet.

We’ll keep practicing until we finish this log cabin. We’ve been here before.

Keep Doing the Stuff of Self-Reliance,

~ Todd

P.S. – You can also keep up with the Stuff we’re Doing on TwitterPinterestYouTubeInstagram, and Facebook… and over at our Doing the Stuff Network.

P.P.S – If you find value in our blog, Dirt Road Girl and I would appreciate your vote on Top Prepper Sites! You can vote daily by clicking here or on the image below. Check out all the other value-adding sites while you’re there…

Thanks for Sharing the Stuff!

Copyright © by Survival Sherpa: Content on this site (unless the work of a third-party) may be shared freely in digital form, in part or whole, for non-commercial use with a link back to this site crediting the author. All links in articles must remain intact as originally posted in order to be republished. If you are interested a third-party article, please contact the author directly for republishing information.

Deja vu: Building an Off-Grid Log Cabin… Again Read More »