One of the easiest hikes to do in Kananaskis Country is the hike to Elbow Lake. It’s only 1.3 kilometres in from the trailhead with about 137 metres of elevation gain. If you’re a keen hiker that won’t be enough but there is the option to continue to Rae Glacier. Note that the hike to Elbow Lake is ideal for families. And it makes a great first camping trip.
Beautiful Elbow Lake in Kananaskis Country
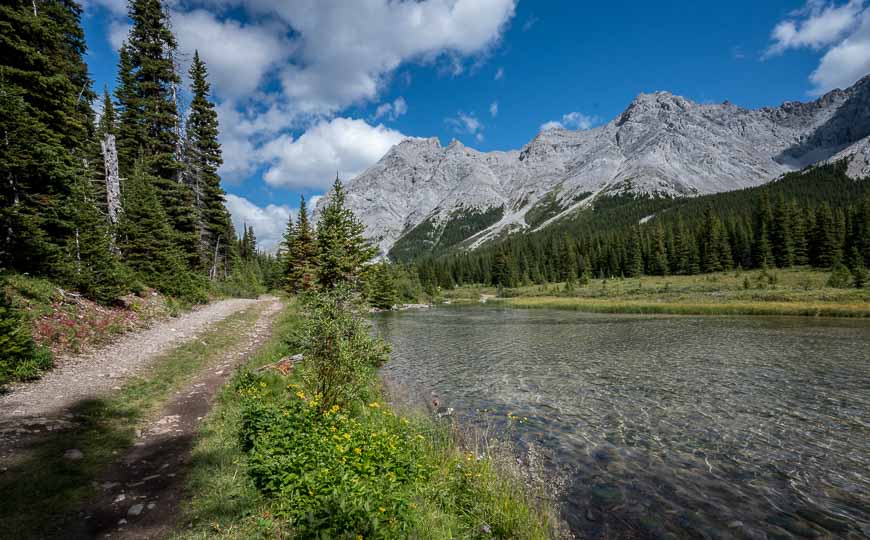
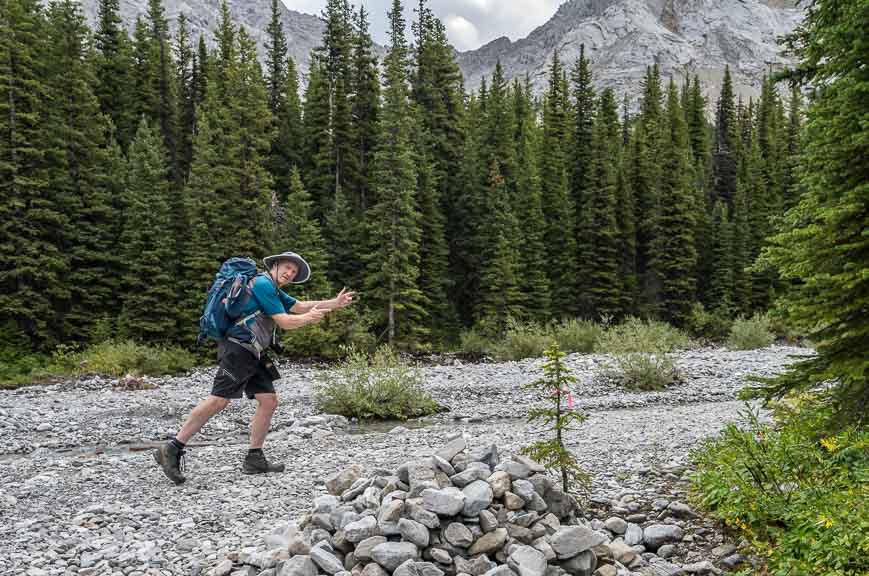
Getting to Elbow Lake from the trailhead
It’s a popular hike to Elbow Lake – in part because it’s short. However it is a steep hike from the get-go, climbing 137 metres to the lake. The trail is on an old fire road through the forest. It’s very obvious and not that interesting until you reach the lake.
Be sure to do a full circuit of Elbow Lake on foot as it’s very pretty from different angles. If you hike it in a counter-clockwise direction you’ll reach the junction with the Rae Glacier trail. Continue instead on a well-worn path to a river crossing of the Elbow on wooden planks. Make your way along the western shore of the lake on a fire road, stopping to admire the blues of the lake and the pretty mountain backdrop.
Keep an eye out for mountain bikers as the trail connects to a network of excellent biking trails in eastern Kananaskis Country so it’s a favourite. Horseback riding is also allowed.
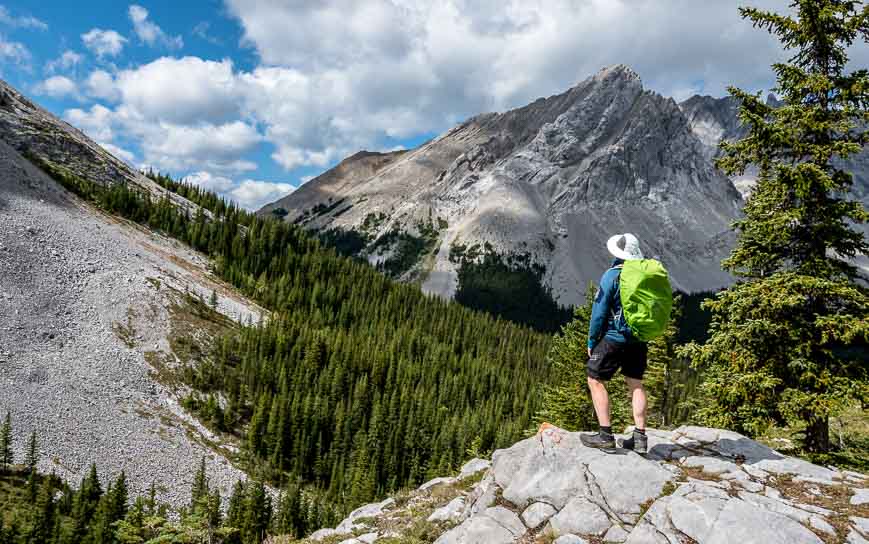
Be sure to do the full hike around Elbow Lake
Elbow Lake scenery from the fire road on the western shore
Camping at the lake
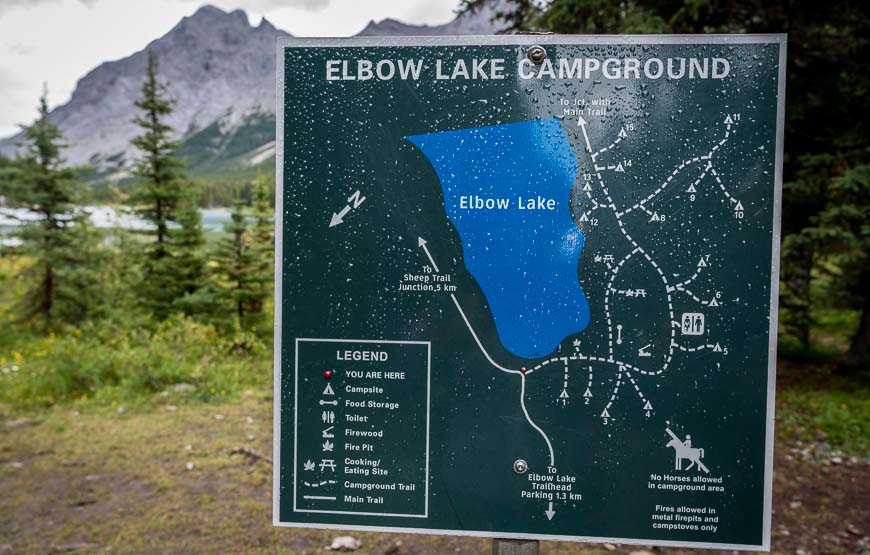
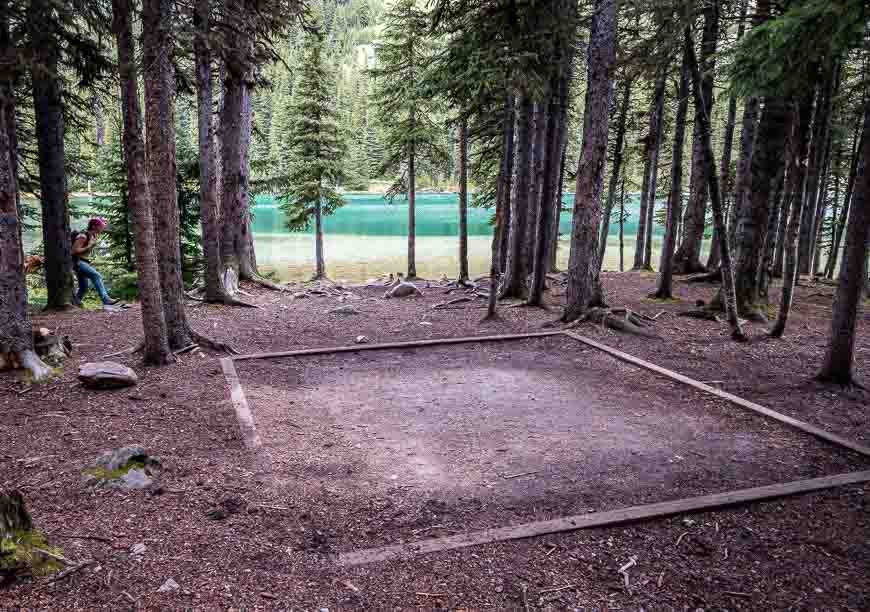
Elbow Lake is a very popular campground, especially for young families. As you can see in the photo below, most of the campsites are in the trees. But if your timing is right you might be lucky and score campsite 12 or 13 which will give you a view of the lake from your sleeping bag.
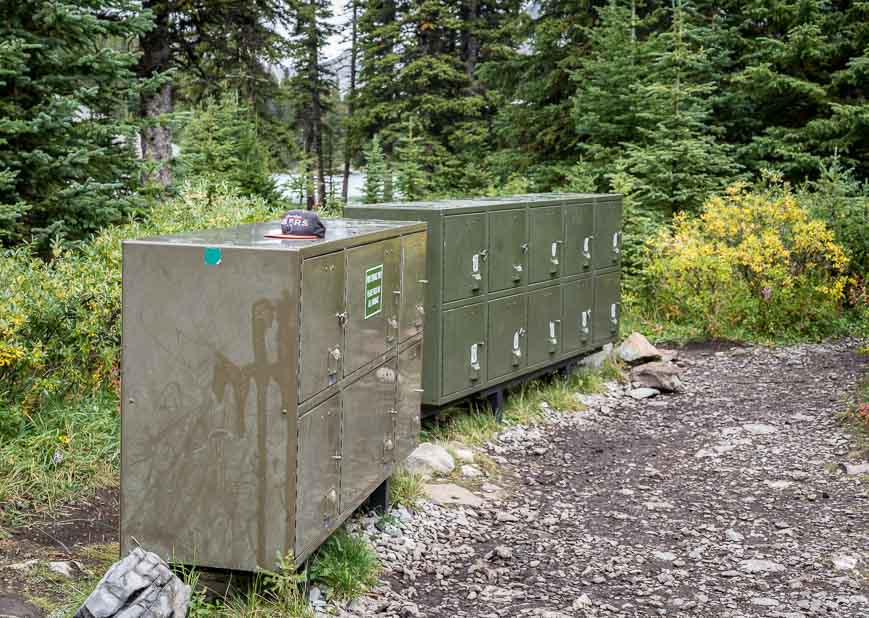
There are bear-proof lockers and outhouses as well as several picnic tables some distance from the tents for cooking. Firewood is provided.
For information on booking campsites and important dates visit the Alberta Parks website. Be prepared to book as soon as the dates open up especially if you’re trying to score a summer weekend.
Great family camping at Elbow Lake
Try and score this campsite close to the lake
Bear boxes at Elbow Lake Campground
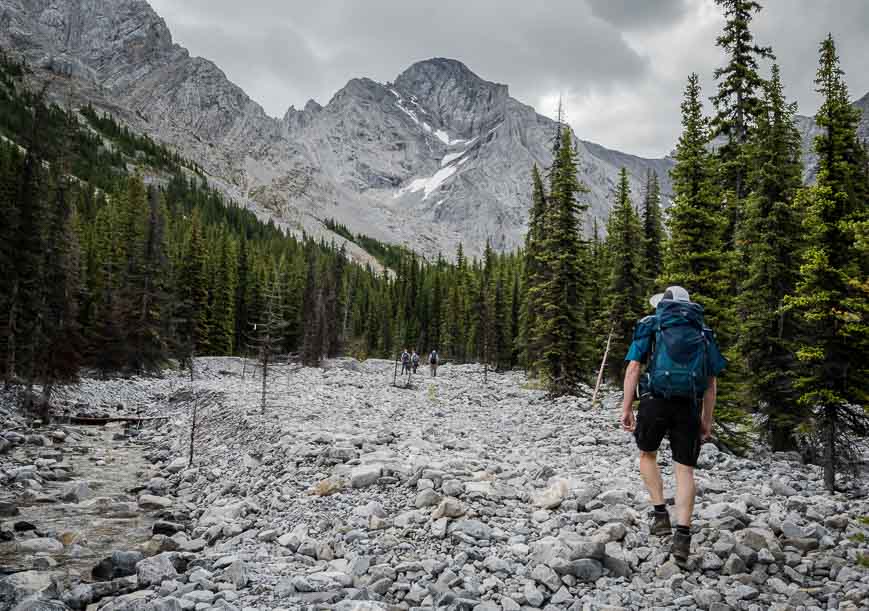
The hike from Elbow Lake to Rae Glacier
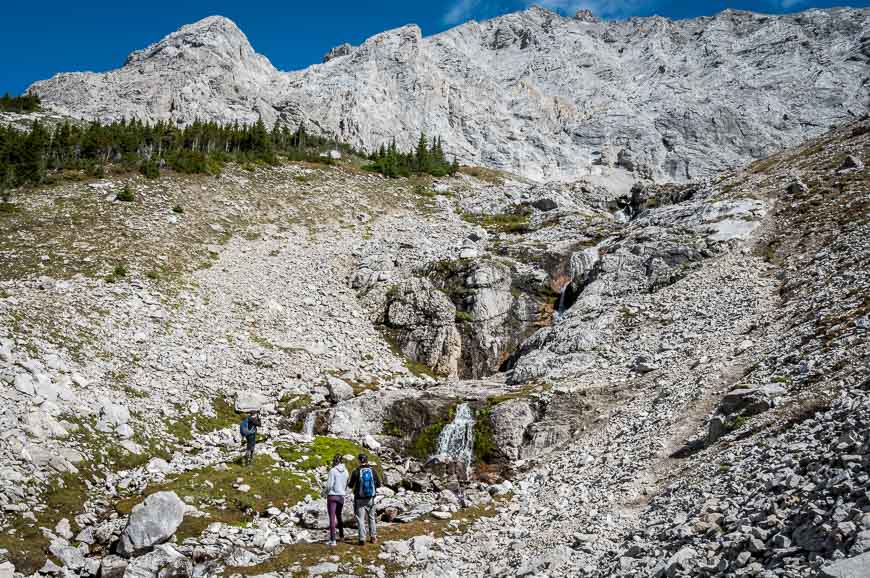
Continue anti-clockwise around the east shore of Elbow Lake to reach the turnoff to Rae Glacier. There isn’t any signage but there is a piece of flagging tape. The intersection is about halfway along the length of the lake.
Turn right onto a rocky trail heading northeast. Follow the path up a rib. At the top there are some pretty views of three mountains – Rae, Tombstone and Alpaca.
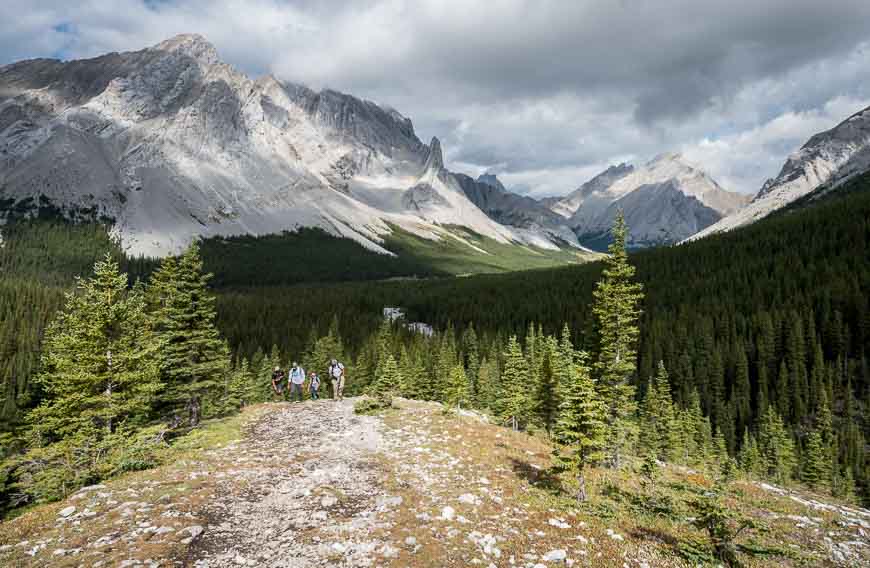
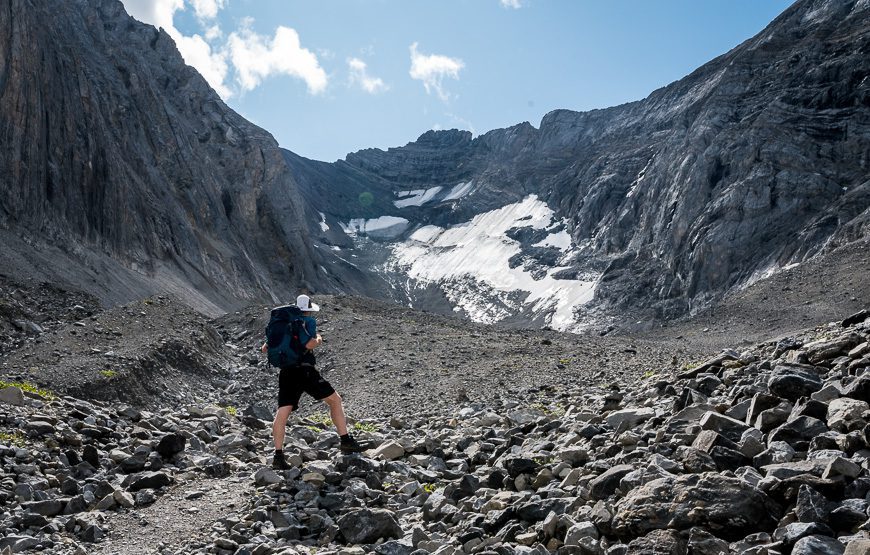
Continue along the rib eventually descending towards the creek. Stay to the right side of it on the scree. In short order the creek heads left. The névé above the small waterfall – five photos down, is the source of the Elbow River. While you can explore the area around the waterfall the trails here won’t get you to Rae Glacier.
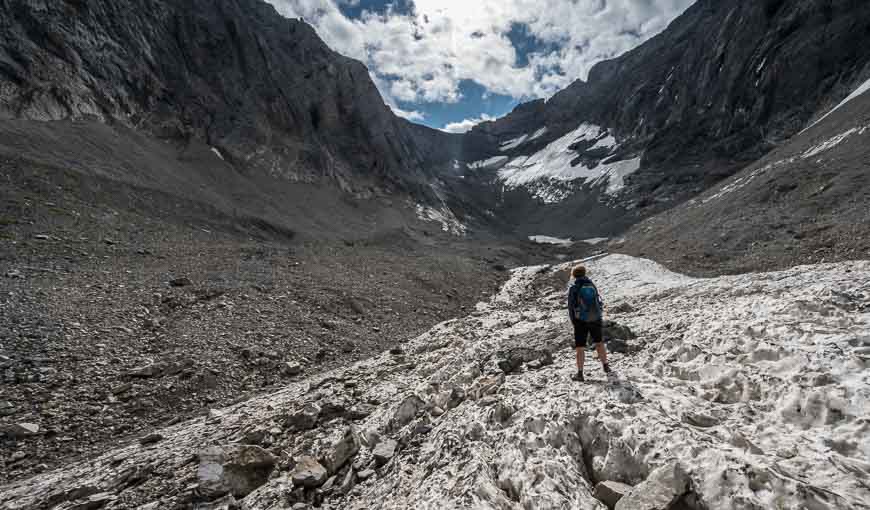
Instead stay right and climb on moraines to the Rae Glacier. Go as far as you feel comfortable. From Elbow Lake to Rae Glacier gain 229 metres over a distance of just 2.2 kilometres.
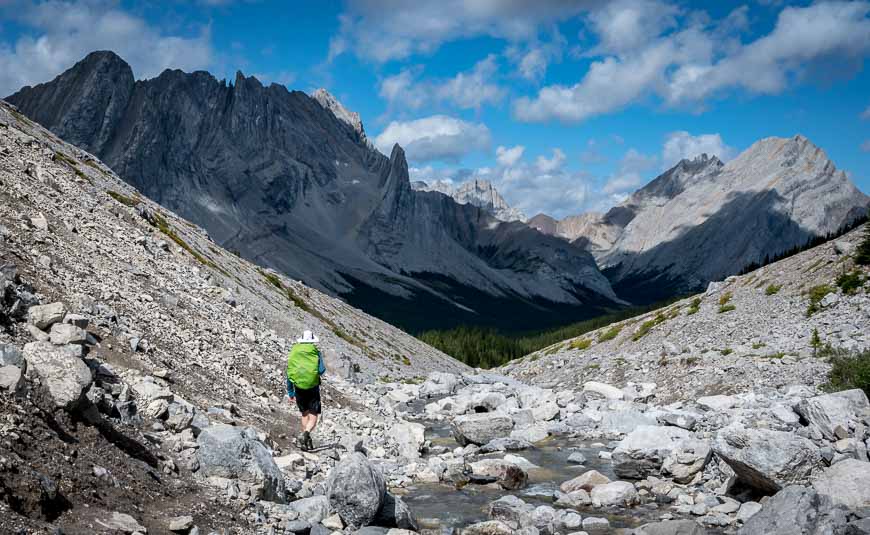
Descend the way you came but consider continuing anticlockwise around Elbow Lake to get back to the trail coming up from the parking lot.
Look for the flagging tape and turn right
An obvious trail through the rocks on the way to Rae Glacier
Hiking up the rib on the way to Rae Glacier
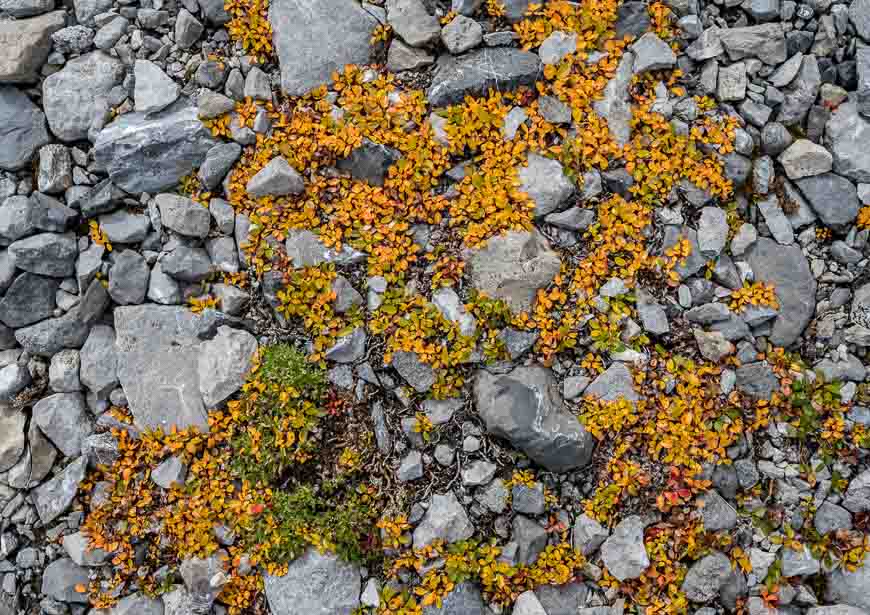
Nice blast of yellow underfoot
This is NOT the way to the Rae Glacier but it is an area you could explore
Hiking through the moraines on the way to Rae Glacier
Standing on chunks of what’s left of the Rae Glacier
It’s a pretty descent back to Elbow Lake
Taking in the view on the hike back to Elbow Lake
Finding the Elbow Lake trailhead
From Calgary take the Trans-Canada Highway west to the Highway 40 turnoff. Turn south on Highway 40 and follow it for about 62 kilometres. The well-signed trailhead is on the east side of the highway. Note that Highway 40 is closed from December 1 – June 15th every year beginning just past the junction with the Smith-Dorrien Road. There is a winter gate.
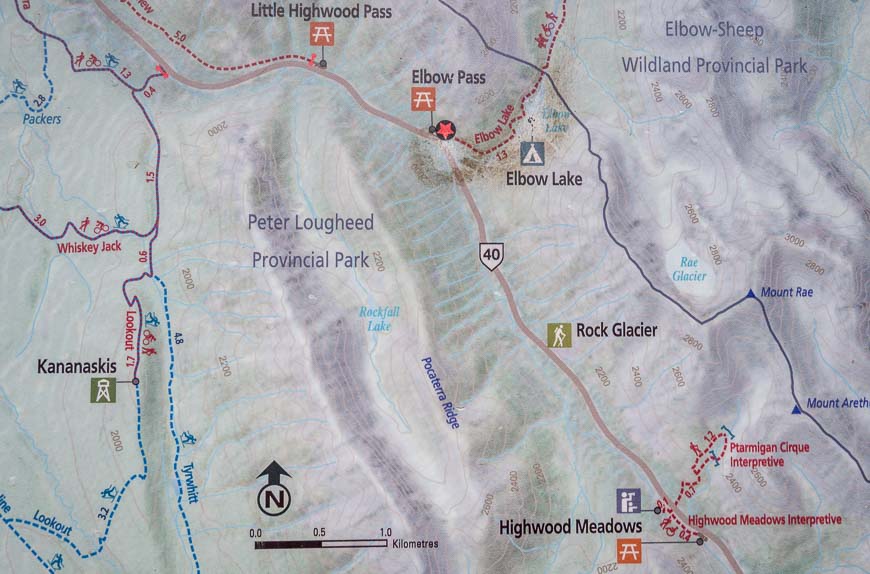
Map showing Elbow Lake & Rae Glacier in Kananaskis Country
Further reading about nearby hikes in Kananaskis Country
Though its from last year it still serves as a reminder as to just how dangerous these laws are. Two Anne Arundel County police officers serving one of the new “red flag” protective orders to remove guns from a household killed a Ferndale man after he A red flag order has resulted in the death of a […]
Guest Blog Post by Tim Webb CCEMT/P, WEMT/ P, US Army SFC (ret)
Ah, the seemingly innocuous blister. We’ve all seen them, likely we’ve all had them, and even more likely we have all been crippled by them at one time or another. When you look at the hierarchy of medical problems that can kill you in the back country, blisters aren’t very high up on that list. However, they are one of the most common problems encountered. My bet is that the first human beings, thousands and thousands of years ago, that strapped some kind of footwear on started suffering from blisters soon there after.
While not threatening in and of themselves, blisters can absolutely become an issue that can put your life at risk. Blisters can cause pain and slow you down, if not stop you completely. They are prone to infection and long-term issues if not promptly fixed and the pain and discomfort alone is enough to cause you to change the way you walk. Potentially putting you at risk for orthopedic injuries including falls, sprains, and strains.
Most of us, whether we are in the back country or in an urban environment, have experienced blisters in one form or another. Some are just a minor annoyance, while others that involve very large areas. Technically speaking, blisters are formed when frictional forces mechanically separate layers of skin, allowing fluid into the void. Blisters can have clear fluids which likely means only superficial damage. Red blisters indicate either deeper tissue or vasculature involvement.
There are three things that have to happen for a blister to form:You have to have heat, moisture, and friction. If you can stop any of those, you can likely prevent blisters. I call these three elements THE BLISTER TRIANGLE Let’s take a look at these three individually:
HEAT
Heat can be caused both by external forces (warm environmental temperatures) and by physical exertion (body heat). As our bodies heat up and send warm blood to the periphery, skin temperatures increase. Unfortunately, there is really no way to control this. Even with really cold temperatures outside, inside your footwear the skin can still heat up. So we can’t really control heat.
MOISTURE
Moisture on the skin can happen due to both environmental and physical causes. Moisture from outside sources in forms such as snow, ice, and rain and physically from heat/sweat. The moisture causes clothing to stick to skin. Again, this is almost impossible to control. Gore-Tex boots and other high tech fabrics like moisture-wicking materials help, but none can completely eliminate the possibility of moisture building. When we have heat, we most likely have moisture. Moisture makes the sock stick to your foot. Once that happens, the sock doesn’t freely move over your skin. Instead, it sticks to your skin. The skin layers then slide, which is where the blister starts to form. So that leaves us truly with only one way to break the blister triangle–eliminate friction.
FRICTION
Friction is the only one of these three blister-causing elements that can be completely controlled. If we recognize that we cannot control heat and moisture, then we need to concentrate on controlling friction. Controlling friction is the key to both prevention and the treatment of blisters.
There are many different ways to treat blisters. Most people that have dealt with blisters typically have their own way of preventing and treating them. Some are really effective and others aren’t very good at all. Most of the techniques I’ve seen or heard of are geared towards eliminating friction. Rightfully so.
ELIMINATING FRICTION–WHAT WORKS
In my almost 30 years of pre-hospital and wilderness medicine, I’ve seen and heard of an amazing amount of things people do to prevent and treat blisters. Anything from using Superglue injected into the blister to smearing Vaseline over their entire foot in an attempt to prevent friction. In the early years of my military career, it wasn’t uncommon for me to use about half a bottle of foot powder in each boot, thinking that would keep my foot dry. Literally, I would squeeze it into this sock and shake the sock until a cloud of powder came out. Obviously, that didn’t work. I still got some horrible blisters. Why? Because I tried controlling one of the sides of the blister triangle that simply cant be controlled (moisture). We’ll talk some more about foot powder later. Remember, foot powder doesn’t help at all with heat or friction. It’s meant to keep the foot drier, but due to its composition, it tends to form small little balls as it pulls in moisture. These little foot powder balls then grade against the skin and apply more friction, not less. The more foot powder, the more likely blisters will form. I learned some very painful lessons through my early years of military service.
CHOOSING PROPER FOOTWEAR–PREVENTING “HOT SPOTS”
So now we know, of the 3 major components that cause blisters, friction is our best bet to break. Obviously proper fitting footwear is a key, however with that said even the best fitting footwear can shift in rugged terrain causing “hot spots” and eventually blisters. On straight, flat terrain, even poor fitting footwear can be fine. On uneven, rocky, or root-filled terrain, where your foot slides back and forth in your shoe/boot no matter how well your shoes fit, you could be in trouble.
Rough or changing terrain can cause blisters, not matter how great the footwear.
Socks can be part of the problem as well. Drooping socks, socks that don’t wick moisture or socks not fit properly to your foot all can cause issues. On a recent 30 mile backpacking trip to the West Rim Trail in Pennsylvania, I developed a blister on my heal in boots that I’ve worn for years, boots that I never had issues with before. The most likely candidate–a drooping sock with a lot of small debris in my boot, due to not wearing gaiters. Friction, friction, friction.
When it comes to socks, there are some really fantastic products out there. Some brands now have socks that are double-walled with moisture-wicking or hydrophobic fabrics. Some hikers still prefer to wear a very thin liner sock and a thicker sock for cushion, which is a time-tested approach that works well. These techniques, whether it’s a double walled anti-blister sock or a liner sock of some sort, are beneficial because they can help break the friction cycle. The inner liner sticks to the foot and the friction happens between the sock and the liner, not your skin.
You can use a very light coating of foot powder or even antiperspirant applied for weeks prior to a trip in an attempt to cut down on the moisture or sweat that’s produced. While these steps are prudent and make sense, it still won’t control external moisture or even completely control sweat production, and it still does nothing to control friction. Another technique I’ve witnessed from others doing medical coverage for long term adventure races is Vaseline coating the entire foot. Some swear by it. Personally, I’m not sure I’d like that feeling on my foot. There are some new anti-chafing products out on the market that actually preform better when heated up. These show a great deal of promise and make sense. Especially when used in combination with a double-layered anti- blister sock.
Choosing the right sock will greatly help blister prevention.
BLISTERS BECAUSE OF SWOLLEN FEET
Another factor often underestimated is swelling or edema. On any hiking trip or extensive workout, your feet are going to swell, particularly in a warm or hot environment . It’s physiologically impossible to stop it–because of gravity. Your core warms up, your body pushes blood to your periphery to cool it, the vessels become engorged, allowing blood to pool there and before too long you have swelling. Have you ever walked a long distance or worked out hard and noticed your rings or watch seem to fit tighter? It’s the same principle. Even with well-fitting footwear, swelling can cause problems.
PRE-TREATING/PREVENTION OF BLISTERS and HOT SPOTS
We all learn through experience. If you know you’re likely to be prone to blisters or you’ve gotten them before, then a really good idea is to pre-treat those areas prior to going out. We’ll discuss some treatment ideas shortly but pre-treating as a means of prevention is ideal. The adage of “an ounce of prevention is better than a pound of cure” is certainly true with blisters. I have a good friend that, no matter what she does, she gets blisters in certain spots. Many of you can empathize with that and would tell a similar story. So now, the night before a trip or hard workout she applies a treatment to those known spots and is fine. Problem fixed.
Earlier I referred to “hot spots.” Most have probably heard the term before, but for those that haven’t a hot spot is the beginning of a blister. Let’s just call it a warning sign of significant trouble ahead if it isn’t cared for quickly. If you were to stop and observe your skin where you feel the pain, you’d actually see a reddish discoloring or inflammation of the affected area. Typically, it’s a little painful to the touch and may have some skin tissue starting to deteriorate. It indicates friction is being applied to the layers of skin and a blister is about to fully form. Fortunately, it can sometimes be fixed by simply adjusting a sock or pulling out debris that’s gotten into your footwear. However, it’s more likely it’s going to take actual treatment. The good news is that hot spots do not have to turn into blisters. If you take the time to fix them, you can prevent a full-on blister from forming
I think something that needs to be pointed out here is that the tendency for some of us to be a bit lazy, myself included. We want to push on, we don’t stop and check if a blister is starting to form. We feel the burn and think, “Ah we’ll be stopping soon, I just put these boots on, I don’t want to hold up the group.” Of course there’s legitimate reasons why you can’t stop, but the point here is that you really want to stop as soon as you can, investigate and treat the hot spots before it becomes a real issue. If you’re involved in guiding a group or a leader in any way, I think it’s a great idea to stop a couple of miles or hours into an event and have everyone check their feet, especially when it comes to kids. I’ve been guilty of not stopping myself and have paid the price for it. Trying to clean the area, drain a blister, prep and dry the skin, apply a dressing and other treatments will take far longer and delay you a lot more than if you just treat the hot spot.
Prevention is preferred over treatment. take the necessary steps to keep blisters from forming so you don’t have to endure discomfort and breakout your med kit on the trails.
TREATMENT
Treatment and prevention go hand in hand, and both start with eliminating friction from the equation. There are multiple ways to accomplish this, and many, many products on the market to assist you–some good, some not so good. Most of you have your own way of treating blisters, and if it works that’s perfect. Stick with what works for you. I’d love to hear about your techniques. But for those that are looking for help, here are some ideas that may be helpful:
First, obviously start with footwear that fits well, but remember, terrain determines whether or not you get blisters. I would suggest trying socks that are designed (double-layered) to help prevent blisters or add a very thin liner sock. Choose socks that are hydrophobic and not a 100% cotton blend. Cotton, while possibly slightly cooler, will hold the moisture and not wick it away from the foot. At night or on prolonged stops, get your feet out of the boots and let them dry out, elevating your feet can help decrease swelling in the short-term.
Mole skin and mole foam are the tried and true methods from years ago. Cutting the mole skin/foam so that it surrounds the blister and provides protection for the blister is simple. However, neither mole skin or mole foam are meant to cover the blister. They can form a protective barrier around the blister, but they won’t help if the blister expands. It works, but personally, I’ve moved away from it. I think there are better ways of managing. On occasion, while treating a major blister on the bottom of the foot, I’ll use it in conjunction with other treatments.
Anti-chafing products can work well as a prevention measure, but as a treatment technique have limited uses. These products are common, inexpensive, and work really well as a pre-treatment and sometimes help in conjunction with treatment. For instance, I’ve used these anti-chaffing products over top of a piece of duct tape that I’ve placed. In combination , this can be a game changer.
I think duct tape works really well, provided you use good, quality duct tape. Not all duct tapes are created equally and the glues used are vastly different. There are medical grade tapes that can be used as well, but they tend to be expensive and hard to find. I haven’t found many cloth tapes or other medical grade tapes to be very effective. Most medical products are not geared to take the heavy pounding we would apply to them, so your money is better spent on products that have multiple uses. The reason why duct tape is so effective is because, once it’s applied to the skin, it allows the friction to take place between the sock and the duct tape and not sock to skin. Typically, I’ll cover the blister itself with a dressing, a band aid or a small piece of gauze first and then apply the duct tape over the blister. Ensure that the duct tape is applied smoothly onto very dry skin. It’s also a good idea to curve the edges of the duct tape so that the edges won’t peel off. The key is to take the time, dry the skin, and apply the duct tape as smoothly as possible.
If using any type of tape around toes or fingers, be careful to NOT circumferentially wrap the digit. Tape applied too tightly can cause circulation issues and in freezing temperatures can lead to frostbite.
SHOULD YOU DRAIN YOUR BLISTER?
To drain or not to drain is the question. My advice here is to drain the blister. I understand the argument that by opening up the skin you risk infection, but I think that’s a minimal risk. The pressure and therefore the pain would be a great deal more if that blister remains intact. Eventually, the outer layer of skin will break and tear regardless, so a controlled drain the serous fluid, relieves pressure and offers the intact skin underneath the blister protection. Drain the blister with a clean needle, either a hypodermic needle (see blister kit picture) or clean safety pin. When you insert the needle, think gravity. This will assist in draining the serous fluid from the blister and then allow it to naturally drain while on the move. Cleaning the blister prior to and post drainage with soap and potable water or an alcohol prep pad should minimize the risk for infection.
Blister ready to be drained and treated
COMPEED–AUTHOR’S RECOMMENDED TREATMENT
After years and years of trial and error, both treating others’ blisters and my own, the single best treatment I’ve found is a product called Compeed. I was introduced to this by a seasoned Himalayan climber years ago and have never looked back. It really is amazing stuff. It sticks well, provides excellent protection, comes in many sizes, is inexpensive. I allows the serous fluid to drain directly into the dressing and it is safe to leave on for days. I have used Compeed in many different climates and conditions from cold Michigan winters to hot, humid desert climates and everything in between. There are other brands that make a similar product but Compeed’s glue is simply superior to anything else I’ve tried. Compeed is listed on Amazon for various prices and package deals.
Compeed’s dressings act like a second skin. They’re designed to help aid in healing the blister, act to provide a friction free area, have a cushion that actually expands a bit as the blisters release fluids and help tremendously with pain.The glue is remarkable and as long as it is applied to dry skin, it can stay on for days. Literally I’ve had these dressings stay in place on patients in very damp environments for over five days. Compeed deserves a place in everyone’s first aid kit and even in their EDC kits.
In extremely wet environments adding Tincture of Benzoin (see blister kit) will help the glue stick better. The key to using Compeed is to apply it to warm, very dry skin. Once smoothly applied to the skin, rub the dressing to warm the glue and it’ll be on for days. The dressing is designed to start to peel at the edges so that you know it’s time to remove the dressing.
I have nothing to disclose with Compeed. I don’t make any money from them at all. Despite that, I have absolutely found their products to be the best on the market. Use it both to treat and to prevent blisters. Pre-applying to blister prone areas can prevent blisters. Once a hot spot is felt, stop, and remove the shoes and socks, clean the area, dry it and apply a Compeed dressing. It can prevent a blister from forming.
HOW AN EMERGENCY MEDICAL EXPERT TREATS BLISTERS
Here’s how I typically treat blisters:
Identify the hot spot or blister. If needed, clean and drain the blister.
Clean and dry the site again after draining.
Apply a Compeed dressing to warm, dry skin.
If the environment is very wet, I may use Tincture of Benzion applied directly to the skin, prior to placing Compeed.
If the area of the blister is in a maximum friction area, I may apply duct tape over top of the Compeed as a protective covering.
Wait for the dressing sides to peel. Remove, clean, and reapply as needed.
Again there are many, many ways to treat and prevent blisters, the key truly is prevention. Stop, check your feet and the feet of your companions and treat as soon as there’s an issue. DON’T WAIT–I cannot stress that enough. Stopping early and taking the time to fix things before it really becomes an issue is immensely important. The adage “pay now or really pay later” applies here. Treat early before it becomes a potential evacuation issue.
AN EMERGENCY MEDICAL EXPERT’S BLISTER KIT
Hers an example of what I may carry in a blister kit:
You’ll note in the picture a small pair of tissue scissors. Quite frequently, wound debridement may need to occur, especially in large blisters. Having a good pair of tissue scissors will be invaluable.
FINAL THOUGHTS
We’ve talked a great deal about blisters to the feet. Granted that’s the most likely scenario, but friction blisters can occur in other places on the body as well. Most commonly on the hands and more likely from a repetitive motion without wearing protection, such as gloves (i.e. cutting firewood). Treat and protect these blisters the same way you would on the feet.
While usually just a painful annoyance, blisters can become a serious safety concern. So much so that evacuations and serious safety issues can occur, putting not only the individual but potentially the whole group’s safety or ability to complete their task at risk. For the most part, blisters are preventable and easily treated if caught in time. Avoid the painful nightmare of blisters by being proactive rather than reactive and your time in the woods or walking on a city street will be much more enjoyable.
Tim Webb CCEMT/P, WEMT/ P, US Army SFC (ret) is a 30 year wilderness and urban prehospital provider. A senior Instructor with Remote Medical Training, holds a Fellowship from the Academy of Wilderness Medicine from the Wilderness Medical Society. A formal tactical medic working with local and federal SRT teams. He served with the US Army for 22 years as a medic including tours during Desert Storm and Operation Iraqi Freedom. He has also traveled to Afghanistan with Wilderness Medical Associates to teach the US Army’s famed 101st Airborne Divisions medics wilderness and remote medicine. He currently works as a Critical Care Paramedic with American Medical Response in West Michigan.
Excerpt from: FM 6-0 Mission Command: Command and Control of Army Forces – August 2003
RELEVANT INFORMATION SUBJECT CATEGORIES—METT-TC
B-10. Relevant information is all information of importance to the commander and staff in the exercise of command and control (FM 3-0 [Operations – February 2008]). In the context of information management, the six factors of METT-TC — Mission, Enemy, Terrain and weather, Troops and support available, Time available, and Civil considerations—make up the major subject categories into which relevant information is grouped for military operations. The commander and staff consider R[elevant] I[nformation] for each category in all military operations. The relative impact of each category may vary, but the commander and C2 [Command and Control] system consider them all.
MISSION
B-11. The mission is the task, together with the purpose, that clearly indicates the action to be taken and the reason therefore (JP 1-02 [Department of Defense Dictionary of Military and Associated Terms]). It is always the first factor commanders consider during decisionmaking. (See FM 5-0 [The Operations Process – March 2010].) A thorough understanding of the mission focuses decisionmaking throughout the operations process. … Commanders and staffs view all the other factors of METT-TC in terms of their impact on mission accomplishment.
B-12. The mission statement defines the who, what, when, where, and why of the operation. A thorough understanding of why the unit is conducting an operation provides the focus for planning.
In every encounter there is an element of chance.
–John Hall, former head of the FBI Firearms Training Unit
Just a quick heads up that the Anova Nano Sous Vide Cooker is on a Cyber Monday Special for only 79 bucks. This is one of the best Sous Vide cookers you can get and any cook on your Christmas …Continue reading →
My name is Kenny I started welding in a fab shop right out of high school. Mostly tack welding for fitters, I worked there for 3 years. I really learned to weld when I got a job working acoal mine construction job building a dragline. after that I was a strip mine welder for 10 years doing dragline maintenance and heavy equipment repair. I worked for a large coal company in central Al until they moved their operation to Columbia. I was laid off and went to nursing school. I worked as a registered nurse for 25 years. Now I am retired and doing part time consulting work teaching electronic patient records to Doctors and nurses. I have started to get back in to the things I enjoy doing, building and repairing things. I will have a lot of questions being that I have been away from it all so long. Thanks for having me.
Kenny
There’s nothing better to get your heart rate up by doing some aerobic activities. No, I’m not talking about aerobics if that’s what you were worried about.
As you’re about to see, there are plenty of things you can do to improve your long-term ability to make physical effort… so let’s not waste anymore time and take them one by one.
Swimming
I
consider swimming to be the holy grail of aerobics. I myself didn’t
know how to swim until after I was 30 but I tried and I tried until
one day I was
able to… and now I’m getting pretty
good at it!
The
benefits of swimming are undeniable. The list could be a lot longer
but here are
just the main ones:
it builds endurance
builds strength
improves cardiovascular fitness
tones muscle
keeps weight under control
contributes to the health of your heart and lungs
it burns a huge number of calories
Best of all, it doesn’t put any stress on your knees and ankles like running does. That’s why swimming is recommended for ALL ages, even if you have a bad back or chronic problems with your legs.
The
only “problem” with swimming is that, unless you happen to have a
swimming pool in your back yard, you’re going
have to pay for access to one. But it’s well worth the money,
considering the amazing benefits.
Of course, you don’t even have to buy a full membership. Swimming only once or twice a week, in conjunction with the rest of the exercises in this course, is more than enough.
Jogging
Another fantastic option, jogging was discussed in another episode of the series. Careful not to hurt your knees, you’ll need proper running shoes, and try to only jog on surfaces that are specifically made for this purpose, such as running tracks and treadmills.
Cycling
Studies
have emerged showing that cycling is actually better than running
because it prevents injury. It makes sense because when you jog, with
each step you take, you’re putting pressure on your ankles, knees
and even your spine.
Of
course, you need strong joints and tendons so you need to jog as
well, but cycling has the huge advantage of allowing your body to
exercise for longer periods of time. In fact, if you’re just
starting out and enjoy biking, you can even skip running altogether
(for now) and start pedaling.
Is
cycling always better than running? Not always. For example, if
you’re looking to burn as many calories as possible, running is
better because you’re using your entire body to move. When cycling,
let’s not forget that you’re in a seated position.
Some
more tips for you to get the most out of
cycling:
Try
different routes. Variety is key as with any “workout” so why
not take advantage of the fact that you can travel long distances to
see some of your surroundings? This is an excellent opportunity for
you to familiarize yourself with all the different bug-out routes you
can take.
Measure
your distances and break your records. Challenge yourself to
always bike more than the list time, even if only by a mile.
Wear
a helmet. Over 6000 American cyclists end up in the hospital with
head injuries every year.
Rope Skipping
What
if I told you that you don’t even need to buy jump rope? You
can just use Paracord to do rope skipping. However, if you have no
problem spending 10-15 bucks on a professional one, you
can find plenty on Amazon.
Either
way, the rope needs to be of the proper length before you use it,
otherwise you won’t last that long. To find out, step in it with
both your feet and raise your arms towards your armpits as much as
you can. The length can be anywhere between your waist and your
armpits.
Believe
it or not, there’s a large number of skipping rope variations you
can do.
Here’s
how to do rope skipping. Simply step on
it with both your feet (like you did previously) and start jumping
WITHOUT MOVING YOUR ARMS OR YOUR ROPE (for now). Do this until you’re
comfortable with the movement; only then should you start rotating
the rope.
The
basic exercise is when you do small and fast jumps (1-2 inches
off the floor) with both your feet while you rotate the skipping rope
from front to back. You only need to jump high enough to give the
rope enough room to slip under you. The trick to making this
work is to keep your elbows close to you as you do the exercise.
If things are going well, you can increase the speed a little bit. Don’t worry if the rope gets stuck, continue doing it until it almost becomes a reflex.
Now,
before we move on to the variations of skipping, let’s talk about
the most common rope skipping mistakes as clearing those out will
pave the way for your doing every other variation like a pro.
Mistake
#1: not starting correctly
What
a lot of people do is they bring both their hands back, they throw
the rope forward and themselves at the same time. That will never
work. To start skipping rope, you need to keep your elbows tucked in
like I showed you, and start jumping 1-2 inches off the ground while
moving the rope back to front in a rotating motion.
Mistake
#2: jumping the wrong way
Man,
I rolled on the floor laughing a few weeks ago when a friend tried
rope skipping for the first time. He was so funny I just had to make
fun of him the whole night. He was putting so much energy to make
sure the rope goes through that he started making these really
awkward movements.
Keep
in mind that the rope is about a quarter of an inch thick, and only
needs 1-2 inches of space to pass through.
Mistake
#3: turning the rope and jumping at the same time
It’s
in our reflex to turn the rope from back to front and jump at the
same time, but that will only result in the rope simply reaching your
legs while they are on the ground.
So
you need to do this in two steps that are something like a third of a
second away from each-other:
Step
1: You move the rope forward like I told you.
Step
2: You jump 1-2 inches off the ground.
Ready
for some rope skipping variations? They’re not as hard as you
think. Well, we’re gonna heave the hard ones for people who are
more passionate about this as we have our own purpose in mind.
Variation
#1: As you’re jumping, move both your feet from side to side
(about 6-7 inches from the original position).
Variation
#2: Jump only on one foot by slightly raising the other one 4-5
inches away, then switch. Do 3 on the left, then switch feet and do 3
on the right.
Variation
#3: Move both your forward and back as you jump.
Variation
#4: Move your feet apart and then together as you jump. Somewhat
similar to variation #1 only this time the feet go in the opposite
direction.
Are
there more variations? Of course, but these
4are enough for now. If you can
incorporate these into your routine, that’ll be more than enough.
Burpees
The
burpee is an aerobic/strength training exercise that doesn’t
require any equipment, and it can be done
in very little space.
The
movement is complex
and, as a result, a lot of people are doing it wrong. Here’s the
right way to do it:
Step
1: Stand up straight with your feet wider than shoulder-width apart.
Step
2: Squat down and put your palms on the floor in front of you.
Step
3: Resting on your palms, jump back with your feet until you land in
the squatting position.
Step
4: Perform a push-up (optional).
Step
5: Bring your feet back where they were at step 2.
Step 6: Raise yourself up and, optionally, jump in the air.
Torso Twists
This is a really easy aerobic exercise that can be done in a very tight space. The movement is compound, meaning a lot of your muscles will get a good workout.
Step
1. Stand up straight with your feet wider than shoulder width
apart, and raise both your hands at chest level with your elbows
bent, with one palm on top of the other.
Step 2. Twist your arms left and right while keeping your body straight.
Jumping Jacks
This
is a really easy exercise taken straight from military playbooks,
where they call it side-straddle stop.
All
you have to do is stand straight, then jump until your feet are apart
and your hands are above your head (some people like to clap when
they do that).
A
variation of this are power jumping jacks. You
have to stand with your feet together, with your knees slightly bent
and your back at a 60 degree angle from the floor. Keep your arms on
the sides and make sure they touch your knees.
Then, in a swift motion, jump into the air while raising your arms high up, almost touching each-other over your head. Return to the original position as you descend.
Rock Climbing
The
benefits of rock climbing are amazing: you get a full body workout
(particularly your core muscles), and it helps with stabilization and
flexibility.
First
of all, you should start doing this indoors where you are safe. What
you really want to do in the beginning is focus on your grip and
getting over your fear of heights. Go to an indoor climbing gym and
make sure you bring someone or that there’s someone there who can
help you.
Second,
keep in mind you don’t just need strong arms to climb. As in the
case of tree climbing, you also have to use your legs to push
yourself up. In other words, if you’re looking to become a better
climber, you need to work your feet just as much as your upper body
(if not more).
Once
you mastered indoor rock climbing, consider doing it outdoors. This
is where things start getting more interesting. For example, did you
know you can do bouldering, which is outdoor close to the ground
climbing without any equipment. There’s even a World Cup for it!
The
nice thing about bouldering is that you don’t really need to invest
in equipment but let’s not get ahead of ourselves. What’s
important now is that you start your first rock climbing experience
as soon as possible.
Martial Arts
I
want to talk with you about martial arts for a minute. Now, I’m no
karate expert, I’m only a prepper but I want to share my
perspective to help you decide.
Obviously,
every style has its benefits but some are better than the other from
our purpose. If you set your eyes on one, you should probably go with
that but if you haven’t, I suggest you look intro Krav Maga
because, unlike the others. The other martial arts have all sorts of
techniques but this one is focused on punching and kicking, which
feels more natural.
The other benefit is that the moves are explosive, which is something you need as part of your survival fitness training, anyway. It helps form reflexes too, useful when you’re taken by surprise by an attacker or a critical event. The only issue is that these explosive movements could cause tendon injuries.
Other
martial arts to learn? Chinese kickboxing, Brazilian jiu-jitsu,
Okinawan Karate, judo or plain old boxing are good places to start.
In
addition to the aerobic movements above, a lot of the things you do
around your house or yard are also aerobic:
mowing the
lawn
mopping and
sweeping
scrubbing
floors or the bathtub
chopping
wood
washing the
car
shoveling
snow etc.
All in all, aerobic exercises will increase your stamina and your ability to stay alert when surviving disasters and emergencies. They key to getting maximum benefit from them is to make them a HABIT.
By David Crane david (at) defensereview (dot) com November 14, 2019 The CAA MCK Glock Micro Conversion Kit (next-gen Micro Roni Stabilizer) for Glock pistols wasn’t the only interesting product DefenseReview (DR) saw at the CAA/Kalashnikov USA booth at SHOT Show 2019. We also got to take a look at the Kalashnikov USA KP-9 semi-auto-only …
Derrick, the founder of Prepper Press, joins Doc and Drew to talk about several interesting topics including an underground house for sale in Las Vegas, the prepper publishing industry, and other interesting topics. Listen as Doc and Drew pepper Derrick with questions and thoughts about the state of the industry and the future of prepping.
Want to comment about this podcast? Sound off below in the comments.
A fun episode with lots of opinions, click on one of the links below to listen now or download to your phone and listen later. Also, if you love the podcast, please leave us a review on iTunes, Stitcher, or Podbeam. It really helps!!!